
相信关注 Java 9 的小伙伴们都知道 java9 版本内置模块提供了 Http 功能,当然并不是说之前jdk之前并不支持,那么这次更新又多了什么呢?或者是解决了什么问题?
自 JDK 1.0 以来,Java 已经支持 HTTP/1.1。 HTTP API 由 java.net 包中的几种类型组成。 现有的API有以下问题:
• 它被设计为支持多个协议,如http,ftp,gopher等,其中许多协议不再被使用。
• 太抽象了,很难使用。
• 它包含许多未公开的行为。
• 它只支持一种模式,阻塞模式,这要求每个请求/响应有一个单独的线程。
2015年5月,IETF(Internet Engineering Task Force)发布了HTTP/2规范。 有关HTTP/2规范的完整文本,请访问。 HTTP/2不会修改应用程序级语义。
也就是说,对应用程序中的HTTP协议的了解和使用情况并没有改变。 它具有更有效的方式准备数据包,然后发送到客户端和服务器之间的电线。 所有之前知道的HTTP,如HTTP头,方法,状态码,URL等都保持不变。 HTTP/2尝试解决与HTTP/1连接所面临的许多性能相关的问题:
• HTTP/2支持二进制数据交换,来代替HTTP/1.1支持的文本数据。
• HTTP/2支持多路复用和并发,这意味着多个数据交换可以同时发生在TCP连接的两个方向上,而对请求的响应可以按顺序接收。 这消除了在对等体之间具有多个连接的开销,这在使用HTTP/1.1时通常是这种情况。 在HTTP/1.1中,必须按照发送请求的顺序接收响应,这称为head-of-line阻塞。 HTTP/2通过在同一TCP连接上进行复用来解决线路阻塞问题。
• 客户端可以建议请求的优先级,服务器可以在对响应进行优先级排序时予以遵守。
• HTTP首部( header )被压缩,这大大降低了首部大小,从而降低了延迟。
• 它允许从服务器到客户端的资源推送。
JDK 9不是更新现有的HTTP/1.1 API,而是提供了一个支持HTTP/1.1和HTTP/2的HTTP/2 Client API。
该API旨在最终取代旧的API。 新API还包含使用WebSocket协议开发客户端应用程序的类和接口。 有关完整的WebSocket协议规范,请访问。新的HTTP/2客户端API与现有的API相比有以下几个好处:
• 在大多数常见情况下,学习和使用简单易用。
• 它提供基于事件的通知。 例如,当收到首部信息,收到正文并发生错误时,会生成通知。
• 它支持服务器推送,这允许服务器将资源推送到客户端,而客户端不需要明确的请求。 它使得与服务器的WebSocket通信设置变得简单。
• 它支持HTTP/2和HTTPS/TLS协议。
• 它同时工作在同步(阻塞模式)和异步(非阻塞模式)模式。
如果想使用Java9的 httpclient 服务,那么你必须熟悉(jdk.incubator.http)包中的以下三个类:
☞ HttpClient http 客户端
该类是Java9开始引入的,官方文档的翻译说明是这样的
•
HttpClient是一个对多个请求配置了公共信息的容器。所有的请求通过一个HttpClient进行发送。
HttpClients是不可变的,通过HttpClient的new build er()创建返回。请求Builders被Http request #newBuilder()来创建。
• 接口API

•
API 中Builder部分用来构建客户端的配置,send相关的几个方法是进行请求发送,不同的是Async是异步操作。其他的基本是客户端的参数配置信息(包括代理,线程,版本,SSL,cookie等),同时也提供了socket支持。

• 使用示例
示例1,使用默认配置
HttpClient client = HttpClient.newHttpClient();
示例2,自定义配置。
try {
Authenticator authenticator=new Authenticator() {
};
client= HttpClient.newBuilder()
.authenticator(authenticator)//配置authenticator
.sslContext(SSLContext.getDefault())//配置 sslContext
.sslParameters(new SSLParameters())//配置 sslParameters
.proxy(ProxySelector.getDefault())//配置 proxy
. executor (Executors.newCachedThreadPool())//配置 executor
.followRedirects(HttpClient.Redirect.ALWAYS)//配置 followRedirects
.cookieManager(new CookieManager())//配置 cookieManager
.version(HttpClient.Version.HTTP_2)//配置 version
.build();
} catch (NoSuchAlgorithmException e) {
e.printStackTrace();
}
• 说明
由于HttpClient隶属于jdk.incubator.httpclient,所以使用的时候需要添加模块依赖方可执行。 如果你是单个class,没有引入模块概念的话需要在 VM 参数中添加模块支持 –add-modules jdk.incubator.httpclient。如果你引入了模块的概念,需要在 你的module.info中添加 requires jdk.incubator.httpclient;依赖。
☞ HttpRequest 请求
• API文档说明
表示可以发送到服务器的一个HTTP请求。 HttpRequest由HttpRequest builders构建生成。 HttpRequest通过调用HttpRequest.newBuilder获得实例。 一个请求的URI ,head和body都可以设置。 请求体提供了HttpRequest.BodyProcessor对象的DELETE , POST或PUT方法。 GET不用设置body。 一旦所有必需的参数都在构建器设置, HttpRequest.Builder.build()将返回一个HttpRequest实例 。 构建器也可以被多次复制和修改,以构建参数不同的多个相关请求。


• 使用示例
示例1,GET请求
HttpResponse<String> response = client.send(
 HttpRequest
 .newBuilder(new URI(""))
 .headers("Foo", "foovalue", "Bar", "barvalue")
 .GET()
 .build(),
 BodyHandler.asString()
 );
 int statusCode = response.statusCode();
 String body = response.body();
示例2,POST请求。
HttpResponse<Path> response = client.send(
HttpRequest
.newBuilder(new URI(""))
.headers("Foo", "foovalue", "Bar", "barvalue")
.POST(BodyProcessor.fromString("Hello world"))
.build(),
BodyHandler.asFile(Paths.get("/path"))
); int statusCode = response.statusCode();
Path body = response.body(); // should be "/path"
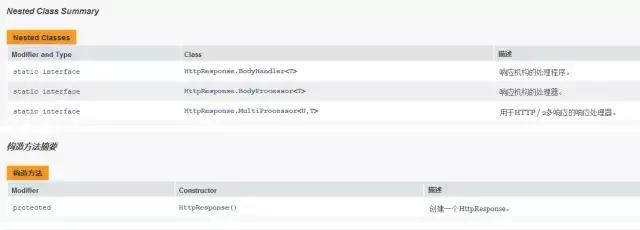
} ☞ HttpResponse 响应
• API文档说明
表示HttpRequest的响应。 通常在响应正文,响应状态代码和headers被接收之后,HttpResponse才是可用的。 这取决于发送请求时提供的响应体处理程序。 在所有情况下,在Body被读取之前调用response body handler程序。 此类中提供了访问响应头和响应主体的方法。
响应处理程序和处理器
Response bodies有两种处理方式。 应用程序代码提供响应处理程序( HttpResponse.BodyHandler ), 一个是可以检查响应状态代码和头文件, 一个是返回一个HttpResponse.BodyProcessor以实际读取(或丢弃)正文并将其转换为一些有用的Java对象类型。 处理程序可以返回预定义的处理器类型之一或定制处理器, 如果正文被丢弃,则可以调用BodyProcessor.discard()并返回丢弃响应正文的处理器。 处理器和处理器的静态实现分别在BodyHandler和BodyProcessor中提供。 在所有情况下,提供的处理程序功能都是方便的实现, 它忽略了提供的状态代码和头文件,并返回相关的预定义的BodyProcessor 。
• 使用示例
示例1,BodyHandler
HttpResponse<Path> resp = HttpRequest
.create(URI.create(""))
.GET()
.response(BodyHandler.asFile(Paths.get("/tmp/f")));
}
示例2,BodyProcessor。
HttpResponse<Path> resp1 = HttpRequest
.create(URI.create(""))
.GET()
.response(
(status, headers) -> status == 200
? BodyProcessor.asFile(Paths.get("/tmp/f"))
: BodyProcessor.discard(Paths.get("/NULL")));
} 

实战应用
这里是一个完整的示例应用,涵盖了HttpClient,httpRequest,HttpResponse等的使用。
package com.javanine.http;
import jdk.incubator.http.HttpClient;
import jdk.incubator.http.HttpRequest;
import jdk.incubator.http.HttpResponse;
import jdk.incubator.http.MultiMapResult;
import javax.net.ssl.SSLContext;
import javax.net.ssl.SSLParameters;
import java.io.FileNotFoundException;
import java.io.IOException;
import java.net.*;
import java.nio.file.Path;
import java.nio.file.Paths;
import java.security.NoSuchAlgorithmException;
import java.time.Duration;
import java.util.Optional;
import java.util.concurrent.CompletableFuture;
import java.util.concurrent.Executors;
/**
 * Created by bgt on 2017/10/1.
 * Java9http示例
 * <p>
 * VM 参数中添加模块支持
 * --add-modules jdk.incubator.httpclient
 */public class HttpDemo {
// private static HttpClient client = HttpClient.newHttpClient();
 private static HttpClient client = null;
static {
//这里是httpclient的配置
 init();


 }
public static void main(String[] args) {
// HttpDemo.HttpGet();
 HttpDemo.HttpGet2();
 }
public static void init(){
try {
 Authenticator authenticator=new Authenticator() {
 };
 client= HttpClient.newBuilder()
 .authenticator(authenticator)//配置authenticator
 .sslContext(SSLContext.getDefault())//配置 sslContext
 .sslParameters(new SSLParameters())//配置 sslParameters
 .proxy(ProxySelector.getDefault())//配置 proxy
 .executor(Executors.newCachedThreadPool())//配置 executor
 .followRedirects(HttpClient.Redirect.ALWAYS)//配置 followRedirects
 .cookieManager(new CookieManager())//配置 cookieManager
 .version(HttpClient.Version.HTTP_2)//配置 version
 .build();

 } catch (NoSuchAlgorithmException e) {
 e.printStackTrace();
 }
 }
/**
 * 普通get方式
 *
 *
 * 结果:{
 "msg" : "未查询到用户,请认真检查账户或者是否登录",
 "success" : false
 }
 响应码:200

 */ public static void HttpGet() {

 HttpRequest request = HttpRequest
//.newBuilder(URI.create(""))
 .newBuilder(URI.create(""))
 .header("refer", "")//携带的参数
 .header("userId", "d3e750db32004972b0ae58f8129f50fc")
 .timeout(Duration.ofSeconds(2))//2秒过期
 .GET()
 .build();
 getReponse(request);

 }
public static void HttpGet2() {

 HttpRequest request = HttpRequest
//.newBuilder(URI.create(""))
 .newBuilder(URI.create(""))
 .header("refer", "")//携带的参数
 .header("userId", "d3e750db32004972b0ae58f8129f50fc")
 .timeout(Duration.ofSeconds(2))//2秒过期
 .GET()
 .build();
 getAsyReponse2(request);

 }
/**
 * 文件上传
 */ public static void HttpPost() {
try {
 HttpRequest request = HttpRequest
 .newBuilder(URI.create(""))
 .header("refer", "")
 .POST(HttpRequest.BodyProcessor.fromFile(Paths.get("/url.txt")))
 .build();
 getAsyReponse(request);
 } catch (FileNotFoundException e) {
 e.printStackTrace();
 }

 }
/**
 * 携带参数
 */ public static void HttpPost2() {
 HttpRequest request = HttpRequest
 .newBuilder(URI.create(""))
 .header("refer", "")
 .POST(HttpRequest.BodyProcessor.fromString("name=ricky,pwd=123456"))
 .build();
 getReponse(request);
 }
/**
 * 输出响应结果
 * @param request
 * @throws IOException
 * @throws InterruptedException
 */ public static void getReponse(HttpRequest request) {
 HttpResponse<String> response = null;
try {
if (client==null) {
 init();
 }
 response = client.send(request, HttpResponse.BodyHandler.asString());
 } catch (IOException e) {
 e.printStackTrace();
 } catch (InterruptedException e) {
 e.printStackTrace();
 }
 String result = response.body();
int code = response.statusCode();
if (code == 200) {
 System.out.println("结果:" + result);
 }
 System.out.println("响应码:" + code);
 }
/**
 * 输出响应结果 带path形式
 * @param request
 * @throws IOException
 * @throws InterruptedException
 */ public static void getReponsePath(HttpRequest request) {
 HttpResponse<Path> response = null;
try {
 client.send(request, HttpResponse.BodyHandler.asFile(Paths.get("/url.text")));
 Path body = response.body();
 System.out.println(body);
 } catch (IOException e) {
 e.printStackTrace();
 } catch (InterruptedException e) {
 e.printStackTrace();
 }
 }
/**
 * 输出响应结果 带path形式的异步
 * @param request
 * @throws IOException
 * @throws InterruptedException
 */ public static void getAsyReponsePath(HttpRequest request) {
 CompletableFuture<Path> response = null;
 client
 .sendAsync(request, HttpResponse.BodyHandler.asFile(Paths.get("/url.text")))
 .thenApply((response1) -> response1.body());

 response.join();
 }
/**
 * 异步的输出响应结果
 * @param request
 * @throws IOException
 * @throws InterruptedException
 */ public static void getAsyReponse(HttpRequest request) {
 CompletableFuture<HttpResponse<String>> cf;
 cf = client.sendAsync(request, HttpResponse.BodyHandler.asString());
 HttpResponse<String> response = cf.join();
 System.out.println(response.body());
 }
/**
 * 异步的输出响应结果
 * @param request
 * @throws IOException
 * @throws InterruptedException
 */ public static void getAsyReponse2(HttpRequest request) {
 MultiMapResult<String> ress;
 ress = client.sendAsync(request, HttpResponse.MultiProcessor.asMap((req)-> Optional.of(
 HttpResponse.BodyHandler.asString()
 ))).join();
 ress.forEach((req,cf)->{
 HttpResponse<String> resp=cf.join();
 System.out.println("uri:"+resp.uri()+"---body:"+resp.body());
 });
 }
}
是针对有1到5年工作的经验的java开发人员,帮助突破技术瓶颈,提升思维能力


