一、Springboot2.0的配置文件
Springboot2.0的应用配置文件支持多种运行环境。
准备工作:
- 创建一个spring-boot-web项目
- 使用gradle
- jdk1.8
二、配置文件使用方式
1. 命令行属性
编译后的程序运行:
java -jar your.jar --server.port=9090 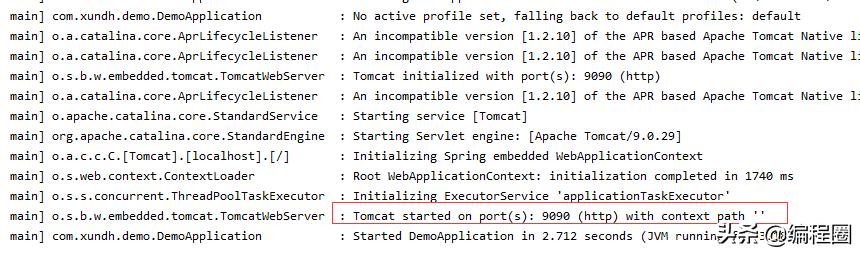
可以使用–添加多个程序属性。
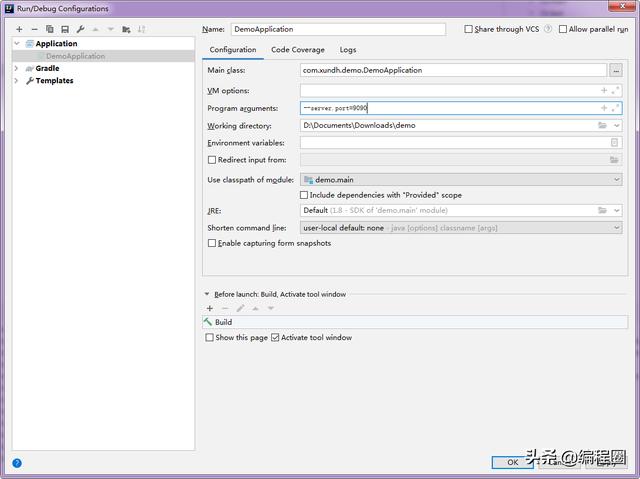
或在idea 设置Configurations
2. 使用properties文件(放在classpath下)
在src/main/resources/application.properties里输入:
  server .port=9090
spring.application.name=demoservice
3. 使用 yaml 文件(放在classpath下)
- 注意对空格要求很严,不能使用tab代替空格
- yaml通过空格缩进确定层级,键后面加冒号,冒号后面有一个空格
在src/main/resources/application.yaml里输入:
 spring:
   application:
      name: demoservice
server:
   port: 9090
4. 扩展属性
配置文件可以不放在classpath下,通过命令行参数指定配置文件位置:
java -jar your.jar -Dspring.config.location = C:application.properties 5. 参数引用
配置文件里的参数可以互相引用,如:
 myparam.name=myname
myparam.fullname=${myparam.name} Xie.
6. 使用随机数,prefix不能是 random
Spring boot 的属性配置文件中,可以通过使用${random}配置来产生随机的int、float或String
 # 随机 字符串
myvalue=${random.value}
# 随机int
myint  =${random.int}
# 随机long
mylong =${random.long}
# 10 以内的随机数
my10   =${random.int(10)}
# 10~20的随机数
my1020 =${random.int[10,20]}
7. 字符串带特殊字符需要转义
 yaml:
  str: 字符串可以不加引号
  specialStr: "双引号直接输出n特殊字符"
  specialStr2: '单引号可以转义n特殊字符'
8. 使用布尔型变量
 yaml:
  flag: false
9. 使用List可重复集合
 yaml:
  list:
    - one
    - two
    - two
 @Value("${yaml.list}")
private List<Object> list;  // list可重复集合
10. 使用set不可重复集合
 yaml:
  set: [1,2,3,4]
 @Value("${yaml.set}")
private Set<Object> set;
11. 使用Map集合
 yaml:
  map: {k1: v1, k2: v2}
 @Value("${yaml.map}")
private Map<String, Object> map;
12. 使用对象
 yaml:
  persons:
    - name: name1
      age: 15
    - name: name2
      age: 16
引用:
 @Value("${yaml.persons}")
private List<Person> persons;  // 复合结构,集合对象
13. 获取系统变量
 //  java 版本
@Value("#{systemProperties['java.version']}")
// 系统配置:os.name
@Value("#{systemProperties['os.name']}")
14. 表达式,支持支持SpEL表达式
 @Value("#{T(java.lang.Math).abs(-2020)}") // 表达式
private String mapExpression;
三、数据校验(JSR303)
 package com.xundh.demo;

import org.springframework.boot.context.properties.ConfigurationProperties;
import org.springframework.stereotype. Component ;
import org.springframework.validation.annotation.Validated;

import javax.validation.constraints.Email;

@Component
@ConfigurationProperties(prefix = "my")
@Validated
public class YamlEntity {
    public String getEmail() {
        return email;
    }

    public void setEmail(String email) {
        this.email = email;
    }

    @Email
    private String email;
}
当配置文件里email的值不是email格式时,编译会失败。
四、读取数据
1. 使用@Value注解读取参数
 spring:
  application:
    name: demoservice
server:
  port: 9090
my:
  property_key_name: myvalue
在controller里读取数据:
import java.util.concurrent.atomic.AtomicLong;

import org.springframework.beans.factory.annotation.Value;
import org.springframework.web.bind.annotation.RequestMapping;
import org.springframework.web.bind.annotation.RequestParam;
import org.springframework.web.bind.annotation.RestController;

@RestController
public class GreetingController {

    private static final String template = "Hello, %s!";
    private final AtomicLong counter = new AtomicLong();

    @Value("${my.property_key_name}")
    String mykey;
    @Value("${spring.application.name}")
    String application_name;

    @RequestMapping("/greeting")
    public Greeting greeting(@RequestParam(value="name", defaultValue="World") String name) {
        System.out.println("mykey=" + mykey);
        System.out.println("application_name=" + application_name);
        return new Greeting(counter.incrementAndGet(),
                String.format(template, name));
    }
} 
如果读取的参数不存在,程序会报java.lang.IllegalArgumentException异常,要避免这种问题可以设置默认值:
 @Value("${property_key_name:default_value}")

@Value("${spring.application.name:demoservice}")
2. 使用ConfigurationProperty注解,支持松散匹配属性
import org.springframework.boot.context.properties.ConfigurationProperties;
import org.springframework.stereotype.Component;

@Component
@ConfigurationProperties(prefix = "my")
public class YamlEntity {
    public String getMykey() {
        return mykey;
    }

    public void setMykey(String mykey) {
        this.mykey = mykey;
    }

    private String mykey;
}
调用:
     @Autowired
    YamlEntity yamlEntity;

    public void test() {
        System.out.println("my value=" + yamlEntity.getMykey());

    }
五、多环境配置文件
可以在项目里使用多个SpringBoot配置文件,通过在application.properties里设置 spring. profiles . active 指定环境。
示例:
application.properties
 server.port = 8080
spring.application.name = demoservice
application-dev.properties
 server.port = 9090
spring.application.name = demoservice
application-prod.properties
 server.port = 4431
spring.application.name = demoservice
通过命令行指定配置文件
java -jar your.jar --spring.profiles.active=dev 也可以在配置文件里指定spring.profiles.active的值。


