
小熊进阶之JAVA编程SSH框架整合教程,不服来吐槽!

小熊进阶之JAVA编程SSH框架整合教程,不服来吐槽!
IDE: Eclipse Mars Release (4.5.0)
DB: MySQL 5.1.73
服务器: Tomcat 7.0
1,首先在Eclipse中新建一个Dynamic Web Project,暂且起名为SSH;
2,新建包名:
3,导入jar包:
4,配置 struts2 框架:
a,在 web.xml 中配置struts2过滤器:
<filter>
<filter-name>action</filter-name>
<filter-class>org.apache.struts2.dispatcher.ng.filter.StrutsPrepareAndExecuteFilter</filter-class>
</filter>
<filter-mapping>
<filter-name>action</filter-name>
<url-pattern>/*</url-pattern>
</filter-mapping>
b,新建config源文件夹,并在该文件夹中新建struts.xml配置文件
<?xmlversion=”1.0″?>
<struts>
< package name=”shw”namespace=”/”extends=”struts-default”>
</package>
</struts>
5,将 log4j.properties 文件复制粘贴到 config 文件夹中;
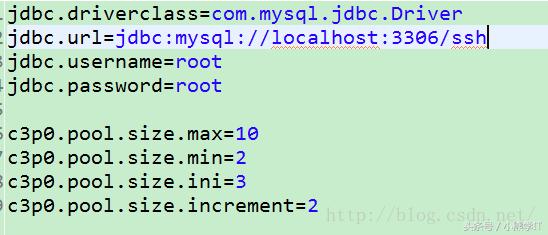
6,新建 jdbc.properties 文件在 config 文件夹中:
小熊进阶之JAVA编程SSH框架整合教程,不服来吐槽!
7,新建 hibernate .cfg.xml 文件到 config 文件夹;
<?xmlversion=”1.0″?>
<!DOCTYPE hibernate-configuration PUBLIC
“-//Hibernate/Hibernate Configuration DTD 3.0//EN”
“”>
<hibernate-configuration>
<session-factory>
<propertyname=”dialect”>org.hibernate.dialect.MySQL5Dialect</property>
<propertyname=”hbm2ddl.auto”>update</property>
<propertyname=”show_sql”>true</property>
</session-factory>
</hibernate-configuration>
8,新建 ApplicationContext.xml 文件在 config 文件夹中;
<?xmlversion=”1.0″?>
<beansxmlns=””
xmlns:xsi=””
xmlns:context=””
xmlns:tx=””
xmlns: aop =””
xsi:schemaLocation=”
bean s-3.0.xsd
“>
<!– 组件扫描 –>
<context:component-scanbase-package=”com.juyuan238.ssh.dao.impl,com.juyuan238.ssh.service.impl,com.juyuan238.ssh.web”/>
<!– 分散配置 –>
<context:property-placeholderlocation=” classpath :jdbc.properties”/>
<!– 数据源 –>
<beanid=”dataSource”class=”com.mchange.v2.c3p0.ComboPooledDataSource”>
<propertyname=”driverClass”value=”${jdbc.driverclass}”/>
<propertyname=”jdbcUrl”value=”${jdbc.url}”/>
<propertyname=”user”value=”${jdbc.username}”/>
<propertyname=”password”value=”${jdbc.password}”/>
<propertyname=”maxPoolSize”value=”${c3p0.pool.size.max}”/>
<propertyname=”minPoolSize”value=”${c3p0.pool.size.min}”/>
<propertyname=”initialPoolSize”value=”${c3p0.pool.size.ini}”/>
<propertyname=”acquireIncrement”value=”${c3p0.pool.size.increment}”/>
</bean>
<!– 本地会话工厂bean,spring整合hibernate的核心入口 –>
<beanid=” sessionFactory “class=”org.springframework. orm .hibernate3.LocalSessionFactoryBean”>
<!– 注入数据源 –>
<propertyname=”dataSource”ref=”dataSource”/>
<!– 指定hibernate配置文件 –>
<propertyname=”configLocation”value=”classpath:hibernate.cfg.xml”/>
<!– 指定映射文件目录 –>
<propertyname=”mappingDirectoryLocations”>
<list>
<value>classpath:com/juyuan238/ssh/domin</value>
</list>
</property>
</bean>
<!– 事务管理器,在service层面上实现事务管理,而且达到平台无关性 –>
<beanid=”txManager”class=”org.springframework.orm.hibernate3.HibernateTransactionManager”>
<propertyname=”sessionFactory”ref=”sessionFactory”/>
</bean>
<!– 配置事务通知 –>
<tx:adviceid=”txAdvice”transaction-manager=”txManager”>
<tx:attributes>
<tx:methodname=”save*”propagation=”REQUIRED” isolation =”DEFAULT”/>
<tx:methodname=”update*”propagation=”REQUIRED”isolation=”DEFAULT”/>
<tx:methodname=”delete*”propagation=”REQUIRED”isolation=”DEFAULT”/>
<tx:methodname=”batch*”propagation=”REQUIRED”isolation=”DEFAULT”/>
<tx:methodname=”new*”propagation=”REQUIRED”isolation=”DEFAULT”/>
<tx:methodname=”get*”propagation=”REQUIRED”isolation=”DEFAULT”read-only=”true”/>
<tx:methodname=”load*”propagation=”REQUIRED”isolation=”DEFAULT”read-only=”true”/>
<tx:methodname=”find*”propagation=”REQUIRED”isolation=”DEFAULT”read-only=”true”/>
<tx:methodname=”*”propagation=”REQUIRED”isolation=”DEFAULT”/>
</tx:attributes>
</tx:advice>
<!– aop事务配置 –>
<aop:config>
<aop:advisoradvice-ref=”txAdvice”pointcut=”execution(* *..*Service.*(..))”/>
</aop:config>
</beans>
9,配置 Spring 的监听器在 web.xml 中;

小熊进阶之JAVA编程SSH框架整合教程,不服来吐槽!
10,新建测试类,测试数据源:

小熊进阶之JAVA编程SSH框架整合教程,不服来吐槽!
注: 如果正常的话,控制台会打印出信息如下:

小熊进阶之JAVA编程SSH框架整合教程,不服来吐槽!
11,接下来的话,我们再来测试下发布成 web 应用时,框架是否能正确运行:
a,在 com.juyuan238.ssh.web 中新建一个类,暂且起名为: ShwAction
@Controller(“shwAction”)
publicclass ShwAction {
public String index(){
return”load”;
}
}
b,到 struts2 配置文件 struts.xml 中,编写配置文件:
<struts>
<packagename=”struts2″namespace=”/”extends=”struts-default”>
<actionname=”shw”class=”shwAction”method=”{1}”>
<resultname=”load”>WEB-INF/ jsp /success.jsp</result>
</action>
</package>
</struts>
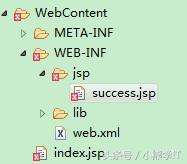
c,在WEB-INF 目录下新建 jsp 文件夹,并在 jsp 文件夹中新建 success.jsp ;
小熊进阶之JAVA编程SSH框架整合教程,不服来吐槽!
注: 新建 jsp 页面的时候,可能会发现 jsp 页面报错,没事,这是正常的。解决办法如下 :
右键当前项目—->Build Path—->Configure Build Path—–>切换到” Libraries “——>Add Libray—–>Server Runtime——->选择相应的” Tomcat “版本—->finish—–>OK
d,在 index.jsp 中添加超链接:

小熊进阶之JAVA编程SSH框架整合教程,不服来吐槽!
e,将项目部署到 tomcat 中,并启动 tomcat 服务器;
f,点击链接,如果能够链接到 success.jsp 页面,说明框架整合成功!否则的话,就要继续努力了……
好了,三大框架的整合说到这里就已经结束了,希望对大家能够有所帮助……

小熊进阶之JAVA编程SSH框架整合教程,不服来吐槽!
欢迎大家在下方积极吐槽,小编会一一进行查看并回复,期待你的答案哦……
小熊原创,如果喜欢请转发,小小支持一下。


