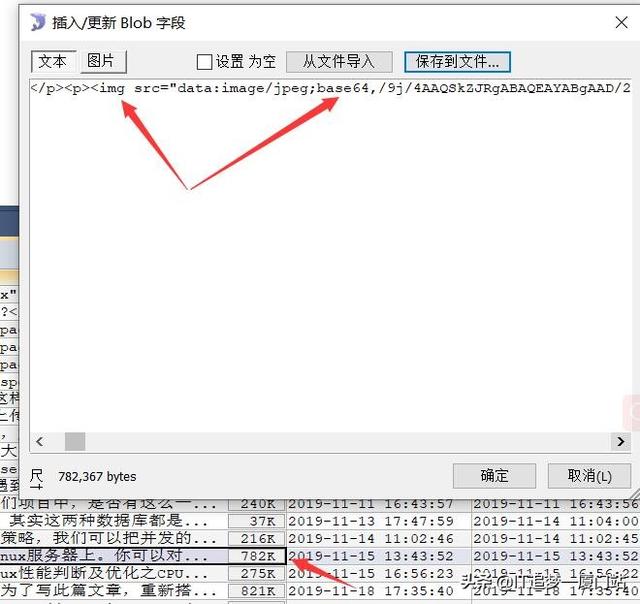
之前闲时,花了几个下班时间使用VUE+Spring Boot前后端分离做了一个博客,博客文章编辑采用vue-quill-editor插件,做了一些简单的配置后,就直接可用了,可惜在编辑文章时,默认的图片上传为Base64存放在文章内容中,这使得原本存储在数据库中的5这个大字段会因一篇文章的图片上传多而变得沉重。因为我使得的是云服务当服务器,有用过云服务的都知道,网络带宽很贵。在带宽只有3M的情况下,读取一篇几兆的文章会有几秒的延迟。一开始我以为是数据库读取问题,所以我把文章内容这个字段做了中间缓存,把常变字段(如阅读数)依然从数据库中读取,在逻辑上进行两者拼接返回给前端,但依然速度很慢。如下图,文章内容中的图片是BASE64存储,存储大小782KB,如果一篇文章的上传图片越多,也就会导致这个文章内容字段越大。
在不考虑提高带宽成本的情况下,准备把富文本图片默认存储为Base64的方案改成图片存储服务器,用URL引用,这样可以减少文章内容的读写IO。以下我将从引用富本文到图片改造再到后端接收上传的图片来介绍。
一、下载富文本依赖
npm install vue-quill-editor --save
下载完依赖后,在package. Json 中,将可以找到对应的版本。

二、在main.js中引用富文本,可以按Ctrl键+鼠标点击vue-quill-editor,看下是否可以看到源码,这样可以再次确认是否下载成功(我用的编译器是JetBrains WebStorm 2018.3.5 x64)
import VueQuillEditor from 'vue-quill-editor'
三、富文本的使用
1、HTML部分代码
<template>
//中间省去其他内容,只显示富文本HTML
<div class="edit_container">
 <quill-editor
 v-model="blogsContent"
 ref="myQuillEditor"
 :options="editorOption"
 @blur="onEditorBlur($event)" @focus="onEditorFocus($event)"
 @change="onEditorChange($event)">
 </quill-editor>
</div>
</template>
2、JS部分代码
< script >
 import {quillEditor} from "vue-quill-editor"; //调用编辑器
 import quillConfig from '../../ api /quill-config.js'//重写富文本,使得图片走自定义上传
 import 'quill/dist/quill.core.css';
 import 'quill/dist/quill.snow.css';
 import 'quill/dist/quill.bubble.css';
export default {
 name: 'editor',
 components: {
 quillEditor
 },
 data() {
 return {
 editorOption: quillConfig,//重写
 }
 }
}
3、重写自定义图片上传quill-config.js代码
以下代码可以直接复制,然后改一下接口地址和你所要的参数即可
/*富文本编辑图片上传配置*/
const uploadConfig = {
 // 必填参数 图片上传地址
 action: '/api/ file /up/img', // 必填参数 图片上传接口地址
 methods: 'POST', // 必填参数 图片上传方式
 token: '', // 可选参数 如果需要token验证,假设你的token有存放在sessionStorage
 name: 'img', // 必填参数 文件的参数名
 size: 500, // 可选参数 图片大小,单位为Kb, 1M = 1024Kb
  accept : 'image/png, image/gif, image/jpeg, image/bmp, image/x-icon' // 可选 可上传的图片格式
};

// toolbar工具栏的工具选项(默认展示全部)
const toolOptions = [
 ['bold', 'italic', 'underline', 'strike'],
 ['blockquote', 'code-block'],
 [{'header': 1}, {'header': 2}],
 [{'list': 'ordered'}, {'list': 'bullet'}],
 [{'script': 'sub'}, {'script': 'super'}],
 [{'indent': '-1'}, {'indent': '+1'}],
 [{'direction': 'rtl'}],
 [{'size': ['small',  false , 'large', 'huge']}],
 [{'header': [1, 2, 3, 4, 5, 6, false]}],
 [{'color': []}, {'background': []}],
 [{'font': []}],
 [{'align': []}],
 ['clean'],
 ['link', 'image', 'video']
];
const handlers = {
 image: function image() {
 var self = this;

 var fileInput = this.container.querySelector('input.ql-image[type=file]');
 if (fileInput === null) {
 fileInput = document.createElement('input');
 fileInput.setAttribute('type', 'file');
 // 设置图片参数名
 if (uploadConfig.name) {
 fileInput.setAttribute('name', uploadConfig.name);
 }
 // 可设置上传图片的格式
 fileInput.setAttribute('accept', uploadConfig.accept);
 fileInput.classList.add('ql-image');
 // 监听选择文件
 fileInput.addEventListener('change',  function  () {
 // 创建formData,append这个方法是添加参数的方法,如果你的接口需要添加其他参数,比如用户ID,也可以在后面加进去。
 var formData = new FormData();
 formData.append(uploadConfig.name, fileInput.files[0]);
 formData.append('object','product');
 // 如果需要token且存在token
 if (uploadConfig.token) {
 formData.append('token', uploadConfig.token)
 }
 // 图片上传
 var xhr = new XMLHttpRequest();
 xhr.open(uploadConfig.methods, uploadConfig.action, true);
 // 上传数据成功,会触发
 xhr.onload = function (e) {
 if (xhr.status === 200) {
 // var res = JSON.parse(xhr.responseText);//如果你图片上传接口返回的是一个Json对象,就需要这个转,然后在下面获取图片URL
 let length = self.quill.getSelection(true).index;
 //这里很重要,你图片上传成功后,img的src需要在这里添加,res.path就是你服务器返回的图片链接。
 //如果只是图片地址,在前端是显示不了的,需要添加前缀,你可以使用接口全路径,也可以使用我下面的VUE路由解决跨域问题
 self.quill.insertEmbed(length, 'image','/api/file/get/img?url='+xhr.responseText);
 self.quill.setSelection(length + 1)
 }
 fileInput.value = ''
 };
 // 开始上传数据
 xhr.upload.onloadstart = function (e) {
 fileInput.value = ''
 };
 // 当发生网络异常的时候会触发,如果上传数据的过程还未结束
 xhr.upload.onerror = function (e) {
 };
 // 上传数据完成(成功或者失败)时会触发
 xhr.upload.onloadend = function (e) {
 // console.log('上传结束')
 };
 xhr.send(formData)
 });
 this.container.appendChild(fileInput);
 }
 fileInput.click();
 }
};

export default {
 placeholder: '',
 theme: 'snow', // 主题
 modules: {
 toolbar: {
 container: toolOptions, // 工具栏选项
 handlers: handlers // 事件重写
 }
 }
};
4、JAVA图片上传接口
@PostMapping("/up/img")
@ApiOperation(value = "上传")
public String upImg(HttpServletRequest request,
 @ApiParam(name = "userId", value = "id") String userId,
 MultipartFile img){
 String fileName =  Service Common.ymdhmsdfStr.format(new Date())+"_"+img.getOriginalFilename();//防止图片重名覆盖,生成一个当前时间+图片名
 String path = filePath;//配置文件中的图片存储前缀,如d://img/
 String nameTypePath = "/" +userId+ "/blog_img" ;//中间路径
 return upFileImgService.upFileService("/" + fileName, path + nameTypePath, nameTypePath, img);//接口看后面Service层
}
4.1、Service层
public Result upFileService(String fileName, String filePath, String nameTypePath, MultipartFile file) {
 try {
 File file1 = new File(filePath);//按路径生成文件对象
 if(!file1.exists()){//如果文件不存在,将创建一个文件
 file1.mkdirs();
 }
 byte [] bytes = file.getBytes();//获取文件二进制字节数组
 String url = filePath+fileName;//存储路径+文件名,产生一个文件存储地址
 Path path = Paths.get(url);
 Files.write(path,bytes);//文件写入
 return nameTypePath+fileName;//返回URL(我这个URL返回的前缀地址是截取掉的,不会显示IP等信息,只返回给前端后半地址,前端在调用图片获取时,将在接口中带入前缀,防止全路径暴露给前端)
 } catch (IOException e) {
 e.printStackTrace();
 return "";
 }
}
5、图片获取接口
@GetMapping("/get/img")
@ApiOperation(value = "获取图片")
public void getImg(HttpServletResponse response,
 @ApiParam(name = "url", value = "文件路径") @RequestParam(required = true) String url,
 @ApiParam(name = "resType", value = "文件以什么类型输出(pdf,jpg)") @RequestParam(required = false) String resType) {
 String path = filePath + url;
 upFileImgService.download(path, response, "get", resType);
}
5.1、图片获取接口Service层
public void download(String filePath, HttpServletResponse response,String type,String resType) {
 File file = new File(filePath);
 response.setContentLength((int)file.length());
 try (
 FileInputStream fis = new FileInputStream(file);
 OutputStream os = response.getOutputStream())
 {
 byte[] buf = new byte[1024 * 256];
 int i;
 while ((i = fis.read(buf)) != -1) {
 os.write(buf, 0, i);
 }
 os.flush();
 } catch (IOException e) {
 System.out.println(e.getMessage());
 }
}

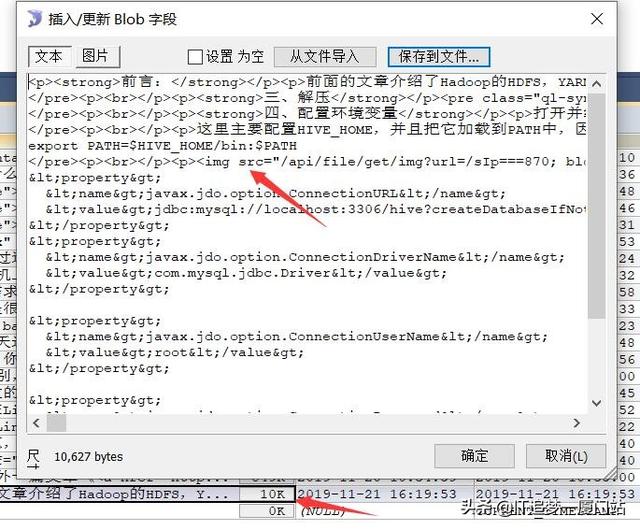
到此VUE 富文本编辑器 +Spring Boot接口就完成了。代码基本复制改改就可以使用。最后看下效果如何,如下图上,从原来的Base64内容变成URL地址,整个文章字段就缩小几十倍,这在IO读取时也加快了几十倍。