基本环境和工具
IDE: IntelliJ IDEA
Maven : 3.6.0
JDK : 1.8
Step 1 搭建基础 SSM 环境
1.1 创建Maven工程,添加SSM+Thymeleaf+ shiro 依赖
Step1创建Maven工程:
省略用 IDEA 添加Maven工厂项目步骤,这个默认大家都懂……
提示:新建项目后记得配置IDEA的Maven参数,改为本地自己安装的Maven
Step2添加Spring Boot父依赖、 Shiro 依赖:
 <!--添加Spring Boot父依赖-->

<parent>

<groupId>org.springframework.boot</groupId>

<artifactId> Spring -boot-starter-parent</artifactId>

<version>2.3.4.RELEASE</version>

</parent>

<dependencies>

<!--shiro 的Spring Boot 启动器-->

<dependency>

<groupId>org. apache .shiro</groupId>

<artifactId>shiro-spring-boot-web-starter</artifactId>

<version>1.6.0</version>

</dependency>

<!--thymeleaf的启动器-->

<dependency>

<groupId>org.springframework.boot</groupId>

<artifactId>spring-boot-starter-thymeleaf</artifactId>

</dependency>

<!-- mybatis 的启动器-->

<dependency>

<groupId>org.mybatis.spring.boot</groupId>

<artifactId>mybatis-spring-boot-starter</artifactId>

<version>2.1.3</version>

</dependency>

<!--数据库的驱动-->

<dependency>

<groupId> mysql </groupId>

<artifactId>mysql-connector-java</artifactId>

<version>8.0.11</version>

</dependency>

</dependencies>
1.2 配置application.yml中数据库信息
 spring:

datasource:

driver-class-name: com.mysql.cj. jdbc .Driver

url: jdbc:mysql://localhost:3306/shiro?characterEncoding=utf8&useSSL=false&serverTimezone=GMT%2B8

username:  root

password: root
1.3 编写MVC各层代码
编写基本MVC各层包和目录以及相关代码:

1.4 编写Thymeleaf页面
Spring Boot 整合Thymeleaf,无需进行任何配置,只需在resources文件夹下创建 templates文件夹 ,在其中创建 html文件 ,SpringMVC即可自动进行跳转:
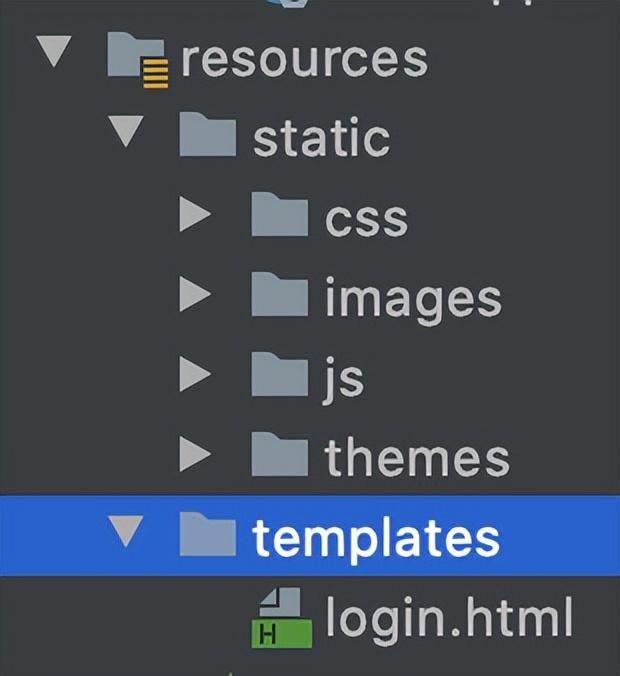
JS、 css 、图片等静态资源须放在 static 文件夹 下
对于公共页面的跳转可以利用路径变量创建一个公用的单元方法:
 // 公共页面跳转共用单元方法

@ Request Mapping("/{path}")

public String getPage(@PathVariable String path){

return path;

}
Step 2 整合Shiro,实现登录认证
注意:相关依赖已在第一步导入,不在赘述。
2.1 配置application.yml
在Spring Boot配置文件application.yml中配置Shiro的默认登录链接:
 shiro:

loginUrl: /login
2.2 编写自定义Realm类和Shiro配置类
Step1 创建com.gcp.shiro包
Step2 在其中创建MyRealm类,继承AuthorizingRealm类,重写认证方法:
 /*重写认证方法*/

@Override

protected  Authentication Info doGetAuthenticationInfo(AuthenticationToken token) throws AuthenticationException {

System.out.println("认证用户中……");

// 从token获取用户登录输入的用户名

 String  unameFromWeb = token.getPrincipal().toString();

// 利用用户名去数据库查询是否有数据

User user = userService.selectUserByUname(unameFromWeb);

if (user!= null ) {

AuthenticationInfo info = new SimpleAuthenticationInfo(token.getPrincipal(), user.getPwd(),

 Byte Source.Util.bytes("gcp"), token.getPrincipal().toString());

return info;

}

return null;

}
Step3 创建ShiroConfig类,配置SecurityManager bean和Shiro内置过滤器bean:
 @Configuration

public class ShiroConfig {

@Autowired

 private  MyRealm myRealm;

// 配置Security Manager

@Bean

public DefaultWebSecurityManager getSecurityManager(){

// 实例化SecurityManager

DefaultWebSecurityManager securityManager = new DefaultWebSecurityManager();

// 实例化Shiro默认的密码匹配器

HashedCredentialsMatcher matcher = new HashedCredentialsMatcher();

// 设置密码加密算法为md5

matcher.set Hash AlgorithmName("md5");

// 设置迭代次数

matcher.setHashIterations(2);

// 将密码匹配器加入自定义realm中:

myRealm.setCredentialsMatcher(matcher);

// 将自定义的realm集成到DefaultWebSecurityManager对象中

securityManager.setRealm(myRealm);

return securityManager;

}

// 配置Shiro默认过滤器

@Bean

public ShiroFilterChainDefinition getFilter(){

DefaultShiroFilterChainDefinition filterChainDefinition = new DefaultShiroFilterChainDefinition();

// 放行公共的页面和静态资源的访问

filterChainDefinition.addPathDefinition("/login","anon");

filterChainDefinition.addPathDefinition("/css/**","anon");

filterChainDefinition.addPathDefinition("/js/**","anon");

filterChainDefinition.addPathDefinition("/images/**","anon");

filterChainDefinition.addPathDefinition("/themes/**","anon");

filterChainDefinition.addPathDefinition("/userLogin","anon");

// 其余必须登录才能访问

filterChainDefinition.addPathDefinition("/**","user");

return filterChainDefinition;

}

}
2.3 编写用户登录验证单元方法
在登录的PulicController类中:
 /**

* 用户登录方法

* @param uname

* @param pwd

* @return

*/

@RequestMapping("userLogin")

@ResponseBody

public Result userLogin(String uname, String pwd){

// 利用用户名密码实例化Shiro token

UsernamePasswordToken tonken = new UsernamePasswordToken(uname, pwd);

try {

// 获取Subject并进行登录

SecurityUtils.getSubject().login(tonken);

return new Result();

}catch (AuthenticationException e) {

e.printStackTrace();

return new Result("用户名或密码不匹配");

}

}
此处login方法会调用MyRealm的认证方法进行匹配。此时项目即可实现用户登录功能了。
2.4 用Shiro实现remember me
Shiro实现记住我功能十分简单:在Shiro的配置文件进行如下修改:
Step1在设置SecurityManager方法中修改:(添加设置Shiro的remember me 功能)
 // 配置Security Manager

@Bean

public DefaultWebSecurityManager getSecurityManager(){

// 实例化SecurityManager

DefaultWebSecurityManager securityManager = new DefaultWebSecurityManager();

// 实例化Shiro默认的密码匹配器

HashedCredentialsMatcher matcher = new HashedCredentialsMatcher();

// 设置密码加密算法为md5

matcher.setHashAlgorithmName("md5");

// 设置迭代次数

matcher.setHashIterations(2);

// 将密码匹配器加入自定义realm中:

myRealm.setCredentialsMatcher(matcher);

// 将自定义的realm集成到DefaultWebSecurityManager对象中

securityManager.setRealm(myRealm);

//设置Shiro的remember me功能

securityManager.setRememberMeManager(rememberMeManager());

return securityManager;

}
rememberMeManager()方法代码:
 // 设置shiro的remembermeManager

private RememberMeManager rememberMeManager() {

// 实例化shiro的remembermeManager

CookieRememberMeManager  cookie RememberMeManager = new CookieRememberMeManager();

// 设置cookie的有效期

 Cookie RememberMeManager.setCookie(rememberMeCookie());

// 添加Cookie加密设置

cookieRememberMeManager.setCipherKey("123123123".getBytes());

return cookieRememberMeManager;

}
rememberMeCookie()方法代码:
 // 设置Cookie参数

private SimpleCookie rememberMeCookie() {

SimpleCookie cookie = new SimpleCookie();

cookie.setPath("/");

cookie.setHttpOnly(true);

// 单位是秒

cookie.setMaxAge(3*24*60*60);

return cookie;

}
Step2设置好后,再次修改用户登录的单元方法:添加一个 Boolean 类型的rememberme参数,并且设置默认值为false:
 /**

* 用户登录方法

*/

@RequestMapping("userLogin")

@ResponseBody

public Result userLogin(String uname, String pwd,@RequestParam(defaultValue = "false") Boolean rememberme){

// 利用用户名密码实例化Shiro token

UsernamePasswordToken tonken = new UsernamePasswordToken(uname, pwd,rememberme);

// 省略余下代码,余下代码没变化,相见上部

}
Step 3 Shiro实现后台功能及页面显示授权
鉴权 就是判断用户是否有权限执行相应方法或看到页面具体内容
授权就是授予认证用户指定的角色或指定的权限。
3.1 后台功能方法鉴权
Shiro在后台可以用在 控制器 方法,也可以用在业务方法。通常都在控制器方法上添加注解进行鉴权。
本项目中具体用户的增删改查四个方法,利用注解 @RequirePermissions(“要求的权限”) 进行分别鉴权,具体代码如下:
新建UserController类:
 @Controller

public class UserController {

//声明单元方法:用户新增

@RequiresPermissions("user:add")

@RequestMapping("userAdd")

@ResponseBody

public String userAdd(){

System.out.println("新增用户单元方法执行。");

return "恭喜,新增用户成功!";

}

//声明单元方法:用户删除

@RequiresPermissions("user:del")

@RequestMapping("userDel")

@ResponseBody

public String userDel(){

System.out.println("用户信息删除单元方法执行");

return "恭喜,用户删除成功!";

}

//声明单元方法:用户修改

@RequiresPermissions("user:edit")

@RequestMapping("userEdit")

@ResponseBody

public String userEdit(){

System.out.println("用户信息修改单元方法执行");

return "恭喜,用户修改成功!";

}

}
3.2 Thymeleaf页面中鉴权
在需要鉴权的页面中,在 <html> 标签中添加属性:
xmlns:shiro=”#34;
在具体的需要进行鉴权的页面元素中使用shiro标识,例如:
 <ul >

<li><a href="/userAdd" shiro:hasPermission="user:add">添加用户</a></li>

<li><a href="/userDel" shiro:hasPermission="user:del">删除用户</a></li>

<li><a href="/userEdit" shiro:hasPermission="user:edit">修改用户</a></li>

<li><a href="/userSel" shiro:hasPermission="user:sel">查询用户</a></li>

</ul>
还需要再添加Thymeleaf整合Shiro的依赖:
 <!--配置Thymeleaf整合shiro-->

<dependency>

<groupId>com.github.theborakompanioni</groupId>

<artifactId>thymeleaf-extras-shiro</artifactId>

<version>2.0.0</version>

</dependency>
在shiro配置类中添加shiro标识解析bean:
 /**

* 配置页面的shiro标识的解析bean

*/

@Bean

public ShiroDialect shiroDialect() {

return new ShiroDialect();

}
3.3 Shiro授权
首先,重写MyRealm中的授权方法:
 /*重写授权方法*/

@Override

protected AuthorizationInfo doGetAuthorizationInfo(PrincipalCollection principalCollection) {

// 获取当前认证用户的用户名

String uname = (String)principalCollection.getPrimaryPrincipal();

// 从数据库查询当前用户的权限信息

List<String> permissionList = userService.getPermissions(uname);

// 从数据库查询当前用户的角色信息

List<String> roleList = userService.getRoles(uname);

// 将查询到的权限、角色信息给Shiro

SimpleAuthorizationInfo info = new SimpleAuthorizationInfo();

info.addStringPermissions(permissionList);

info.addRoles(roleList);

return info;

}
然后,添加相应的两个查询方法,此处代码省略
最后添加鉴权失败后,进行异常拦截的通知类和方法:
新建ExpController类:
 @ControllerAdvice

public class ExpController {

@ResponseBody

@ExceptionHandler(UnauthorizedException.class)

public String handleShiroException(Exception ex) {

return "无权限";

}

@ResponseBody

@ExceptionHandler(AuthorizationException.class)

public String AuthorizationException(Exception ex) {

return "权限认证失败";

}

}
Step 4 Shiro整合 EhCache
在授权过程中,我们会发现,Shiro每次都会去访问数据库,较为耗费资源,引入缓存即可解决问题,Shiro 支持很多第三方缓存工具。官方提供了 shiro-ehcache,实现了把 ehcache 当 做 Shiro 的缓存工具的解决方案。其中最好用的一个功能是就是缓存认证执行的 Realm 方 法,减少对数据库的访问。
4.1 添加依赖
 <!--shiro整合EhCache依赖-->

<dependency>

<groupId>org.apache.shiro</groupId>

<artifactId>shiro-ehcache</artifactId>

<version>1.4.2</version>

</dependency>

<dependency>

<groupId>commons-io</groupId>

<artifactId>commons-io</artifactId>

<version>2.6</version>

</dependency>
4.2 编写ehcache缓存配置
在resources下新建eh Cache /ehcache-shiro.xml:
 <?xml version="1.0" encoding="UTF-8"?>

<ehcache name="ehcache" updateCheck="false">

<!-- 磁盘缓存位置 -->

<diskStore path="java.io.tmpdir"/>

<!-- 默认缓存策略 -->

<!--timeToIdleSeconds:缓存钝化时间-->

<!--timeToLiveSeconds:缓存有效时间-->

<defaultCache

maxEntriesLocalHeap="1000"

eternal="false"

timeToIdleSeconds="3600"

timeToLiveSeconds="3600"

overflowToDisk="false">

</defaultCache>

</ehcache>
4.3 修改配置文件shiroconfig
在ShiroConfig类的setSecurityManager方法中加入如下代码:
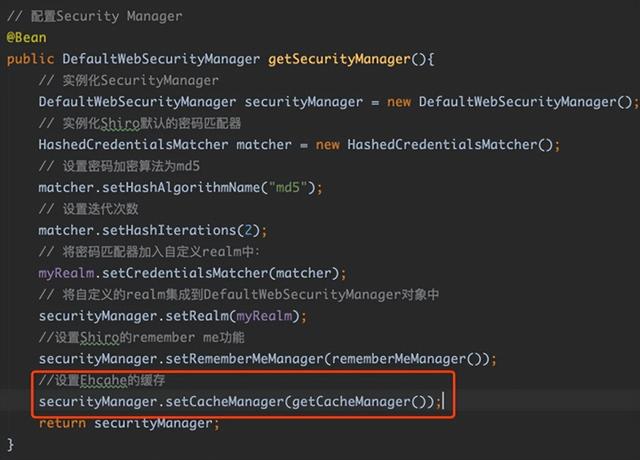
getCacheManager()方法具体代码:
 /**

* 设置shiro的CacheManager

*/

private CacheManager getCacheManager() {

// 1.实例化 Shiro 自身的 CacheManager,EhCache 的实现类

EhCacheManager shiroCacheManager = new EhCacheManager();

// 2.获取 EhCache 的配置类文件并转成输入流

 InputStream  is = null;

try {

is = ResourceUtils.getInputStreamForPath("classpath:ehcache/ehcache-shiro.xml");

} catch (IOException e) {

e.printStackTrace();

}

// 3.实例化 EhCacheManager 自身对象

net.sf.ehcache.CacheManager ehCacheManager =new net.sf.ehcache.CacheManager(is);

// 4.将 EhCacheManager 自身对象赋值给 Shiro 的 CacheManager

shiroCacheManager.setCacheManager(ehCacheManager);

// 5.返回

return shiroCacheManager;

}
Step 5 实现多次输错密码锁定账号
5.1 在ehcache-shiro.xml中配置缓存策略
 <!-- 登录记录缓存策略: 锁定10分钟 -->

<cache name="loginRecordCache"

maxEntriesLocalHeap="2000"

eternal="false"

timeToIdleSeconds="600"

timeToLiveSeconds="0"

overflowToDisk="false"

statistics="true">

</cache>
5.2 创建自定义凭证匹配器
创建凭证匹配器RetryLimitHashedCredentialsMatcher继承HashedCredentialsMatcher:
 @Component

public class RetryLimitHashedCredentialsMatcher extends HashedCredentialsMatcher {

// 声明缓存对象

private Ehcache passwordRetryCache;

// 获取EhCache缓存管理器并获取缓存策略

public RetryLimitHashedCredentialsMatcher(EhCacheManager ehCacheManager) {

this.passwordRetryCache = ehCacheManager.getCacheManager().getCache("loginRecordCache");

}

@Override

public boolean doCredentialsMatch(AuthenticationToken token, AuthenticationInfo info) {

// 声明变量记录错误次数

int i = 0;

// 1. 获取用户登录次数的缓存信息

// 获取用户的身份信息(身份信息为缓存数据的键名)

String username = token.getPrincipal().toString();

// 获取缓存对象

Element element = passwordRetryCache.get(username);

// 判断是否有缓存数据

if (element==null) {

// 没有缓存数据,新建

Element ele = new Element(username,new AtomicInteger(0));

passwordRetryCache.put(ele);

} else {

// 有缓存,提取自增

AtomicInteger atomicInteger = (AtomicInteger) element.getObjectValue();

i = atomicInteger.incrementAndGet();

}

System.out.println("验证次数:"+i);

// 3. 判断i次数

if (i >= 4) {

throw new ExcessiveAttemptsException();

}

// 4. 进行本次登录判断

boolean match = super.doCredentialsMatch(token,info);

// 5. 如果登录成功,则移除登录记录

if (match) {

passwordRetryCache.remove(username);

}

return match;

}

}
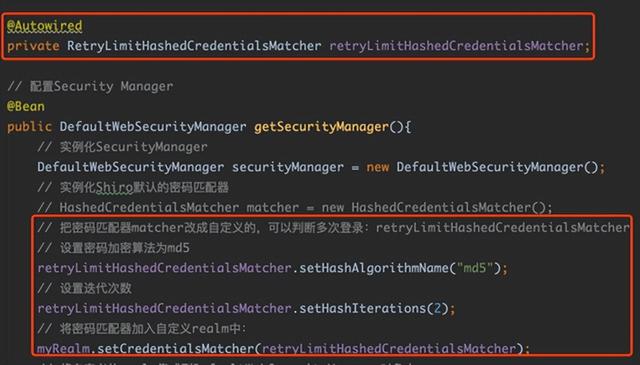
5.3 修改配置类ShiroConfig
- 将EhCacheManager的实例化交给Spring容器管理
在获取EhCacheManager的getCacheManager方法前添加@Bean注解:

把此对象的实例化交给Spring容器托管,以便RetryLimitHashedCredentialsMatcher构造器使用
- 修改密码匹配器:
使用在ShiroConfig的设置SecurityManager方法中把原来默认的密码匹配器替换为新自定义的类:
5.4 修改登录单元方法

至此,即完成功能开发。


