
平台地址 CSDN:
简书:
个人博客:
继上篇文章《[Spring Boot] 配置文件加载[超详细]》之后,今天来介绍个好用的工具jasypt-spring-boot-starter。
主要用途是可以实现配置文件的加密,避免一些敏感信息泄露。也无需自定义加解密工具,集成 Spring Boot,轻量好用。
jasypt-spring-boot-starter 介绍
Jasypt Spring Boot为Spring Boot application s中的属性源提供加密支持。
有三种方法可以集成jasypt-spring-boot到您的项目中:
- jasypt-spring-boot-starter如果使用@SpringBootApplication或@EnableAutoConfiguration将在整个Spring环境中启用加密属性,只需将该 jar 添加到类路径中即可
- 添加jasypt-spring-boot到类路径并添加@EnableEncryptableProperties到主 config uration类以在整个Spring环境中启用可加密属性
- 添加jasypt-spring-boot到类路径并使用声明单个可加密属性源@EncrytablePropertySource
更新
更新1/8/2019:版本2.1.1版本包括非对称加密
和支持带有IV生成器的JSB96(感谢@melloware !!)
更新7/17/2018:版本2.1.0发行版包括过滤器
更新3/17/2018:已发布支持Spring Boot 2.0.X.RELEASE的2.0.0版。SemVer采用。
2015年7月18日更新:jasypt-spring-boot现在在Maven Central!
配置说明
根据上文提到的三种方式分别进行介绍配置方式:
- 如果Spring Boot应用程序使用@SpringBootApplication或者@EnableAutoConfiguration在整个Spring环境中启用加密属性,那么只需将初始jar依赖项添加到项目中(这意味着任何系统属性,环境属性,命令行参数,application.properties,yaml属性和任何属性)其他自定义属性源可以包含加密属性):
<dependency>
 <groupId>com.github.ulisesbocchio</groupId>
 <artifactId>jasypt-spring-boot-starter</artifactId>
 <version>2.1.1</version>
</dependency>
- 如果您不使用@SpringBootApplication或@EnableAutoConfiguration自动配置注释,则将此依赖项添加到您的项目
<dependency>
 <groupId>com.github.ulisesbocchio</groupId>
 <artifactId>jasypt-spring-boot</artifactId>
 <version>2.1.1</version>
</dependency>
然后添加@EnableEncryptableProperties到Configuration类。例如:
@Configuration
@EnableEncryptableProperties
public class MyApplication {
 ...
}
并且将在整个Spring环境中启用可加密属性(这意味着任何系统属性,环境属性,命令行参数,application.properties,yaml属性和任何其他自定义属性源都可以包含加密属性)
- 如果您不使用@SpringBootApplication或@EnableAutoConfiguration自动配置注释,并且您不希望在整个Spring环境中启用加密属性,那么还有第三种选择。首先将以下依赖项添加到项目中:
<dependency>
 <groupId>com.github.ulisesbocchio</groupId>
 <artifactId>jasypt-spring-boot</artifactId>
 <version>2.0.0</version>
</dependency>
然后@EncryptablePropertySource在配置文件中添加任意数量的注释。就像使用Spring的@PropertySource注释一样。例如:
@Configuration
@EncryptablePropertySource(name = "EncryptedProperties", value = "classpath:encrypted.properties")
public class MyApplication {
 ...
}
更方便的是,还有一个@EncryptablePropertySources注释,可以用来对类型的注释进行分组,@EncryptablePropertySource如下所示:
@Configuration
@EncryptablePropertySources({@EncryptablePropertySource("classpath:encrypted.properties"),
 @EncryptablePropertySource("classpath:encrypted2.properties")})
public class MyApplication {
 ...
}
另请注意,从1.8版开始,@EncryptablePropertySource支持YAML文件。
项目实战
环境准备
- Gradle 4.7+ / Maven3.0+
- JDK 1.8+
- IntelliJ IDEA 2019.2
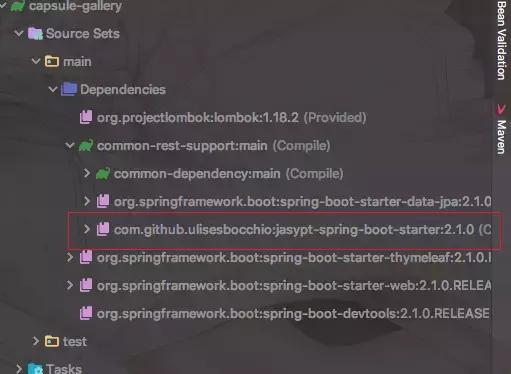
引入关键依赖,对数据库连接的敏感信息进行加密:
.
buildscript {
 repositories {
 maven { url = "" }
 maven { url = "" }
 jcenter()
 }
 dependencies {
 classpath libs["spring-boot-gradle-plugin"]
 }
}
apply plugin: "io.spring.dependency-management"
apply plugin: "org.springframework.boot"
bootJar {
 baseName = 'common-boot-support'
 version = '1.0.0'
}
configurations {
 all*.exclude group: 'javax.persistence',module:'persistence-api'
}
dependencies {
 implementation 'org.springframework.boot:spring-boot-starter-web'
 compile libs["jasypt-spring-boot-starter"]
 runtimeOnly 'org.springframework.boot:spring-boot-devtools'
 testImplementation 'org.springframework.boot:spring-boot-starter-test'
}
注入工具类实例org.jasypt.util.password.PasswordEncryptor
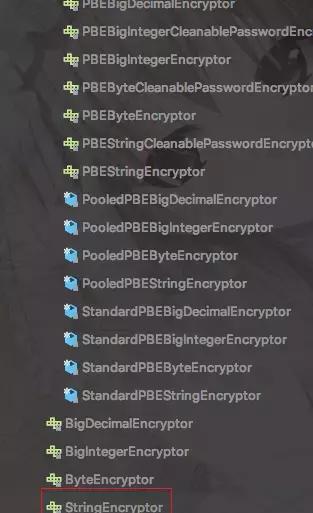
选一种加密实现类即可,比如:
@Configuration
public class SecurityConfiguration {
 @Bean
 public StandardPBEStringEncryptor passwordEncryptor(){
 return new StandardPBEStringEncryptor();
 }
}
yaml 中配置密钥
jasypt:
 encryptor:
 password: xcy
在测试类中注入该实例,编写测试用例获取加密后密文

我们随便定义个属性password添加到yaml中,然后编写接口获取。
password: ENC(2y6fenecYr195Fr38uDxjw==)
此处注意要用ENC()包裹生成的加密后的密码,该规则可以自定义配置
@SpringBootApplication
@ComponentScan("com.example")
@RestController
@RequestMapping("/test")
public class CommonBootSupportApplication {
 @ Resource
 private Environment environment;
 public static void main(String[] args) {
 SpringApplication.run(CommonBootSupportApplication.class);
 }
 @GetMapping("/prop")
 public String getProp(String key){
 return environment.getProperty(key);
 }
}
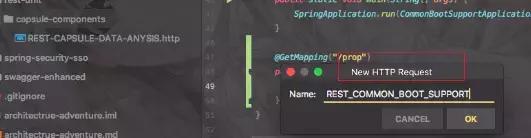
来我们调用接口获取下看看
利用IDEA自带的脚本工具进行测试:
GET
Accept: application/json
###
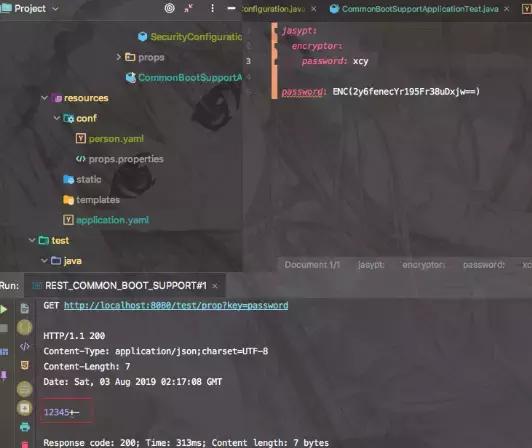
从图中我们可以看出接口获取的password字段已经直接解密了。
密钥安全管理方案
但是有的同学肯定会说,你这个密钥都放在yaml里,别人取到源码自己执行下不就可以知道你密码了,那么前一篇文章《[Spring Boot] 配置文件加载[超详细]》不正为这个做铺垫么,我们只需要将密钥存放到服务器安全目录下,然后从外部读取即可。
以实际项目部署的数据库敏感信息为例,关键配置列出以供参考:
spring:
 datasource:
 username: ENC(0oZozS+SZ4qSex4/gKan/w==)
 password: ENC(EoUYXgHaCxs3+aiBdofIsbYuvdVKVCQZ)
 driver-class-name: com.mysql.cj.jdbc.Driver
 url: ENC(0lvWVTKgrpX2CHRuU1ly+NDOd4lVsVSmJSYDsRXF7n0pmPHQhyKK/MaMq1yC1VWEO8pWlVp5lEYiNq2oBh8NLP4QZGNQLQZH8yUN6gZtsYby5Ztvew66sL6LiDNpvbnr)
 jpa:
 hibernate:
 ddl-auto: update
 show-sql: true
 database-platform: org.hibernate.dialect.MySQL5Dialect
jasypt:
 encryptor:
 bean: capStringEncryptor
然后密钥存储配置解析和配置加载,此处还需注意该jar包读取的资源的是application.yaml下的,所以需要重写下加密方法的生成类
@Configuration
public class SecurityConfiguration {
 @Resource
 private Environment environment;
 @Resource
 private BeanFactory beanFactory;
 @Bean(name = "capStringEncryptor")
 public PBEStringCleanablePasswordEncryptor capStringEncryptor(){
 return CapLazyEncryptor.getSingleton(environment,beanFactory);
 }
}
/*
 * @ProjectName: 编程学习
 * @Copyright: 2019 HangZhou xiazhaoyang Dev, Ltd. All Right Reserved.
 * @address: https:yiyuery.club
 * @date: 2019/5/20 20:57
 * @email: xiazhaoyang@live.com
 * @description: 本内容仅限于编程技术学习使用,转发请注明出处.
 */package com.example.common.spring.security;
import com.example.common.spring.config.CapPropertyPlaceholderConfigurer;
import lombok.extern.slf4j.Slf4j;
import org.jasypt.encryption.StringEncryptor;
import org.jasypt.encryption.pbe.PBEStringCleanablePasswordEncryptor;
import org.jasypt.encryption.pbe.PooledPBEStringEncryptor;
import org.jasypt.encryption.pbe.config.SimpleStringPBEConfig;
import org.springframework.beans.factory.BeanFactory;
import org.springframework.core.env.Environment;
import java.util.Objects;
/**
 * <p>
 * 自定义加密工具生成类
 * 支持外部参数加载
 * </p>
 *
 * @author xiazhaoyang
 * @version v1.0.0
 * @date 2019-07-28 14:13
 * @modificationHistory=========================逻辑或功能性重大变更记录
 * @modify By: {修改人} 2019-07-28
 * @modify reason: {方法名}:{原因}
 * ...
 */@Slf4j
public class CapLazyEncryptor implements StringEncryptor {
 private static PBEStringCleanablePasswordEncryptor singleton;
 private static CapPropertyPlaceholderConfigurer configurer;
 public static synchronized PBEStringCleanablePasswordEncryptor getSingleton(final Environment e, final BeanFactory bf) {
 if (Objects.isNull(singleton)) {
 singleton = createDefault(e, bf);
 }
 return singleton;
 }
 private CapLazyEncryptor() {
 }
 private static PBEStringCleanablePasswordEncryptor createDefault(Environment e, BeanFactory bf) {
 configurer = bf.getBean(CapPropertyPlaceholderConfigurer.class);
 PooledPBEStringEncryptor encryptor = new PooledPBEStringEncryptor();
 SimpleStringPBEConfig config = new SimpleStringPBEConfig();
 //密钥获取位置代码修改
 config.setPassword(getRequiredProperty(e, "jasypt.encryptor.password"));
 config.setAlgorithm(getProperty(e, "jasypt.encryptor.algorithm", "PBEWithMD5AndDES"));
 config.setKeyObtentionIterations(getProperty(e, "jasypt.encryptor.keyObtentionIterations", "1000"));
 config.setPoolSize(getProperty(e, "jasypt.encryptor.poolSize", "1"));
 config.setProviderName(getProperty(e, "jasypt.encryptor.providerName", null));
 config.setProviderClassName(getProperty(e, "jasypt.encryptor.providerClassName", null));
 config.setSaltGeneratorClassName(getProperty(e, "jasypt.encryptor.saltGeneratorClassname", "org.jasypt.salt.RandomSaltGenerator"));
 config.setStringOutputType(getProperty(e, "jasypt.encryptor.stringOutputType", "base64"));
 encryptor.setConfig(config);
 return encryptor;
 }
 private static String getProperty(Environment environment, String key, String defaultValue) {
 if (!propertyExists(environment, key)) {
 log.info("Encryptor config not found for property {}, using default value: {}", key, defaultValue);
 }
 String property = environment.getProperty(key);
 return Objects.isNull(property) ? configurer.getCapProps().getProperty(key, defaultValue) : property;
 }
 private static boolean propertyExists(Environment environment, String key) {
 return environment.getProperty(key) != null || configurer.getCapProps().getProperty(key) != null;
 }
 private static String getRequiredProperty(Environment environment, String key) {
 if (!propertyExists(environment, key)) {
 throw new IllegalStateException(String.format("Required Encryption configuration property missing: %s", key));
 }
 String property = environment.getProperty(key);
 //密钥获取位置代码修改,取不到的话从外部配置读取
 return Objects.isNull(property) ? configurer.getCapProps().getProperty(key) : property;
 }
 /**
 * Encrypt the input message
 *
 * @param message the message to be encrypted
 * @return the result of encryption
 */ @Override
 public String encrypt(String message) {
 return singleton.encrypt(message);
 }
 /**
 * Decrypt an encrypted message
 *
 * @param encryptedMessage the encrypted message to be decrypted
 * @return the result of decryption
 */ @Override
 public String decrypt(String encryptedMessage) {
 return singleton.decrypt(encryptedMessage);
 }
}
当然,外部配置文件的加载配置少不了:
/**
 * 加载外部配置文件
 * @return
 */@Bean
@Primary
public CapPropertyPlaceholderConfigurer propertyConfigurer(){
 CapPropertyPlaceholderConfigurer configurer = new CapPropertyPlaceholderConfigurer();
 YamlPropertiesFactoryBean yaml = new YamlPropertiesFactoryBean();
 //此处替换为自身项目安全敏感信息存放目录即可
 yaml.setResources(new FileSystemResource(Paths.get(RunnerMonitor.getEnvConfPath().getConfPath(), "config.yaml").toFile()));
 Properties props = new Properties();
 props.putAll(Objects.requireNonNull(yaml.getObject()));
 configurer.setProperties(props);
 configurer.setFileEncoding(BasicConstants.DEFAULT_ENCODING);
 return configurer;
}
好了,心动不如行动,想优雅得给配置中的敏感信息加密就快来实战吧。
总结
本文介绍了一款集成Spring的配置文件优雅加密的工具,并提供了一种外部密钥存储的加密方案。其实除了本文介绍的,该工具的能力还远远不止这些,更多的详见REFERENCES中的GITHUB链接哦!
REFERENCES
- GitHub 资源
- idea中HTTP测试支持
更多
扫码关注架构探险之道,回复文章标题,获取本文相关源码和资源链接

知识星球(扫码加入获取历史源码和文章资源链接)