什么是 J.U.C ?
它是 Java java .util.concurrent 包的缩写,从包的名称就可以看出,它应该主要提供一些 线程 同步 的类。
这个包下面的类提供了多种实现线程同步的方式,还有诸如 Executor 、Callable 、Future 、ExecutorService 等耳熟能详的接口。
一道面试题
实现一个容器,提供两个方法 add ,size ,实现两个线程:
线程1,向容器中添加 10 个元素到容器中;
线程2,实时监控容器元素个数,当元素个数到5个时,线程2给出提示并结束。
看到这道题,我首先想到的是 synchronized + wait/notify ,具体实现为:
 public class NiubilityContainer<T> {
     private  List<T> list = new ArrayList<>();

    /**
     * add方法,借用list的add方法相容器添加元素
     * @param t 待添加的元素
     */
    public  void  add(T t) {
        list.add(t);
    }

    /**
     * 借助list的size方法返回当前容器的元素个数
     * @return int 容器元素个数
     */
    public int size(){
        return list.size();
    }

    public  static  void main(String[] args) {
        NiubilityContainer c = new NiubilityContainer();
        //定义一个需要上锁的对象,线程持有该对象的锁才能执行
        final Object  lock  = new Object();

        //启动一个监控线程
        new Thread(() -> {
            System.out.println("监控线程启动...");
            synchronized (lock) {
                //只要元素个数不为5,就调用wait方法让出CPU
                if (c.size() != 5) {
                    try {
                        lock.wait();
                    } catch (Interrupted Exception  e) {
                        e.printStackTrace();
                    }
                }
                //通知添加元素的线程继续执行
                lock.notify();
            }
            System.out.println("容器元素个数为5,监控线程退出!");
        }, "MonitorThread").start();

        //启动一个添加元素的线程
        new Thread(() -> {
            System.out.println("添加元素线程启动...");
            synchronized (lock) {
                for (int i = 0; i < 10; i++) {
                    c.add(i);
                    System.out.println("添加元素线程 add " + i);

                    if (c.size() == 5) {
                        //先唤醒当前线程
                        lock.notify();
                        try {
                            //释放锁,使得监控线程得以执行
                            lock.wait();
                        } catch (InterruptedException e) {
                            e.printStackTrace();
                        }
                    }
                }
            }
        }, "AddThread").start();
    }
}
复制代码
运行结果:
 监控线程启动...
添加元素线程启动...
添加元素线程 add 0
添加元素线程 add 1
添加元素线程 add 2
添加元素线程 add 3
添加元素线程 add 4
容器元素个数为5,监控线程退出!
添加元素线程 add 5
添加元素线程 add 6
添加元素线程 add 7
添加元素线程 add 8
添加元素线程 add 9
复制代码
这种方法要注意 wait 和 notify 的顺序,而且他们都必须放在 synchronized 内。
CyclicBarrier
CyclicBarrier的官网描述:
转译总结一下,大概就是这个意思:
它允许一组线程互相等待,直到到达某个公共屏障点 (Common Barrier Point)。在涉及一组固定大小的线程的程序中,这些线程必须不时地互相等待,此时 CyclicBarrier 很有用。因为该 Barrier 在释放等待线程后可以重用,所以称它为循环( Cyclic ) 的屏障( Barrier ) 。
构造函数
 /**
 * 创建一个新的 CyclicBarrier,它将在给定数量的参与者(线程)处于等待状态时启动,并在启动 barrier 时执行给定的屏障操作,该操作由最后一个进入 barrier 的线程执行。
 *
 * @param parties 拦截线程的总数量
 * @param barrierAction 为 CyclicBarrier 接收的 Runnable 命令,用于在线程到达屏障时,优先执行
 * @throws IllegalArgumentException 当拦截线程数量小于1时抛出异常
 */
public CyclicBarrier(int parties, Runnable barrierAction) {
    if (parties <= 0) throw new IllegalArgumentException();
    this.parties = parties;
    this.count = parties;
    this.barrierCommand = barrierAction;
}

/**
 * 创建一个新的 CyclicBarrier,它将在给定数量的参与者(线程)处于等待状态时启动,但它不会在启动 barrier 时执行预定义的操作。
 * @param parties 表示拦截线程的总数量。
 * @throws IllegalArgumentException 当拦截线程数量小于1时抛出异常
 */
public CyclicBarrier(int parties) {
    this(parties, null);
}
复制代码
在 CyclicBarrier 中最重要的方法莫过于 await() 方法,在所有参与者 parties 都已经在此 barrier 上调用 await 方法之前,将一直等待。
我举个栗子,一个小伙子( 线程1 )骑自行车到了一个红绿灯路口,红灯( Barrier )亮了,他需要停下来等待( await );一个白富美( 线程2 )开着 兰博基尼 也路过此路口,恰好此时绿灯亮了( 拦截的最后一个线程到达barrier )。小伙子和白富美确认过眼神后,过绿灯可以去干别的事( barrierAction )了。
基于以上对 CyclicBarrier 的了解,我们要强行使用 CyclicBarrier 来解决开始的那道题(==只需要实现效果即可==),怎么办?
我的思路是,我只定义一个需要拦截的线程,让它去做添加元素的操作,当元素添加到5个之后,await,执行一个Runnable,也就是barrierAction,用来提示已经有5个元素了。
具体实现:
 public class  Test CyclicBarrier {

    static CyclicBarrier barrier ;
    static List lists = new LinkedList();


    static void add(Object o) {
        lists.add(o);
    }

    static int size() {
        return lists.size();
    }

    static class ReactThread implements Runnable {
        @Override
        public void run() {
            System.out.println("============== 元素个数已到达5,监控退出!=============");
        }
    }

    static class AddThread  extends  Thread {
        @Override
        public void run() {
            for (int i = 1; i < 11; i++) {
                add(new Object());
                System.out.println("添加元素线程 add 第" + i + "个元素");

                if (size() == 5) {
                    try {
                        barrier.await();
                    } catch (InterruptedException e) {
                        e.printStackTrace();
                    } catch (BrokenBarrierException e) {
                        e.printStackTrace();
                    }
                }
            }
        }
    }

    public static void main(String[] args) {
        barrier = new CyclicBarrier(1, new ReactThread());
        new AddThread().start();
    }
}
复制代码
执行结果:
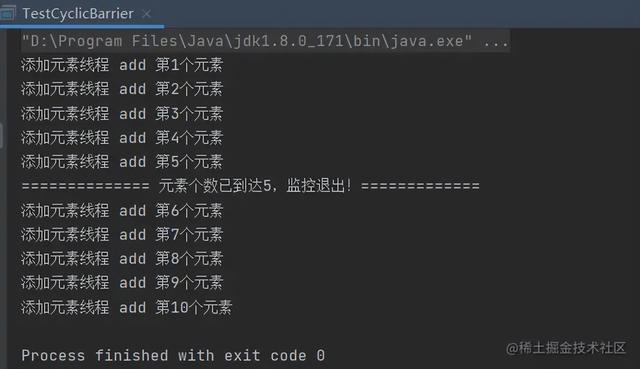
CountDownLatch
CountDownLatch的API描述:
A synchronization aid that allows one or more threads to wait until a set of operations being performed in other threads completes.
一种同步机制,它允许一个或多个线程等待,直到在其他线程中执行的一组操作完成为止。
A CountDownLatch is initialized with a given count. The await methods block until the current count reaches zero due to invocations of the countDown() method, after which all waiting threads are released and any subsequent invocations of await return immediately. This is a one-shot phenomenon — the count cannot be reset. If you need a version that resets the count, consider using a CyclicBarrier.
用给定的计数初始化 CountDownLatch。由于调用了 countDown() 方法,所以在当前计数到达零之前,await() 方法会一直受阻塞。之后,会释放所有等待的线程,await() 的所有后续调用都将立即返回。这种现象只出现一次——计数无法被重置。如果需要重置计数,请考虑使用 CyclicBarrier 。
CountDownLatch 是通过一个 计数器 来实现的,当我们在 new 一个 CountDownLatch 对象的时候,需要带入该计数器值,该值就表示了线程的数量。
每当一个线程完成自己的任务后,计数器的值就会减 1 。 当计数器的值变为0时,就表示所有的线程均已经完成了任务,然后就可以恢复等待的线程继续执行了。
再次强行使用 CountDownLatch 来解决一下开始的那道题,尝试代码如下:
 public class TestCountDownLatch {

    static CountDownLatch latch = new CountDownLatch(1);
    static List lists = new LinkedList();


    static void add(Object o) {
        lists.add(o);
    }

    static int size() {
        return lists.size();
    }

    static class ReactThread extends Thread {
        @Override
        public void run() {
            try {
                latch.await();
            } catch (InterruptedException e) {
                e.printStackTrace();
            }
            System.out.println("============== 元素个数已到达5,监控退出!=============");
        }
    }

    static class AddThread extends Thread {
        @Override
        public void run() {
            for (int i = 1; i < 11; i++) {
                add(new Object());
                System.out.println("添加元素线程 add 第" + i + "个元素");

                if (size() == 5) {
                    latch.countDown();
                }

                //(监控线程已经准备打印退出了,添加元素的线程还在继续添加)
                //加个睡眠时间,方便观察,因为打印的动作也需要耗时
                try {
                    TimeUnit.MILLISECONDS.sleep(100);
                } catch (InterruptedException e) {
                    e.printStackTrace();
                }
            }
        }
    }

    public static void main(String[] args) {
        new ReactThread().start();
        new AddThread().start();
    }
}
复制代码
运行结果也能达到预期:
 添加元素线程 add 第1个元素
添加元素线程 add 第2个元素
添加元素线程 add 第3个元素
添加元素线程 add 第4个元素
添加元素线程 add 第5个元素
============== 元素个数已到达5,监控退出!=============
添加元素线程 add 第6个元素
添加元素线程 add 第7个元素
添加元素线程 add 第8个元素
添加元素线程 add 第9个元素
添加元素线程 add 第10个元素
复制代码
CountDownLatch的关键类图:
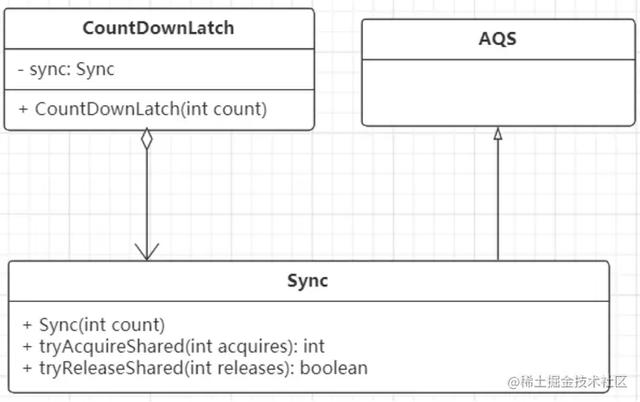
通过这个图,我们试着看一下它的实现源码。
- 构造方法 :
 /**
 * 构造一个用给定计数初始化的 CountDownLatch
 *
 * @param count the  number  of times {@link #countDown} must be invoked
 *        before threads can pass through {@link #await}
 * @throws IllegalArgumentException if {@code count} is negative
 */
public CountDownLatch(int count) {
    if (count < 0) throw new IllegalArgumentException("count < 0");
    this.sync = new Sync(count);
}
复制代码
- Sync
Sync 是 CountDownLatch 的一个内部类,它实现了 AbstractQueuedSynchronizer ( AQS )。
 /**
 * Synchronization control For CountDownLatch.
 * Uses AQS state to represent count.
 */
private static final class Sync extends AbstractQueuedSynchronizer {
    private static final long serialVersionUID = 4982264981922014374L;

    Sync(int count) {
        setState(count);
    }

    //获取同步状态
    int getCount() {
        return getState();
    }

    //获取同步状态
    protected int tryAcquireShared(int acquires) {
        return (getState() == 0) ? 1 : -1;
    }

    //释放同步状态
    protected boolean tryReleaseShared(int releases) {
        // Decrement count; signal when transition to zero
        for (;;) {
            int c = getState();
            if (c == 0)
                return false;
            int nextc = c-1;
            if (compareAndSetState(c, nextc))
                return nextc == 0;
        }
    }
}
复制代码
由此可见,CountDownLatch 内部是采用 共享锁 来实现的。
- await方法
 public void await() throws InterruptedException {
    sync.acquireSharedInterruptibly(1);
}
复制代码
acquireSharedInterruptibly 这个方法在其父类 AQS 里,来看一下:
 // java.util.concurrent.locks.AbstractQueuedSynchronizer.java
public final void acquireSharedInterruptibly(int arg)
        throws InterruptedException {
    if (Thread.interrupted())
        throw new InterruptedException();
    if (tryAcquireShared(arg) < 0)
        doAcquireSharedInterruptibly(arg);
}

//...

private void doAcquireSharedInterruptibly(int arg)
    throws InterruptedException {
    final Node node = addWaiter(Node.SHARED);
    boolean failed = true;
    try {
        for (;;) {
            final Node p = node.predecessor();
            if (p == head) {
                int r = tryAcquireShared(arg);
                if (r >= 0) {
                    setHeadAndPropagate(node, r);
                    p.next = null; // help GC
                    failed = false;
                    return;
                }
            }
            if (shouldParkAfterFailedAcquire(p, node) &&
                parkAndCheckInterrupt())
                throw new InterruptedException();
        }
    } finally {
        if (failed)
            cancelAcquire(node);
    }
}
复制代码
当进入到 doAcquireSharedInterruptibly 方法后,它会自旋 for (;;) ,一直尝试去获取同步状态。
- countDown
 public void countDown() {
    sync.releaseShared(1);
}
复制代码
这里调用的 releaseShared 也是父类 AQS 的方法:
 // AQS
public final boolean releaseShared(int arg) {
    if (tryReleaseShared(arg)) {
        doReleaseShared();
        return true;
    }
    return false;
}
复制代码
 // CountDownLatch内部类Sync重写tryReleaseShared方法
protected boolean tryReleaseShared(int releases) {
    // Decrement count; signal when transition to zero
    for (;;) {
        //获取锁状态
        int c = getState();
        //c == 0 直接返回,释放锁成功
        if (c == 0)
            return false;
        int nextc = c-1;
        //比较并替换CAS,更新锁状态(计数器)
        if (compareAndSetState(c, nextc))
            return nextc == 0;
    }
}
复制代码
Semaphore
Semaphore 也是并发工具类之一,按惯例,我们来看一下它的API描述:
计数信号量。从概念上讲,信号量维护了一个许可集。
如有必要,在许可可用前会阻塞每一个 acquire,然后再获取该许可。 每个 release 添加一个许可,从而可能释放一个正在阻塞的获取者。 但是,不使用实际的许可对象,Semaphore 只对可用许可的号码进行计数,并采取相应的行动。
信号量通常用于限制线程数量,使其无法访问某些(物理或逻辑)资源,例如 API 上举了一个例子,通过 Semaphore 来控制资源池中数据的访问:
 class Pool {
    private static final int MAX_AVAILABLE = 100;
    private final Semaphore available = new Semaphore(MAX_AVAILABLE, true);

    public Object getItem() throws InterruptedException {
     available.acquire();
     return getNextAvailableItem();
    }

    public void putItem(Object x) {
     if (markAsUnused(x))
       available.release();
    }

    // Not a particularly efficient data structure; just for demo

    protected Object[] items = ... whatever kinds of items being managed
    protected boolean[] used = new boolean[MAX_AVAILABLE];

    protected synchronized Object getNextAvailableItem() {
     for (int i = 0; i < MAX_AVAILABLE; ++i) {
       if (!used[i]) {
          used[i] = true;
          return items[i];
       }
     }
     return null; // not reached
    }

    protected synchronized boolean markAsUnused(Object item) {
     for (int i = 0; i < MAX_AVAILABLE; ++i) {
       if (item == items[i]) {
          if (used[i]) {
            used[i] = false;
            return true;
          } else
            return false;
       }
     }
     return false;
    }
}
复制代码
从中我们可以领会到,Semaphore 的关键方法就是 acquire() 和 release() 。
- acquire
获取信号量的方法。
- release
释放信号量的方法。
再再次强行使用 Semaphore 来完成我们之前那道题,上代码:
 public class TestSemaphore {
    static List lists = new LinkedList();

    static void add(Object o) {
        lists.add(o);
    }

    static int size() {
        return lists.size();
    }

    static Thread t1 = null, t2 = null;

    public static void main(String[] args) {
        //定义一个只能有1个线程能获得许可的信号量
        Semaphore semaphore = new Semaphore(1);

        t1 = new Thread(() -> {
            try {
                //尝试获得许可
                semaphore.acquire();
                //添加5个元素之后,释放锁
                for (int i = 0; i < 5; i++) {
                    add(new Object());
                    System.out.println("线程t1 已经 add " + size() + " 个元素");
                }
                //释放锁,等待t2打印退出
                semaphore.release();

                //需要让t2执行
                t2.start();
                t2.join();

                //t2退出后,继续获得许可,添加元素
                semaphore.acquire();
                for (int i = 0; i < 5; i++) {
                    add(new Object());
                    System.out.println("线程t1 已经 add " + size() + " 个元素");
                }
            } catch (InterruptedException e) {
                e.printStackTrace();
            }
        });

        t2 = new Thread(() -> {
            try {
                //首先获得许可
                semaphore.acquire();
                //打印 退出
                System.out.println("------- 线程t2已知容器中有5个元素了,t2退出。-------");
                //释放锁,等t1接着添加剩余的元素
                semaphore.release();
            } catch (InterruptedException e) {
                e.printStackTrace();
            }
        });

        t1.start();
    }
}
复制代码
执行结果:
 线程t1 已经 add 1 个元素
线程t1 已经 add 2 个元素
线程t1 已经 add 3 个元素
线程t1 已经 add 4 个元素
线程t1 已经 add 5 个元素
------- 线程t2已知容器中有5个元素了,t2退出。-------
线程t1 已经 add 6 个元素
线程t1 已经 add 7 个元素
线程t1 已经 add 8 个元素
线程t1 已经 add 9 个元素
线程t1 已经 add 10 个元素
复制代码
小结
这次从一道线程同步的题目,切入 Java 并发与线程同步新机制,使用了 CyclicBarrire , CountDownLatch 和 Semaphore 实现了预期的效果。
其实还有像 Exchanger , Phaser 等等并发工具类没有介绍到,他们的底层实现都是继承了 AQS 这个强大的类。
关于 AQS 的文章蓄力中…

作者:行百里er
链接:


