
拦截器
你已经学到,在 hibernate 中,一个对象将被创建和保持。一旦对象已经被修改,它必须被保存到数据库里。这个过程持续直到下一次对象被需要,它将被从持久的存储中加载。
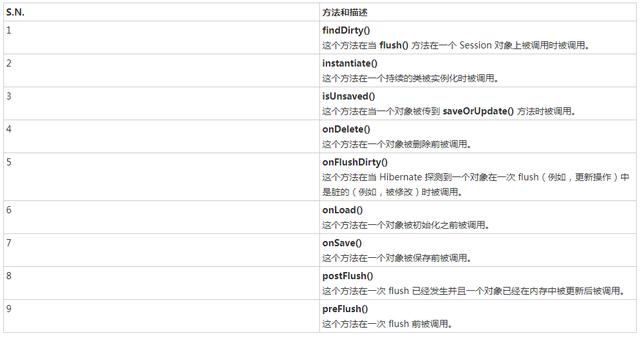
因此一个对象通过它生命周期中的不同阶段,并且 Interceptor 接口 提供了在不同阶段能被调用来进行一些所需要的任务的方法。这些方法是从会话到应用程序的回调函数,允许应用程序检查或操作一个持续对象的属性,在它被保存,更新,删除或上传之前。以下是在 Interceptor 接口中可用的所有方法的列表。
Hibernate 拦截器给予了我们一个对象如何应用到应用程序和数据库的总控制。
如何使用拦截器?
为了创建一个拦截器你可以直接实现 Interceptor 类或者继承 EmptyInterceptor 类。以下是简单的使用 Hibernate 拦截器功能的步骤。
创建拦截器
我们将在例子中继承 EmptyInterceptor,当 Employee 对象被创建和更新时拦截器的方法将自动被调用。你可以根据你的需求实现更多的方法。
import java.io.Serializable;
import java.util.Date;
import java.util.Iterator;
import org.hibernate.EmptyInterceptor;
import org.hibernate.Transaction;
import org.hibernate.type.Type;
public class MyInterceptor extends EmptyInterceptor {
 private int updates;
 private int creates;
 private int loads;
 public void onDelete(Object entity,
 Serializable id,
 Object[] state,
 String[] propertyNames,
 Type[] types) {
 // do nothing
 }
 // This method is called when Employee object gets updated.
 public boolean onFlushDirty(Object entity,
 Serializable id,
 Object[] currentState,
 Object[] previousState,
 String[] propertyNames,
 Type[] types) {
 if ( entity instanceof Employee ) {
 System.out.println("Update Operation");
 return true;
 }
 return false;
 }
 public boolean onLoad(Object entity,
 Serializable id,
 Object[] state,
 String[] propertyNames,
 Type[] types) {
 // do nothing
 return true;
 }
 // This method is called when Employee object gets created.
 public boolean onSave(Object entity,
 Serializable id,
 Object[] state,
 String[] propertyNames,
 Type[] types) {
 if ( entity instanceof Employee ) {
 System.out.println("Create Operation");
 return true;
 }
 return false;
 }
 //called before commit into database
 public void preFlush(Iterator  iterator ) {
 System.out.println("preFlush");
 }
 //called after committed into database
 public void postFlush(Iterator iterator) {
 System.out.println("postFlush");
 }
}
创建 POJO 类
现在让我们稍微修改我们的第一个例子,我们使用 EMPLOYEE 表单和 Employee 类:
public class Employee {
 private int id;
 private String firstName;
 private String lastName;
 private int salary;
 public Employee() {}
 public Employee(String fname, String lname, int salary) {
 this.firstName = fname;
 this.lastName = lname;
 this.salary = salary;
 }
 public int getId() {
 return id;
 }
 public void setId( int id ) {
 this.id = id;
 }
 public String getFirstName() {
 return firstName;
 }
 public void setFirstName( String first_name ) {
 this.firstName = first_name;
 }
 public String getLastName() {
 return lastName;
 }
 public void setLastName( String last_name ) {
 this.lastName = last_name;
 }
 public int getSalary() {
 return salary;
 }
 public void setSalary( int salary ) {
 this.salary = salary;
 }
}
创建数据库表
第二步将是在你的数据库中创建表。一张表对应每个你提供持久性的对象。考虑以上的对象需要被存储和检索到以下的 RDBM 表中:
create table EMPLOYEE (
 id INT NOT NULL auto_increment,
 first_name VARCHAR(20) default NULL,
 last_name VARCHAR(20) default NULL,
 salary INT default NULL,
 PRIMARY KEY (id)
);
创建 Mapping 配置文件
这个步骤是来创建一个指导 Hibernate 如何将定义的类或者多个类映射到数据库表单中的映射文件。
<?xml version="1.0" encoding="utf-8"?>
<!DOCTYPE hibernate-mapping PUBLIC
 "-//Hibernate/Hibernate Mapping DTD//EN"
 "">
<hibernate-mapping>
 <class name="Employee" table="EMPLOYEE">
 <meta attribute="class-description">
 This class contains the employee detail.
 </meta>
 <id name="id" type="int" column="id">
 <generator class="native"/>
 </id>
 <property name="firstName" column="first_name" type="string"/>
 <property name="lastName" column="last_name" type="string"/>
 <property name="salary" column="salary" type="int"/>
 </class>
</hibernate-mapping>
创建 Application 类
最后,我们将用 main() 创建 application 类来运行应用程序。这里应该注意当创建 session 对象时我们使用 Interceptor 类作为参数。
import java.util.List;
import java.util.Date;
import java.util.Iterator;
import org.hibernate.HibernateException;
import org.hibernate.Session;
import org.hibernate.Transaction;
import org.hibernate.Session factory ;
import org.hibernate.cfg.Configuration;
public class ManageEmployee {
 private static SessionFactory factory;
 public static void main(String[] args) {
 try{
 factory = new Configuration().configure().buildSessionFactory();
 }catch (Throwable ex) {
 System.err.println("Failed to create sessionFactory object." + ex);
 throw new ExceptionInInitializerError(ex);
 }
 ManageEmployee ME = new ManageEmployee();
 /* Add few employee records in database */ Integer empID1 = ME.addEmployee("Zara", "Ali", 1000);
 Integer empID2 = ME.addEmployee("Daisy", " Das ", 5000);
 Integer empID3 = ME.addEmployee("John", "Paul", 10000);
 /* List down all the employees */ ME.listEmployees();
 /* Update employee's records */ ME.updateEmployee(empID1, 5000);
 /* Delete an employee from the database */ ME.deleteEmployee(empID2);
 /* List down new list of the employees */ ME.listEmployees();
 }
 /* Method to CREATE an employee in the database */ public Integer addEmployee(String fname, String lname, int salary){
 Session session = factory.openSession( new MyInterceptor() );
 Transaction tx = null;
 Integer employeeID = null;
 try{
 tx = session.beginTransaction();
 Employee employee = new Employee(fname, lname, salary);
 employeeID = (Integer) session.save(employee);
 tx.commit();
 }catch (HibernateException e) {
 if (tx!=null) tx.rollback();
 e.printStackTrace();
 }finally {
 session. close ();
 }
 return employeeID;
 }
 /* Method to READ all the employees */ public void listEmployees( ){
 Session session = factory.openSession( new MyInterceptor() );
 Transaction tx = null;
 try{
 tx = session.beginTransaction();
 List employees = session.createQuery("FROM Employee").list();
 for (Iterator iterator =
 employees.iterator(); iterator.hasNext();){
 Employee employee = (Employee) iterator.next();
 System.out.print("First Name: " + employee.getFirstName());
 System.out.print(" Last Name: " + employee.getLastName());
 System.out.println(" Salary: " + employee.getSalary());
 }
 tx.commit();
 }catch (HibernateException e) {
 if (tx!=null) tx.rollback();
 e.printStackTrace();
 }finally {
 session.close();
 }
 }
 /* Method to UPDATE salary for an employee */ public void updateEmployee(Integer EmployeeID, int salary ){
 Session session = factory.openSession( new MyInterceptor() );
 Transaction tx = null;
 try{
 tx = session.beginTransaction();
 Employee employee =
 (Employee)session.get(Employee.class, EmployeeID);
 employee.setSalary( salary );
 session.update(employee);
 tx.commit();
 }catch (HibernateException e) {
 if (tx!=null) tx.rollback();
 e.printStackTrace();
 }finally {
 session.close();
 }
 }
 /* Method to DELETE an employee from the records */ public void deleteEmployee(Integer EmployeeID){
 Session session = factory.openSession( new MyInterceptor() );
 Transaction tx = null;
 try{
 tx = session.beginTransaction();
 Employee employee =
 (Employee)session.get(Employee.class, EmployeeID);
 session.delete(employee);
 tx.commit();
 }catch (HibernateException e) {
 if (tx!=null) tx.rollback();
 e.printStackTrace();
 }finally {
 session.close();
 }
 }
}
编译和执行
这里是编译和运行上面提及的应用程序的步骤。确保你已经在处理编译和执行前正确设置了 PATH 和 CLASSPATH。
- 创建在 configuration 章节中解释的 hibernate.cfg.xml 配置文件。
- 创建如上所示的 Employee.hbm.xml 映射文件。
- 创建如上所示的 Employee.java 源文件 并编译。
- 创建如上所示的 MyInterceptor.java 源文件并编译。
- 创建如上所示的 ManageEmployee.java 源文件并编译。
- 执行 ManageEmployee 来运行程序。
你将得到以下结果,而且记录将在 EMPLOYEE 表单中被创建。
$java ManageEmployee
.......VARIOUS LOG MESSAGES WILL DISPLAY HERE........
Create Operation
preFlush
postFlush
Create Operation
preFlush
postFlush
Create Operation
preFlush
postFlush
First Name: Zara Last Name: Ali Salary: 1000
First Name: Daisy Last Name: Das Salary: 5000
First Name: John Last Name: Paul Salary: 10000
preFlush
postFlush
preFlush
Update Operation
postFlush
preFlush
postFlush
First Name: Zara Last Name: Ali Salary: 5000
First Name: John Last Name: Paul Salary: 10000
preFlush
postFlush
如果你检查你的 EMPLOYEE 表单,它应该有如下结果:
mysql> select * from EMPLOYEE;
+----+------------+-----------+--------+
| id | first_name | last_name | salary |
+----+------------+-----------+--------+
| 29 | Zara | Ali | 5000 |
| 31 | John | Paul | 10000 |
+----+------------+-----------+--------+
2 rows in set (0.00 sec
mysql>


