背景
随着App的快速发展,在功能、内容丰富的同时不可避免的会引入很多第三方工具库,例如友盟、支付组件、视频组件、IM即时通讯组件等,导致App首次启动的时候,时间较长,用户体验差,用户流失甚至弃用。
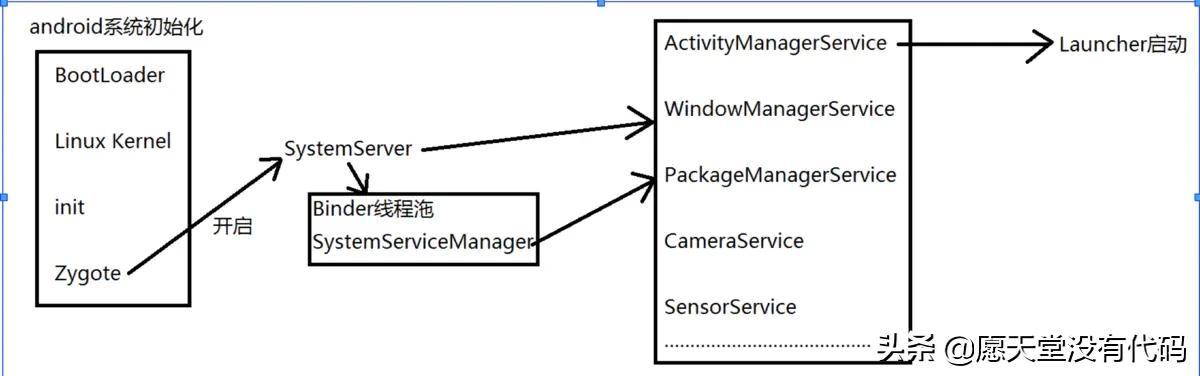
系统启动简述
1.打开电源 引导芯片代码加载引导程序Boot Loader到RAM中去执行
2.Boot Loader把操作系统拉起来
3. Linux 内核启动开始系统设置,找到一个init.rc文件启动初始化进程
4.init进程初始化和启动属性服务,之后开启Zygote进程
5.Zygote开始创建 JVM 并注册 JNI 方法,开启SystemServer
6.启动Binder线程池和SystemServiceManager,并启动各种服务
7.AMS启动Launcher
App启动方式
App启动方式主要分为三种,冷启动、热启动、温启动
1.1:冷启动
冷启动:app没有启动或者进程被杀死后,系统不存在该app进程。 冷启动流程指app启动全过程,包括创建app进程、加载资源、启动Main Thread、初始化SplashActivtiy等
1.2:热启动
热启动:app处于后台状态未被杀死,系统只是把app从后台带到前台,展示给用户
1.3:温启动
介于二者之间,一般有两种情况:
1.用户点击back键退出,又重新启动;
2.用户退出app后,在onCreat()中恢复之前用onSaveInstanceState()中保存的状态;
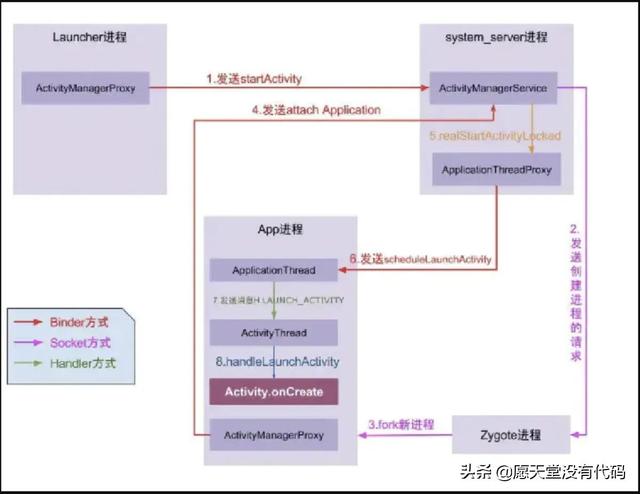
App启动流程简述
以冷启动为例
1.当用户点击app Icon,Launcher进程采用Binder IPC方式向system_server发出startActivity请求
2.system_server接收到请求后,向zygote进程发起创建App进程的请求
3.Zygote进程孵化出新的子进程,即App进程
4.App进程通过Binder IPC方式向system_server发出attachApplication请求
5.system_server接收到请求后,做一系列准备工作,通过Binder IPC向App进程发送scheduleLaunchActivity的请求
6.App进程的binder线程( Activity Thread)在收到请求后,通过handler向主线程发送LAUNCH_ACTIVITY消息
7.主线程在收到message后,通过反射的方式创建相关的Activity,并调用Activity的onCreat等方法
8.至此,app便正式启动,正式进入Activity的 生命周期 ,执行完渲染完便可以看见App的主界面。
黑白屏优化
1.概述
android 中的黑白屏指的是在点击app icon到主页界面UI这段时间所出现的白屏或者黑屏现象 黑白屏优化是一种伪优化,只是为了用户使用体验舒适一些。
2.解决办法:
1.在自己的 <style name=”AppTheme” parent=”Theme.AppCompat.Light”> 中加入windowsbackground
2.设置windowbackground为透明的 <item name=”android:windowIsTranslucent”> true </item>
3.以上这2种方法会有个问题,所有的activity启动都会显示,需要单独做成一个主题
 <pre spellcheck="false" class="md-fences md-end-block ty-contain-cm modeLoaded" lang="java" cid="n54" mdtype="fences" style="box-sizing: border-box; overflow: visible; font-family: var(--monospace); font-size: 0.9em; display: block; break-inside: avoid; text-align: left; white-space: normal; background-image: inherit; background-position: inherit; background-size: inherit; background-repeat: inherit; background-attachment: inherit; background-origin: inherit; background-clip: inherit; background-color: rgb(248, 248, 248); position: relative !important; border: 1px solid rgb(231, 234, 237); border-radius: 3px;  padding : 8px 4px 6px; margin-bottom: 15px;  margin -top: 15px; width: inherit; color: rgb(51, 51, 51); font-style: normal; font-variant-ligatures: normal; font-variant-caps: normal; font-weight: 400; letter-spacing: normal; orphans: 2; text-indent: 0px; text-transform: none; widows: 2; word-spacing: 0px; -webkit-text-stroke-width: 0px;  text-decoration -style: initial; text-decoration-color: initial;"><style name="AppTheme.Launcher">
 <item name="android:windowBackground">@drawable/launch_layout</item>
 <item name="android:windowFullscreen">true</item>
 <item name="android:windowNoTitle">true</item>
 <item name="android:windowContentOverlay">@null</item>
 </style></pre>
再在功能清单中的单独activity下设置
 <pre spellcheck="false" class="md-fences md-end-block ty-contain-cm modeLoaded" lang="java" cid="n57" mdtype="fences" style="box-sizing: border-box; overflow: visible; font-family: var(--monospace); font-size: 0.9em; display: block; break-inside: avoid; text-align: left; white-space: normal; background-image: inherit; background-position: inherit; background-size: inherit; background-repeat: inherit; background-attachment: inherit; background-origin: inherit; background-clip: inherit; background-color: rgb(248, 248, 248); position: relative !important; border: 1px solid rgb(231, 234, 237); border-radius: 3px; padding: 8px 4px 6px; margin-bottom: 15px; margin-top: 15px; width: inherit; color: rgb(51, 51, 51); font-style: normal; font-variant-ligatures: normal; font-variant-caps: normal; font-weight: 400; letter-spacing: normal; orphans: 2; text-indent: 0px; text-transform: none; widows: 2; word-spacing: 0px; -webkit-text-stroke-width: 0px; text-decoration-style: initial; text-decoration-color: initial;"><activity
 android:theme="@style/AppTheme.Launcher"
/></pre>
然后在APP欢迎页(第一页)的onCreate()super前添加代码如下
<pre spellcheck="false" class="md-fences md-end-block ty-contain-cm modeLoaded" lang="java" cid="n59" mdtype="fences" style="box-sizing: border-box; overflow: visible; font-family: var(--monospace); font-size: 0.9em; display: block; break-inside: avoid; text-align: left; white-space: normal; background-image: inherit; background-position: inherit; background-size: inherit; background-repeat: inherit; background-attachment: inherit; background-origin: inherit; background-clip: inherit; background-color: rgb(248, 248, 248); position: relative !important; border: 1px solid rgb(231, 234, 237); border-radius: 3px; padding: 8px 4px 6px; margin-bottom: 15px; margin-top: 15px; width: inherit; color: rgb(51, 51, 51); font-style: normal; font-variant-ligatures: normal; font-variant-caps: normal; font-weight: 400; letter-spacing: normal; orphans: 2; text-indent: 0px; text-transform: none; widows: 2; word-spacing: 0px; -webkit-text-stroke-width: 0px; text-decoration-style: initial; text-decoration-color: initial;">setTheme(R.style.AppTheme);</pre> 4. QQ 中使用的方法
 <pre spellcheck="false" class="md-fences md-end-block ty-contain-cm modeLoaded" lang="java" cid="n61" mdtype="fences" style="box-sizing: border-box; overflow: visible; font-family: var(--monospace); font-size: 0.9em; display: block; break-inside: avoid; text-align: left; white-space: normal; background-image: inherit; background-position: inherit; background-size: inherit; background-repeat: inherit; background-attachment: inherit; background-origin: inherit; background-clip: inherit; background-color: rgb(248, 248, 248); position: relative !important; border: 1px solid rgb(231, 234, 237); border-radius: 3px; padding: 8px 4px 6px; margin-bottom: 15px; margin-top: 15px; width: inherit; color: rgb(51, 51, 51); font-style: normal; font-variant-ligatures: normal; font-variant-caps: normal; font-weight: 400; letter-spacing: normal; orphans: 2; text-indent: 0px; text-transform: none; widows: 2; word-spacing: 0px; -webkit-text-stroke-width: 0px; text-decoration-style: initial; text-decoration-color: initial;"><item name="android:windowDisablePreview">true</item>
<item name="android:windowBackground">@null</item></pre>
启动时间优化
概述
app启动时间优化指的是Application中的onCreate(),运行到Activity的 onCreate (),中的运行时间优化。
这个过程中时间过长的话,可能存在几个问题: 1.点击图标很久不响应。 2.首页显示太慢。
发现问题-查看启动时间
AndroidStudio 4.4以前:
<pre spellcheck="false" class="md-fences md-end-block ty-contain-cm modeLoaded" lang="java" cid="n68" mdtype="fences" style="box-sizing: border-box; overflow: visible; font-family: var(--monospace); font-size: 0.9em; display: block; break-inside: avoid; text-align: left; white-space: normal; background-image: inherit; background-position: inherit; background-size: inherit; background-repeat: inherit; background-attachment: inherit; background-origin: inherit; background-clip: inherit; background-color: rgb(248, 248, 248); position: relative !important; border: 1px solid rgb(231, 234, 237); border-radius: 3px; padding: 8px 4px 6px; margin-bottom: 15px; margin-top: 15px; width: inherit; color: rgb(51, 51, 51); font-style: normal; font-variant-ligatures: normal; font-variant-caps: normal; font-weight: 400; letter-spacing: normal; orphans: 2; text-indent: 0px; text-transform: none; widows: 2; word-spacing: 0px; -webkit-text-stroke-width: 0px; text-decoration-style: initial; text-decoration-color: initial;">adb shell am start -W -n 包名/包名.activity.MainActivity</pre> ThisTime:最后一个启动的Activity的启动耗时; TotalTime:自己的所有Activity的启动耗时; WaitTime: ActivityManagerService启动App的Activity时的总时间(包括当前Activity的onPause()和自己Activity的启动)。
AndroidStudio 4.4以后 Logcat 输入Display筛选系统日志 不过滤信息No Filters
定位问题
-查看Application中onCreate()中的所有方法的具体运行时间
1.Debug.startMethodTracing( File Path); 中间为需要统计执行时间的代码 Debug.stopMethodTracing();
2.adb pull /storage/emulated/0/app1.trace把文件拉出来分析 把pull到电脑上的文件拖到AS中就可以分析了
解决问题-优化方案
1.开 线程
1.里面的API不能去创建 handler 2.不能有 UI 操作 3.对异步要求不高的
2.懒加载
用的时候再初始化,如网络、数据库操作
 <pre spellcheck="false" class="md-fences md-end-block ty-contain-cm modeLoaded" lang="java" cid="n82" mdtype="fences" style="box-sizing: border-box; overflow: visible; font-family: var(--monospace); font-size: 0.9em; display: block; break-inside: avoid; text-align: left; white-space: normal; background-image: inherit; background-position: inherit; background-size: inherit; background-repeat: inherit; background-attachment: inherit; background-origin: inherit; background-clip: inherit; background-color: rgb(248, 248, 248); position: relative !important; border: 1px solid rgb(231, 234, 237); border-radius: 3px; padding: 8px 4px 6px; margin-bottom: 15px; margin-top: 15px; width: inherit; color: rgb(51, 51, 51); font-style: normal; font-variant-ligatures: normal; font-variant-caps: normal; font-weight: 400; letter-spacing: normal; orphans: 2; text-indent: 0px; text-transform: none; widows: 2; word-spacing: 0px; -webkit-text-stroke-width: 0px; text-decoration-style: initial; text-decoration-color: initial;">@Override
 public  void  onCreate() {
 super.onCreate();
 File file = new File(Environment.getExternalStorageDirectory(), "app1.trace");
 Log.i(TAG, "onCreate: " + file.getAbsolutePath());
 //把分析结果存在一个文件
 Debug.startMethodTracing(file.getAbsolutePath());
 //对全局属性赋值
 mContext = getApplicationContext();
 mMainThread = Thread.currentThread();
 mMainThreadId = android.os.Process.myTid();
 mMainLooper = getMainLooper();
 mHandler = new Handler();
 //因为LQRUIKit中已经对ImageLoader进行过初始化了
//        initImageLoader(getApplicationContext());
 new Thread(){
 @Override
 public void run() {
 //如果要用线程来节约了这些初始化的时间
 //1.里面的API不能去创建handler
 //2.不能有UI操作
 //3.对异步要求不高
 initNim();
 initImagePicker();
 initOkHttp();//可以懒加载
 }
 }.start();
 Debug.stopMethodTracing();
 }</pre>
有需要文中完整代码的同学 可以 私信发送 “底层源码” 即可 免费获取
现在私信还可以获得 更多《Android 学习笔记+源码解析+面试视频》
最后我想说:
对于 程序员 来说,要学习的知识内容、技术有太多太多,要想不被环境淘汰就只有不断提升自己,从来都是我们去适应环境,而不是环境来适应我们
技术是无止境的,你需要对自己提交的每一行代码、使用的每一个工具负责,不断挖掘其底层原理,才能使自己的技术升华到更高的层面
Android 架构师之路还很漫长,与君共勉


