1. 构建项目
使用Spring Boot快速构建一个Web工程,并导入与操作Excel相关的 poi 包以及一些常用的工具类包,pom文件中添加如下一些依赖:
 <dependency>
 <groupId>org. apache .poi</groupId>
 <artifactId>poi</artifactId>
 <version>3.9</version>
 </dependency><dependency><groupId>org.apache.poi</groupId><artifactId>poi-ooxml</artifactId><version>3.9</version></dependency><dependency><groupId>org.apache.commons</groupId><artifactId>commons-lang3</artifactId><version>3.3.2</version></dependency><dependency><groupId>com.google.collections</groupId><artifactId>google-collections</artifactId><version>1.0</version></dependency>
2. 自定义Excel注解
使用注解的形式,自定义一些与操作Excel相关的基本信息,如生成Excel模板时,需要有哪些字段名、字段标题、字段之间的排序、字段中内容的位置、对齐方式等信息。然后通过在 JavaBean 中的需要的字段对应的getter方法上添加这些注解,就可以将其标记为Excel相关的字段。自定义注解内容主要如下(为了节省篇幅,一下代码中的注解已删除, 详细代码可以看文章后面的链接 )
@Target({ElementType.FIELD,Element type .TYPE,ElementType.METHOD})
@Retention(RetentionPolicy.RUNTIME)
public @interface ExcelField {
String value() default "";
String title();
int type() default 0;
int align() default 0;
int sort() default 0;
String dictType() default "";
Class<?> fieldType() default Class.class;
int[] groups() default {};
}
3. 通过反射创建Excel模板
使用反射的方式获取类的信息、类中方法、属性,为了创建一个可供用户填写的Excel模板,我们需要在模板中定义系统需要收集的数据字段,即在JavaBean中,通过注解定义的相关字段。伪代码及关键代码如下:
public ExportExcel(String title, Class<?> cls, int type, int... groups){
// Get annotation field
Field[] fs = cls.getDeclaredFields();
for (Field f : fs){
//获取字段上加的@Excel注解
ExcelField ef = f.getAnnotation(ExcelField.class);
if (ef != null && (ef.type()==0 || ef.type()==type)){
//根据字段注解中配置的groups进行分组//....
}else{
//若无group属性,则直接将字段和对应的注解加入到一个全局的注解链表中,用于之后进行统一的排序
annotationList.add(new Object[]{ef, f});
}
}
}
// Get annotation method
Method[] ms = cls.getDeclaredMethods();
for (Method m : ms){
//获取方法上的注解
ExcelField ef = m.getAnnotation(ExcelField.class);
if (ef != null && (ef.type()==0 || ef.type()==type)){
//操作同对字段的操作
}else{
annotationList.add(new Object[]{ef, m});
}
}
}
// 对字段进行排序
Collections.sort(annotationList, new Comparator<Object[]>() {
//排序规则
});
// Initialize
List<String> headerList = Lists.newArrayList();
for (Object[] os : annotationList){
//获取注解title属性值
String t = ((ExcelField)os[0]).title();
//将字段名称保存在一个list中,交给初始化方法使用
headerList.add(t);
}
//初始化操作,创建Excel,设置文件名称,表格标题,表头内容及单元格的格式等信息
initialize(title, headerList);
}
4. 导入Excel文件
导入Excel文件,意味着需要将一个根据我们生成模板填好的Excel文件导入到系统中。在这个过程中,需要使用一个接口去接收文件,并对文件进行解析。在Excel文件中,每一行都对应着我们定义的一个实体对象,所以解析之后,我们得到的是一个存放着多个对象的List。
在解析文件的过程中,首先需要对文件格式校验,保证是一个有效的Excel文件,然后循环读取每一行的数据,并将其赋值给对象。
5. 导出Excel文件
导出Excel的原理同导出模板一样,只是需要将数据填充到Excel文件中。填充数据过程中,还是需要通过@Excel注解将JavaBean中的字段找出,并将值设置到单元格中
6. 测试
01
定义实体类
public class User {
private String userName;
private String nickName;
private Integer age;
private Date birth;
@NotNull( message  = "User Name 不能为空")
@ExcelField(title="User Name", align=2, sort=1)
public String getUserName() {
 return userName;
 }

public void setUserName(String userName) {
 this.userName = userName;
 }

@ExcelField(title="Nick Name", align=2, sort=2)
public String getNickName() {
 return nickName;
 }
public void setNickName(String nickName) {
 this.nickName = nickName;
 }
@ExcelField(title="Age", align=2, sort=3)
public Integer getAge() {
 return age;
 }
public void setAge(Integer age) {
 this.age = age;
 }
@JsonFormat(pattern = "mm/dd/YYYY")
@NotNull(message="Birth Day不能为空")
@ExcelField(title="Birth Day", align=2, sort=4)
public Date getBirth() {
 return birth;
 }
public void setBirth(Date birth) {
 this.birth = birth;
 }
}
02
定义接口方法
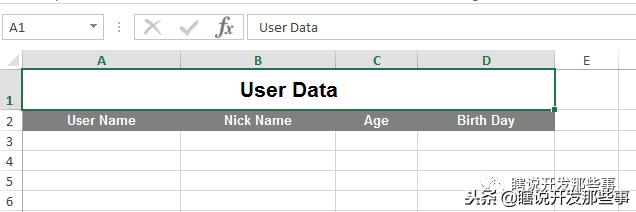
1. 下载输入数据的模板
 @RequestMapping("import/template")
 public void importFileTemplate(HttpServletResponse response){
 try {
 //定义文件名称
 String fileName = "User_Data_import_template.xlsx";
 List<User> list = Lists.newArrayList();
 new ExportExcel("User Data", User.class, 1).setDataList(list).write(response, fileName).dispose();
 } catch (IOException e) {
 e.printStackTrace();
 }
 }
2. 导入Excel文件到系统
 @RequestMapping(value = "import",method = RequestMethod.POST)
 public void importFile(MultipartFile multipartFile){
 try {
 int successNum = 0;
 int failureNum = 0;
 StringBuilder failureMsg = new StringBuilder();

 ImportExcel ei = new ImportExcel(multipartFile, 1, 0);

 List<User> list = ei.getDataList(User.class);
 for (User user : list){
 try{
 //to do: 保存/处理数据
 // users ervice.save(user);
 logger.info(user.toString());
 successNum++;
 }catch(ConstraintViolationException ex){
 failureNum++;
 }catch (Exception ex) {
 failureNum++;
 }
 }
 if (failureNum>0){
 failureMsg.insert(0, ", Failures: "+failureNum);
 }
 logger.info("Had Operation "+successNum+" Data;"+" "+"Failure "+failureNum);
 } catch (Exception e) {
 logger.error("导入失败",e);
 }
 }
3. 导出Excel文件
 @RequestMapping("export")
 public void export(HttpServletResponse response){
 try {
 String fileName = "User Data"+ DateUtils.getDate("yyyyMMddHHmmss")+".xlsx";
 List<User> users=new ArrayList<>();
 User user1=new User();
 user1.setUserName("小明");
 user1.setNickName("猪小明");
 user1.setAge(20);
 user1.setBirth(DateUtils.parseDate("1992-10-10"));
 users.add(user1);
 User user2=new User();
 user2.setUserName("小红");
 user2.setNickName("小小红");
 user2.setAge(18);
 user2.setBirth(DateUtils.parseDate("1998-11-09"));
 users.add(user2);
 new ExportExcel("Test Over View Define", User.class,2).setDataList(users).write(response, fileName).dispose();
 } catch (Exception e) {
 }
 }
03
演示
端口号可以自己通过在application.properties文件中,添加 server.port=8000 进行定义
通过浏览器访问接口 ,下载模板:

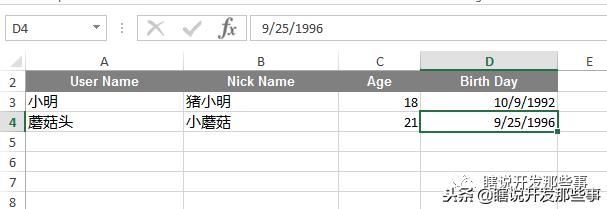
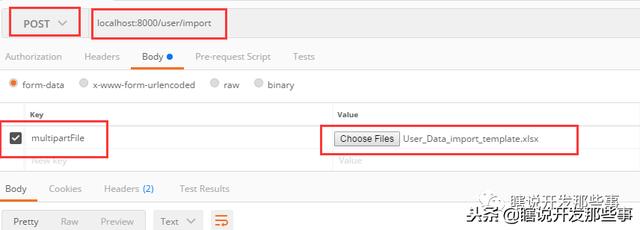
编辑Excel文件,并通过接口测试工具Postman访问接口 localhost:8000/user/import :
接口测试工具中,上传文件,并访问:
上传之后,通过日志输出文件解析的结果:
2017-11-24 19:56:15.186 INFO 37428 --- [nio-8000-exec-5] com.shexd.Controller.UserController : User{userName='小明', nickName='猪小明', age=18, birth=1992-10-09}
2017-11-24 19:56:15.187 INFO 37428 --- [nio-8000-exec-5] com.shexd.Controller.UserController : User{userName='蘑菇头', nickName='小蘑菇', age=21, birth=1996-09-25}
2017-11-24 19:56:15.187 INFO 37428 --- [nio-8000-exec-5] com.shexd.Controller.UserController : Had Operation 2 Data; Failure 0
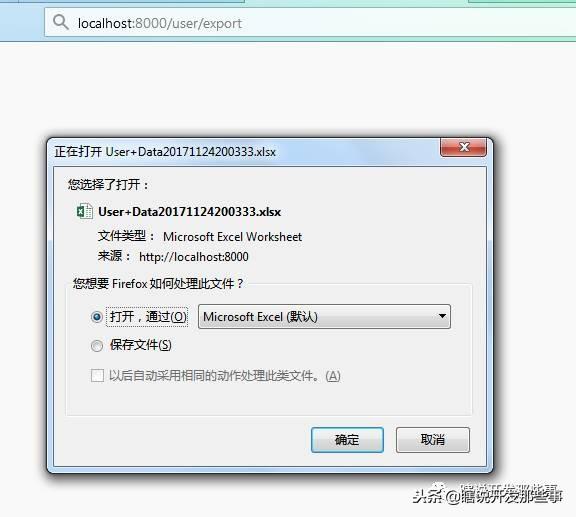
访问接口 ,从系统导出Excel文件
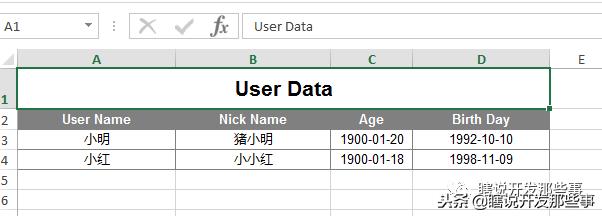
7. 小结
本文简单介绍了利用 Java 注解和反射对Excel进行操作的基本原理,并实例进行详细说明。本文中项目代码已上传至Github,别忘了Star一个吆,传送门:
ExcelHandle。