1、 java 原生api操作
- 引入 maven 依赖
 <!--引入 fastdfs 客户端依赖-->
<dependency>
    <groupId>cn.bestwu</groupId>
    <artifactId>fastdfs-client-java</artifactId>
    <version>1.27</version>
</dependency>
- 配置 tracker server地址
使用配置文件fastdfs.properties
 # 指定跟踪服务器地址,不需要指定storage server地址,因为tracker server会返回storage地址
fastdfs.tracker_servers = 192.168.244.128:22122
# 配置编码格式
fastdfs. charset  = UTF-8
# 配置网络连接时间
fastdfs.connect_timeout_in_seconds = 5
# 配置网络超时时间
fastdfs.network_timeout_in_seconds = 30
- 测试上传
 /**
 * @author: itdl
 * @date: 2022/3/7 12:09
 * @description: 测试上传
 * @version: 1.0
 */
public class TestUpload {
    public  static   void  main(String[] args) throws IO Exception , MyException {
        // 1、加载配置文件
        ClientGlobal.initByProperties("fastdfs.properties");
        // 2、创建一个tracker客户端,用于获取跟踪服务器
        TrackerClient trackerClient = new TrackerClient();
        TrackerServer trackerServer = trackerClient.getConnection();

        // 3、使用tracker server获取一个storage客户端, 此时还没有获取到storage server
        StorageClient1 storageClient = new StorageClient1(trackerServer, null);

        // 4、定义文件元数据信息,用于上传
        NameValuePair[] nameValuePairs = new NameValuePair[1];
        nameValuePairs[0] = new NameValuePair("fileName", "test.jpg");

        // 5、执行上传操作 参数1表示文件在磁盘中的全路径,参数2表示文件后缀,参数3表示元数据信息
        String fileId = storageClient. Upload _ File 1("F:\new\test.jpg", "jpg", nameValuePairs);
        System.out.println(fileId);
    }
}
测试结果, 记录fileId为:group1/M00/00/00/wKj0gGIlh-WALCshAABDhrJAkTU644.jpg
- 测试下载
 /**
 * @author: itdl
 * @date: 2022/3/7 12:09
 * @description: 测试下载
 * @version: 1.0
 */
public class TestDownload {
    public static void main(String[] args) throws IOException, MyException {
        // 1、加载配置文件
        ClientGlobal.initByProperties("fastdfs.properties");
        // 2、创建一个tracker客户端,用于获取跟踪服务器
        TrackerClient trackerClient = new TrackerClient();
        TrackerServer trackerServer = trackerClient.getConnection();

        // 3、使用tracker server获取一个storage客户端, 此时还没有获取到storage server
        StorageClient1 storageClient = new StorageClient1(trackerServer, null);

        // 4、下载文件
        // 就是我们上传之后返回的文件id
        String fileId = "group1/M00/00/00/wKj0gGIlh-WALCshAABDhrJAkTU644.jpg";
         byte [] bytes = storageClient.download_file1(fileId);

        // 5、将字节流写到文件
         FileOutputStream  outputStream = new FileOutputStream(new File("F:\new\download.jpg"));
        // 写入后关闭流
        outputStream.write(bytes);
        outputStream.close();
    }
}
- 测试查看文件信息
 /**
 * @author: itdl
 * @date: 2022/3/7 12:09
 * @description: 测试查看文件信息
 * @version: 1.0
 */
public class TestQuery {
    public static void main(String[] args) throws IOException, MyException {
        // 1、加载配置文件
        ClientGlobal.initByProperties("fastdfs.properties");
        // 2、创建一个tracker客户端,用于获取跟踪服务器
        TrackerClient trackerClient = new TrackerClient();
        TrackerServer trackerServer = trackerClient.getConnection();

        // 3、使用tracker server获取一个storage客户端, 此时还没有获取到storage server
        StorageClient1 storageClient = new StorageClient1(trackerServer, null);

        // 4、查看文件信息
        // 就是我们上传之后返回的文件id
        String fileId = "group1/M00/00/00/wKj0gGIlh-WALCshAABDhrJAkTU644.jpg";
        FileInfo fileInfo = storageClient.query_file_info1(fileId);

        // 5、打印文件信息
        System.out.println(fileInfo);
    }
}
结果如下:
source_ip_addr = 192.168.244.128, file_size = 17286, create_timestamp = 2022-03-07 12:19:49, crc 32 = -1304391371
2、 Spring boot操作fastdfs
- 创建springboot项目并引入依赖
 <?xml version="1.0" encoding="UTF-8"?>
<project xmlns="#34; xmlns:xsi="#34;
         xsi:schemaLocation=" #34;>
    <modelVersion>4.0.0</modelVersion>
    <parent>
        <groupId>org.springframework.boot</groupId>
        <artifactId>spring-boot-starter-parent</artifactId>
        <version>2.6.4</version>
        <relativePath/> <!-- lookup parent from repository -->
    </parent>
    <groupId>com.itdl</groupId>
    <artifactId>fastdfs-springboot</artifactId>
    <version>0.0.1-SNAPSHOT</version>
    <name>fastdfs-springboot</name>
    <description>Demo project for Spring Boot</description>
    <properties>
        <java.version>1.8</java.version>
    </properties>
    <dependencies>
        <!--web支持-->
        <dependency>
            <groupId>org.springframework.boot</groupId>
            <artifactId>spring-boot-starter-web</artifactId>
        </dependency>
        <!--配置支持-->
        <dependency>
            <groupId>org.springframework.boot</groupId>
            <artifactId>spring-boot-configuration-processor</artifactId>
            <optional>true</optional>
        </dependency>
        <!--set get省略-->
        <dependency>
            <groupId>org.projectlombok</groupId>
            <artifactId>lombok</artifactId>
            <optional>true</optional>
        </dependency>
        <!--fastdfs客户端依赖-->
        <dependency>
            <groupId>com.github.tobato</groupId>
            <artifactId>fastdfs-client</artifactId>
            <version>1.26.1-RELEASE</version>
        </dependency>
    </dependencies>

    <build>
        <plugins>
            <plugin>
                <groupId>org.springframework.boot</groupId>
                <artifactId>spring-boot-maven-plugin</artifactId>
                <configuration>
                    <excludes>
                        <exclude>
                            <groupId>org.projectlombok</groupId>
                            <artifactId>lombok</artifactId>
                        </exclude>
                    </excludes>
                </configuration>
            </plugin>
        </plugins>
    </build>

</project>
- 配置文件编写
创建配置文件application.yml,并配置tracker server地址
 fdfs:
  # 配置tracker server集群地址
  tracker-list:
    - 192.168.244.128:22122
  # 设置连接超时时间
  connect-timeout: 30
# 配置springboot启动端口
server:
  port: 8080
itdl:
  # 文件系统使用fastdfs,需要开启该开关
   filesystem :
    fastdfs:
      enable: true
- 编写通用返回类
 /**
 * @author: itdl
 * @date: 2022/3/7 14:03
 * @description: 定义通用返回结果
 * @version: 1.0
 */
@Data
@Builder
@ToString
public class R<T> implements Serializable {
    /**
     * 系统是否处理成功 true成功 false失败
     */
     private   Boolean  success;

    /**
     * 业务处理是否成功,true成功, false业务处理失败
     */
    private boolean executed;

    /**
     * 处理结果编码
     */
    private String code;

    /**
     * 处理结果消息
     */
    private String message;

    /**
     * 处理结果携带的数据
     */
    private T data;

    /**
     * 功能描述: 构建成功结果
     */
    public static R success() {
        return R.builder()
                .success(true)
                .executed(true)
                .code("200")
                .message("success")
                .build();
    }

    /**
     * 功能描述: 构建成功结果, 携带返回数据
     */
    public static <T>R success(T data) {
        return R.builder()
                .success(true)
                .executed(true)
                .code("200")
                .message("success")
                .data(data)
                .build();
    }

    /**
     * 功能描述: 构建成功结果, 指定code和message
     */
    public static R success(String code, String message) {
        return R.builder()
                .success(true)
                .executed(true)
                .code(code)
                .message(message)
                .build();
    }

    /**
     * 功能描述: 构建成功结果, 指定code和message和data
     */
    public static <T>R success(String code, String message, T data) {
        return R.builder()
                .success(true)
                .executed(true)
                .code(code)
                .message(message)
                .data(data)
                .build();
    }


    /**
     * 功能描述: 构建失败结果, 指定code和message
     */
    public static R error(String code, String message) {
        return R.builder()
                .success(false)
                .executed(false)
                .code(code)
                .message(message)
                .build();
    }


    /**
     * 功能描述: 构建失败结果, 指定code和message
     */
    public static <T>R error(String code, String message, T data) {
        return R.builder()
                .success(false)
                .executed(false)
                .code(code)
                .message(message)
                .data(data)
                .build();
    }
}
- 编写文件上传接口
1、定义上传结果返回对象
 /**
 * @author: itdl
 * @date: 2022/3/7 14:14
 * @description: 文件上传结果封装
 * @version: 1.0
 */
@Data
@NoArgs Constructor
@AllArgsConstructor
public class UploadResponseDTO implements Serializable {
    /**
     * fastdfs文件Id
     */
    private String fileId;

    /**
     * 文件后缀
     */
    private String suffix;

    /**
     * 文件大小
     */
    private Long fileSize;
}
2、编写fastdfs开关条件类
 /**
 * @author: itdl
 * @date: 2022/3/7 14:22
 * @description: fastdfs条件类,用于开启和关闭fastdfs功能
 * @version: 1.0
 */
public class FastDfsCondition implements Condition {
    @Override
    public boolean matches(ConditionContext context, AnnotatedTypeMetadata metadata) {
        String property = context.getEnvironment().getProperty("itdl.filesystem.fastdfs.enable");
        return Boolean.parseBoolean(property);
    }
}
3、编写配置类
 /**
 * @author: hedl
 * @date: 2022/3/7 14:52
 * @description: fastdfs配置类
 * @version: 1.0
 */
@Configuration
@Conditional(FastDfsCondition.class)
@EnableMBeanExport(registration = RegistrationPolicy.IGNORE_EXISTING)//解决 jmx 重复注册bean问题
@Import(FdfsClientConfig.class)// 导入fastdfs的客户端配置类
public class FastDfsConfig {

}
4、编写文件操作接口
 /**
 * @author: itdl
 * @date: 2022/3/7 14:02
 * @description: 文件操作接口,比如文件上传。文件下载等基本操作
 * @version: 1.0
 */
public interface IFileOperator {
    /**
     * 文件上传
     * @param bytes 文件字节流
     * @param fileSize 文件大小
     * @param originFileName 文件原始名称
     * @return
     */
    UploadResponseDTO upload(byte[] bytes, long fileSize, String originFileName);

}
5、编写文件操作实现类
 /**
 * @author: itdl
 * @date: 2022/3/7 14:20
 * @description: fastdfs实现文件操作
 * @version: 1.0
 */
@Component
@Conditional(FastDfsCondition.class)// 开关打开时条件才生效
public class FastDfsFileOperator implements IFileOperator {
    @Autowired
    private FastFileStorageClient fastFileStorageClient;

    @Override
    public UploadResponseDTO upload(byte[] bytes, long fileSize, String originFileName) {
        // 创建输入流
        ByteArrayInputStream inputStream = new ByteArrayInputStream(bytes);

        // 获取文件后缀
        String fileSuffix = originFileName.substring(originFileName.lastIndexOf(".") + 1);

        // 执行文件上传
        StorePath storePath = fastFileStorageClient.uploadFile(inputStream, fileSize, fileSuffix, null);

        return new UploadResponseDTO(storePath.getFullPath(), fileSuffix, fileSize);
    }
}
6、编写文件上传controller
 /**
 * @author: itdl
 * @date: 2022/3/7 14:33
 * @description: 文件操作接口类
 * @version: 1.0
 */
@RestController
@RequestMapping("/file")
public class FileController {
    @Autowired
    private IFileOperator fileOperator;

    @PostMapping("/upload")
    public R<UploadResponseDTO> upload(@RequestParam("file") MultipartFile file) throws IOException {
        if (file == null){
            return R.error("501", "文件不能为空");
        }
        // 执行文件上传
        UploadResponseDTO upload = fileOperator.upload(file.getBytes(), file.getSize(), file.getOriginalFilename());

        if (upload == null){
            return R.error("500", "文件上传出现异常");
        }
        return R.success(upload);
    }
}
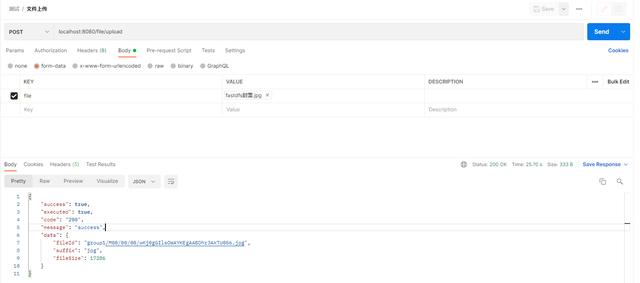
7、使用postman测试上传
- 编写文件下载接口
1、编写文件下载工具类
 /**
 * @author: itdl
 * @date: 2022/3/7 15:37
 * @description: 文件下载工具类
 * @version: 1.0
 */
public class DownloadUtil {
    /**
     * 文件下载
     * @param response 响应对象
     * @param bytes 字节数组
     * @param responseFileName 文件下载名称
     */
    public static void download(HttpServletResponse response, byte[] bytes, String responseFileName){
        ServletOutputStream outputStream = null;
        try {
            // 设置请求头和下载时的文件名
            response.setHeader("Content-disposition", "attachment;filename=" + URLEncoder.encode(responseFileName, StandardCharsets.UTF_8.name()));
            // 设置编码
            response.setCharacterEncoding("UTF-8");
            // 获取输出流对象
            outputStream = response.getOutputStream();
            // 将文件流写入输出流
            outputStream.write(bytes);
        } catch (IOException e) {
            e.printStackTrace();
        } finally {
            // 如果流不为空,刷新并关闭输出流
            if (outputStream != null){
                try {
                    outputStream.flush();
                    outputStream.close();
                } catch (IOException e) {
                    e.printStackTrace();
                }
            }
        }

    }
}
2、增加文件下载实现方法
 /**
 * @author: itdl
 * @date: 2022/3/7 14:20
 * @description: fastdfs实现文件操作
 * @version: 1.0
 */
@Component
@Conditional(FastDfsCondition.class)
public class FastDfsFileOperator implements IFileOperator {
    @Autowired
    private FastFileStorageClient fastFileStorageClient;

    @Override
    public UploadResponseDTO upload(byte[] bytes, long fileSize, String originFileName) {
        // 创建输入流
        ByteArrayInputStream inputStream = new ByteArrayInputStream(bytes);

        // 获取文件后缀
        String fileSuffix = originFileName.substring(originFileName.lastIndexOf(".") + 1);

        // 执行文件上传
        StorePath storePath = fastFileStorageClient.uploadFile(inputStream, fileSize, fileSuffix, null);

        return new UploadResponseDTO(storePath.getFullPath(), fileSuffix, fileSize);
    }

    @Override
    public byte[] download(String fileId) {
        // 下载文件到字节数组中
        return fastFileStorageClient.downloadFile(
                fileId.substring(0, fileId.indexOf("/")),
                fileId.substring(fileId.indexOf("/") + 1),
                new DownloadByteArray());
    }
}
3、controller增加下载接口
     @RequestMapping(value = "/download", method = {RequestMethod.GET, RequestMethod.POST})
    public void download(@RequestParam("fileId") String fileId, HttpServletResponse response){
        // 下载为字节数组
        byte[] bytes = fileOperator.download(fileId);
        // 下载到流中, 并指定下载文件名称
        DownloadUtil.download(response, bytes, ", 并指定下载文件名称"  + System.currentTimeMillis() + UUID.randomUUID().toString().replaceAll("-", "") );
    }
4、使用浏览器测试下载

- 附上项目地址
码云:


