本文假定你已经对Elasticsearch 的基本概念有比较全面的认识,然后演示如何使用Elasticsearch 提供的Java API。
通过官方文档可以得知,现在存在至少三种 Java 客户端。
1. Transport Client
2. Java High Level REST Client
3. Java Low Level Rest Client

现在Elasticsearch 官方推出Java High Level REST Client,它是基于Java Low Level REST Client的封装,并且API接收参数和返回值和TransportClient是一样的,使得代码迁移变得容易并且支持了RESTful的风格,兼容了这两种客户端的优点。当然缺点是存在的,就是版本的问题。ES的小版本更新非常频繁,在最理想的情况下,客户端的版本要和ES的版本一致(至少主版本号一致),次版本号不一致的话,基本操作也许可以,但是新API就不支持了。
另外,还有Spring Data Elasticsearch 组件,该组件主要是与Spring生态对接,可以在web系统中整合到Spring中使用。目前比较推荐使用官方的高阶、低阶Rest Client,官方维护,比较值得信赖。
下面演示基于Elasticsearch Client提供的Java High Level REST Client来操作Elasticsearch。
1. 首先创建Spring Boot 项目
如下图所示,创建一个普通的Spring Boot 项目。

2. Maven 配置
添加elasticsearch-rest-high-level-client依赖包,将以下内容添加到 pom .xml文件中。
elasticsearch-rest-high-level-client还存在依赖关系,High Level Java REST Client依赖于以下工件及其传递依赖性。
- org.elasticsearch.client:elasticsearch-rest-client
- org.elasticsearch:elasticsearch
如果使用了parent,那么需要在此定义es版本号,因为spring-boot-start-parent中已经定义了es相关依赖的版本号,high-level-client中的部分依赖会被覆盖成低版本的,导致出现莫名其妙的错误。

如上图所示,Spring Boot的每个发布版本都会规划它所支持的依赖项。实际上,你不用指定这些依赖项的版本号,因为Spring Boot都为你管理好了。当更新Spring Boot时,会相应的更新依赖。
通过代码跟踪方式,跟踪到这个 pom 的 parent,一直到 Spring Boot Dependencies 这个 POM 文件,可以看到如下的版本信息 (部分摘要)。
spring-boot-dependencies pom文件部分截图,其中发现elasticsearch 默认引用版本为 6.4.3,但是本项目中,我们需要引用最新版本的 elasticsearch v7.3.0 相关依赖包。

在本场景下,不希望使用 parent pom。可以在Maven 中的 dependencyManagement 管理所有依赖的版本号。
在 dependencyManagement 元素中声明 jar 包的版本信息,那么子项目再次引用相应 jar 包时则无需指定版本号。Maven 会沿着父子层级向上寻找 dependencyManagement 元素,然后使用其指定的版本号。
<dependencyManagement>
<dependencies>
<dependency>
<groupId>org.elasticsearch.client</groupId>
<artifactId>elasticsearch-rest-client</artifactId>
<version>7.3.0</version>
</dependency>
<dependency>
<groupId>org.elasticsearch</groupId>
<artifactId>elasticsearch</artifactId>
<version>7.3.0</version>
</dependency>
</dependencies>
</dependencyManagement>
此时,发现elasticsearch-rest-high-level-client 依赖包都已经更新为正确的版本号 v7.3.0,而不是之前spring boot dependencies 中默认的v6.4.3 版本。

3. application.properties 配置文件
在properties 配置文件中,添加如下参数:
spring.application.name = rest-client-demo
server.port = 8088
elasticsearch.host = localhost
elasticsearch.port = 9200
设置 ES 的主机地址,以及端口号9200,因为REST client是通过HTTP 和ES 进行交互的,因此port=9200。
4. EsConfig 配置类
添加 High Level REST Client配置。
package com.rickie.elasticsearch.restclientdemo.config;
import lombok.Data;
import org.apache.http.HttpHost;
import org.elasticsearch.client.RestClient;
import org.elasticsearch.client.RestHighLevelClient;
import org.springframework.boot.context.properties. Configuration Properties;
import org.springframework.context.annotation.Bean;
import org.springframework.context.annotation.Configuration;
@Data
@Configuration
@ConfigurationProperties(prefix = “elasticsearch”)
public class EsConfig {
private String host;
private Integer port;
@Bean(destroyMethod = “close”)
public RestHighLevelClient client(){
return new RestHighLevelClient(RestClient.builder(
new HttpHost(host, port, “http”)
));
}
}
注意:上述代码引用了 lombok 依赖包。

另外,在Spring Boot启动类上加上@EnableConfigurationProperties注解:
@EnableConfigurationProperties({EsConfig.class})

至此,我们的项目框架就搭建完毕了。直接运行,我们可以看到项目已经跑起来了。

5. 开发Elasticsearch 相关的业务代码
项目框架搭建完毕后,我们来尝试着执行一些简单的增删改查操作。
首先,我们构建一个Book service ,并且注入RestHighLevelClient。
Index API允许用户将一个类型化的JSON文档 索引 (插入)到一个特定的索引中,并使其可搜索。
完整代码如下所示。
package com.rickie.elasticsearch.restclientdemo.service;
import com.rickie.elasticsearch.restclientdemo.domain.vo.BookVO;
import org.elasticsearch.action.index.IndexRequest;
import org.elasticsearch.action.index.IndexResponse;
import org.elasticsearch.client.RequestOptions;
import org.elasticsearch.client.RestHighLevelClient;
import org.elasticsearch.common.xcontent.XContentBuilder;
import org.elasticsearch.common.xcontent.XContentFactory;
import org.springframework.stereotype.Service;
import javax.annotation. Resource ;
import java.io.IOException;
@Service
public class BookService {
@Resource
private RestHighLevelClient client;
public String addBook(BookVO vo) {
try {
XContentBuilder content = XContentFactory.jsonBuilder().startObject()
.field(“type”, vo.getType())
.field(“word_count”, vo.getWordCount())
.field(“author”, vo.getAuthor())
.field(“title”, vo.getTitle())
.timeField(“publish_date”, vo.getPublishDate())
.endObject();
IndexRequest request = new IndexRequest(“book”).source(content);
IndexResponse response = client.index(request, RequestOptions.DEFAULT);
return response.toString();
} catch (IOException e) {
e.printStackTrace();
}
return null;
}
}
BookVo.java 类的代码如下所示。
package com.rickie.elasticsearch.restclientdemo.domain.vo;
import lombok.Data;
@Data
public class BookVO {
private String id;
private String type;
private Integer wordCount;
private String author;
private String title;
private String publishDate;
}
BookController 的代码如下所示。
package com.rickie.elasticsearch.restclientdemo.controller;
import com.rickie.elasticsearch.restclientdemo.domain.vo.BookVO;
import com.rickie.elasticsearch.restclientdemo.service.BookService;
import org.springframework.web.bind.annotation.*;
import javax.annotation.Resource;
@RestController
@RequestMapping(“book”)
public class BookController {
@Resource
private BookService bookService;
@PostMapping(“add”)
public String add(@RequestBody BookVO vo) {
return bookService.addBook(vo);
}
@GetMapping(“test”)
public String test() {
return “hello rickie”;
}
}
演示项目包结构如下图所示。

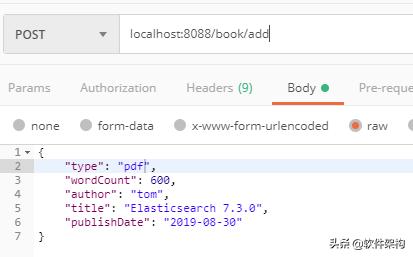
现在直接项目,通过postman 发送post请求,请求参数如下所示。
输出结果:
IndexResponse[index=book,type=_doc,id=NYLx5WwB19IsZPIN0L3a,version=1,result=created,seqNo=2,primaryTerm=1,shards={” total “:2,”successful”:1,”failed”:0}]
IndexResponse中包含了一些我们刚刚创建的文档的信息,并且该文档的id 为 【NYLx5WwB19IsZPIN0L3a】。自动生成的id,长度为20个字符,URL安全,base64编码,GUID,分布式系统并行生成时不可能会发生冲突。

在代码中,我们首先构建出了一个IndexRequest对象,然后为该对象设置了source参数,随后使用我们上面注入的RestHighLevelClient对象,并调用 index() 方法,这样就拿到了对应的Response对象。
source 参数通过XContentBuilder构建是一种推荐的方式。
另外,client.index()方法的第二个参数,我们可以自定义一些请求配置项,比如,我们可以在这里指定一个节点选择器(NodeSelector)来控制哪个节点接收请求。这里,我们直接使用了默认配置 RequestOptions.DEFAULT。
执行三次,下面Elasticsearch中产生的索引数据。

6. 其他对索引文件的操作
(1)Get API
Get API允许根据 id 从索引中获取一个类型化的JSON文档。

(2)Update API
Update API 通过使用脚本或传递部分文档来更新现有文档。

输出结果:UpdateResponse[index=book,type=_doc,id=NIJy5WwB19IsZPINrr0l,version=2,seqNo=4,primaryTerm=1,result=updated,shards=ShardInfo{total=2, successful=1, failures=[]}]
(3)Delete API
Delete API 就是根据ID删除相关的文档。
POST localhost:8088/book/delete/OILI52wB19IsZPIN9b0q
返回结果:DeleteResponse[index=book,type=_doc,id=OILI52wB19IsZPIN9b0q,version=2,result=deleted,shards=ShardInfo{total=2, successful=1, failures=[]}]
(4)Search API
Search API用于搜索文档、聚合分析等等相关操作。

输出结果:
{“took”:4,”timed_out”:false,”_shards”:{“total”:6,”successful”:6,”skipped”:0,”failed”:0},”hits”:{“total”:{“value”:1,”relation”:”eq”},”max_score”:1.7294393,”hits”:[{“_index”:”book”,”_type”:”_doc”,”_id”:”M4KO42wB19IsZPINAb0E”,”_score”:1.7294393,”_source”:{“type”:”doc”,”word_count”:300,”author”:”rickie”,”title”:”Elasticsearch 7.x”,”publish_date”:”2019-08-31″}}]}}


