
转载本文需注明出处:微信公众号EAWorld,违者必究。
前言:
随着传统企业的发展,企业数据呈现多样化,海量化,难以实现数据快速分析。 Mongodb 是当前很多企业使用的,当日积月累数据很大时,就可能会忽略历史数据的价值,可以把数据实时同步到其他储存:HBASE、HIVE、HDFS文件等等。在当前大数据、云计算的时代潮流下,实现数据价值,对企业决策力、洞察发现力极其有益。
在MongoDB 3.6 之后版本,提供Change Streams API。但目前数据量庞大的仍还是3.6之前版本的历史悠久企业。这些资产数据是不可缺少的,所以当使用3.6之前版本,两步走:首先对历史库数据迁移。再开始监听MongoDB库增量变化,实现MongoDB的监听和实时同步(Oplog)。
目录:
1.Oplog简介
2.MongoDB服务配置启动
3.Oplog获取和查看
4.简单 Java 代码实现
1.Oplog简介
1、认识
当在MongoDB的Primary下,我们进行操作库表时,这些操作会以特殊格式储存在local库下的一个固定集合中(下面会介绍到)。Secondary(次)就会通过获取主的oplog,来进行同步数据,并且存储自己的Oplog。所以Oplog 也是Mongodb Replication的重要组成了。
2、大小
Mongodb默认将其大小分配的是5%的空闲磁盘空间。也可以在创建 mongod 服务时,在mongo.conf中oplogSize自定义参数设置,单位是mb,如果不指定,不同操作系统上的 oplog 默认大小不同,具体为以下:
For 64-bit Linux, Solaris, and FreeBSD systems:可以分配 5% 的剩余空间。如果分配的值仍小于 1GB,那么会分配 1GB。
For 64-bit OS X systems:分配 183MB。
For 32-bit systems:分配 48MB。
oplog的内存占比速度与系统处理写请求的速度相当,所以很快就会增量更新数据。时间上完全可以支持实时同步。
3、oplog库表
oplog会自动创建在local库的collection:
a、 master/slave 架构下:local.oplog.$main
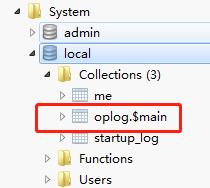
b、 replica sets 架构下:local.oplog.rs
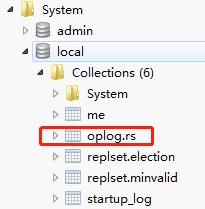
c、 sharding 架构下,mongos下不能查看oplog,可到每一片去
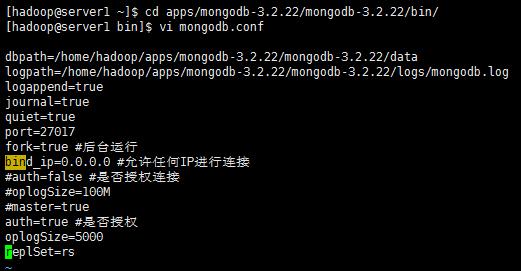
2.MongoDB服务配置启动
1.解压当前目录
tar zxvf mongodb-linux-x86_64-3.2.22.tgz -C ./ mongodb-3.2.22
2.创建data、logs/mongodb.log文件夹

3. bin下创建mongodb.conf自定义配置
4. 创建启动脚本
start-mongodb.sh,赋权chmod +x start-mongodb.sh

5. 启动 ./start-mongodb.sh
6.测试
./mongo,默认进入的collections是test,PRIMARY节点


3.oplog获取和查看
1. oplog数据结构
分析oplog中字段的含义
- ts: 8字节的时间戳,由4字节unix timestamp + 4字节自增计数表示。这个值很重要,在选举(如master宕机时)新primary时,会选择ts最大的那个secondary作为新primary
- op:1字节的操作类型
- “i”:insert
- “u”:update
- “d”:delete
- “c”:db cmd
- “db”:声明当前数据库 (其中ns 被设置成为=>数据库名称+ ‘.’)
- “n”: no op,即空操作,其会定期执行以确保时效性
- ns:操作所在的namespace
- o:操作所对应的document,即当前操作的内容(比如更新操作时要更新的的字段和值)
- o2: 在执行更新操作时的where条件,仅限于update时才有该属性
2. 查看oplog的基本信息
通过”db.printReplicationInfo()”命令可以查看oplog的信息
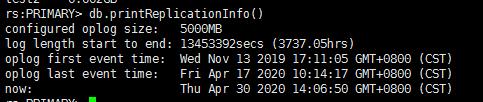
字段说明:
- configured oplog size:oplog文件大小
- log length start to end: oplog日志的启用时间段
- oplog first event time: 第一个事务日志的产生时间
- oplog last event time: 最后一个事务日志的产生时间
- now: 现在的时间
3、查看oplog日志数据
这里我们一般会重视数据的变化,所以列出insert、update、delete示例
添加一条数据:
db.test.insert({"name":"这是一侧测试","age":"18"})
oplog日志数据:
 {
    "ts" : Timestamp(1588728789, 1),
    "h" : NumberLong(0),
    "v" : 2,
    "op" : "i",
    "ns" : "runoob.test",
    "o" : {
        "_id" : ObjectId("5eb213d5ce1474899c3a2482"),
        "name" : "这是一侧测试",
        "age" : "18"
    }
}
修改:
db.test.update({"_id": ObjectId("5eb213d5ce1474899c3a2482")},{$set:{"name":"这是修改的测试","age":"20"}},false,true)
 {
    "ts" : Timestamp(1588730210, 1),
    "h" : NumberLong(0),
    "v" : 2,
    "op" : "u",
    "ns" : "runoob.test",
    "o2" : {
        "_id" : ObjectId("5eb213d5ce1474899c3a2482")
    },
    "o" : {
        "$set" : {
            "name" : "这是修改的测试",
            "age" : "20"
        }
    }
}
删除:
db.test.remove({"name" : "这是修改的测试"})
 {
    "ts" : Timestamp(1588730347, 1),
    "h" : NumberLong(0),
    "v" : 2,
    "op" : "d",
    "ns" : "runoob.test",
    "o" : {
        "_id" : ObjectId("5eb213d5ce1474899c3a2482")
    }
}
4.简单Java代码实现
1、maven依赖引入
 <dependency>
  <groupId>com.alibaba</groupId>
  <artifactId>fastjson</artifactId>
  <version>1.2.41</version>
</dependency>
<dependency>
  <groupId>org.mongodb</groupId>
  <artifactId>mongo-java-driver</artifactId>
  <version>3.2.2</version>
</dependency>
2、配置文件resource/mongo-config.properties
 connectionsPerHost=10
connectTimeout=10000
cursorFinalizerEnabled=true
maxWaitTime=120000
threadsAllowedToBlockForConnectionMultiplier=5
readSecondary=false
socketTimeout=0
socketKeepAlive=false
write=0
writeTimeout=0
journal=false
hostConfString=127.0.0.1:27017
userName=adminUser
useCollection=admin
passWord=adminPass
3、MongoDBUtil.java工具类
 /**
 * @author wxb
 * @date 2019-10-12 11:26
 */
public class MongoDBUtil {
    private static MongoClient mongoClient;
    private static Properties properties;
    private static WriteConcern concern;
    static {
        try {
            InputStream inputStream = MongoDBUtil.class.getClassLoader().getResourceAsStream("mongo-config.properties");
            properties = new Properties();
            properties.load(inputStream);
            concern = new WriteConcern(Integer.parseInt(properties.getProperty("write")),
                    Integer.parseInt(properties.getProperty("writeTimeout")));
            concern.withJournal(Boolean.valueOf(properties.getProperty("journal")));//读取journal参数值

        } catch (IOException e) {
            e.printStackTrace();
        }
    }
    /**
     * 初始化,返回客户端
     */
    public static MongoClient initMongoHasUser() throws IOException {
        List<ServerAddress> adds = new ArrayList<>();
        String[] address = properties.getProperty("hostConfString").split(":");//读取服务IP地址和端口号
        ServerAddress serverAddress = new ServerAddress(address[0], Integer.valueOf(address[1]));
        adds.add(serverAddress);
        List<MongoCredential> credentials = new ArrayList<>();
        MongoCredential mongoCredential = MongoCredential.createScramSha1Credential(
                properties.getProperty("userName"),
                properties.getProperty("useCollection"),
                properties.getProperty("passWord").toCharArray());
        credentials.add(mongoCredential);
        MongoClientOptions options = MongoClientOptions.builder()
                .connectionsPerHost(Integer.parseInt(properties.getProperty("connectionsPerHost")))
                .connectTimeout(Integer.parseInt(properties.getProperty("connectTimeout")))
                .cursorFinalizerEnabled(Boolean.valueOf(properties.getProperty("cursorFinalizerEnabled")))
                .maxWaitTime(Integer.parseInt(properties.getProperty("maxWaitTime")))
                .threadsAllowedToBlockForConnectionMultiplier(Integer.parseInt(properties
                        .getProperty("threadsAllowedToBlockForConnectionMultiplier")))
                .socketTimeout(Integer.valueOf(properties.getProperty("socketTimeout")))
                .socketKeepAlive(Boolean.valueOf(properties.getProperty("socketKeepAlive")))
                .writeConcern(concern)
                .build();
        if (adds.size() > 1){
            mongoClient = new MongoClient(adds, credentials, options);
        }else {
            mongoClient = new MongoClient(adds.get(0), credentials, options);
        }
        return mongoClient;
    }
}
4、MongoDBOpLog.java 集成了库验证、表查询、数据动态获取
4.1 测试初始化客户端-持有数据库
     public class MongoDBOpLog {
    private static MongoClient mongoClient;
    public static void main(String[] args) throws InterruptedException {
        initMongoClient();
        //获取local库
        MongoDatabase database = getDatabase("local");
        //监控库oplog.$main
        MongoCollection<Document> runoob = getCollection(database, "oplog.$main");
        //处理
        dataProcessing(runoob);
    }
    private static void initMongoClient() {
        try {
            mongoClient = MongoDBUtil.initMongoHasUser();
        } catch (IOException e) {
            e.printStackTrace();
        }
    }
    public static MongoDatabase getDatabase(String dataBase) {
        if (!mongoClient.getDatabaseNames().contains(dataBase)) {
            throw new RuntimeException(dataBase + " no exist !");
        }
        MongoDatabase mongoDatabase = mongoClient.getDatabase(dataBase);
        return mongoDatabase;
    }
4.2 获取表对象
   /**
     * 获取表对象
          * @param mongoDatabase
     * @param testCollection
     * @return
     */
    public static MongoCollection<Document> getCollection(MongoDatabase mongoDatabase, String testCollection) {
        MongoCollection<Document> collection = null;
        try {
            //获取数据库dataBase下的集合collecTion,如果没有将自动创建
            collection = mongoDatabase.getCollection(testCollection);
        } catch (Exception e) {
            throw new RuntimeException("获取" + mongoDatabase.getName() + "数据库下的" + testCollection + "集合 failed !" + e);
        }
        return collection;
    }
4.3 获取数据流处理
     /**
     * 解析操作类型
     * @param op
     * @return
     */
    private static String getEventType(String op) {
        switch (op) {
            case "i":
                return "insert";
            case "u":
                return "update";
            case "d":
                return "delete";
            default:
                return "other";
        }
    }
    /**
     * 数据解析、格式封装,返回所有insert、update新数据,delete的老数据,做输出为逻辑删除, condition 字段为空
     * @return JSON Object
     */
    private static JSONObject resultRow(Document document, JSONObject result, String eventType) {
        JSONObject columns = new JSONObject();// 存放变化后的字段
        result.put("columns", columns);
        result.put("condition", new JSONObject()); // 条件
        for (Map.Entry<String, Object> entry : document.entrySet()) {
            if (entry.getKey().equalsIgnoreCase("_id")) {
                columns.put(entry.getKey(), ((ObjectId) entry.getValue()).toString());
                continue;
            }
            columns.put(entry.getKey(), entry.getValue());
        }
        return result;
    }
      case "d":                return "delete";            default:                return "other";        }    }    /**     * 数据解析、格式封装,返回所有insert、update新数据,delete的老数据,做输出为逻辑删除,condition字段为空     * @return JSONObject     */    private static JSONObject resultRow(Document document, JSONObject result, String eventType) {        JSONObject columns = new JSONObject();// 存放变化后的字段        result.put("columns", columns);        result.put("condition", new JSONObject()); // 条件        for (Map.Entry<String, Object> entry : document.entrySet()) {            if (entry.getKey().equalsIgnoreCase("_id")) {                columns.put(entry.getKey(), ((ObjectId) entry.getValue()).toString());                continue;            }            columns.put(entry.getKey(), entry.getValue());        }        return result;    }
4.4 数据流标准化
     /**
     * 解析操作类型
     * @param op
     * @return
     */
    private static String getEventType(String op) {
        switch (op) {
            case "i":
                return "insert";
            case "u":
                return "update";
            case "d":
                return "delete";
            default:
                return "other";
        }
    }
    /**
     * 数据解析、格式封装,返回所有insert、update新数据,delete的老数据,做输出为逻辑删除,condition字段为空
     * @return JSONObject
     */
    private static JSONObject resultRow(Document document, JSONObject result, String eventType) {
        JSONObject columns = new JSONObject();// 存放变化后的字段
        result.put("columns", columns);
        result.put("condition", new JSONObject()); // 条件
        for (Map.Entry<String, Object> entry : document.entrySet()) {
            if (entry.getKey().equalsIgnoreCase("_id")) {
                columns.put(entry.getKey(), ((ObjectId) entry.getValue()).toString());
                continue;
            }
            columns.put(entry.getKey(), entry.getValue());
        }
        return result;
    }
      case "d":                return "delete";            default:                return "other";        }    }    /**     * 数据解析、格式封装,返回所有insert、update新数据,delete的老数据,做输出为逻辑删除,condition字段为空     * @return JSONObject     */    private static JSONObject resultRow(Document document, JSONObject result, String eventType) {        JSONObject columns = new JSONObject();// 存放变化后的字段        result.put("columns", columns);        result.put("condition", new JSONObject()); // 条件        for (Map.Entry<String, Object> entry : document.entrySet()) {            if (entry.getKey().equalsIgnoreCase("_id")) {                columns.put(entry.getKey(), ((ObjectId) entry.getValue()).toString());                continue;            }            columns.put(entry.getKey(), entry.getValue());        }        return result;    }
5、结果
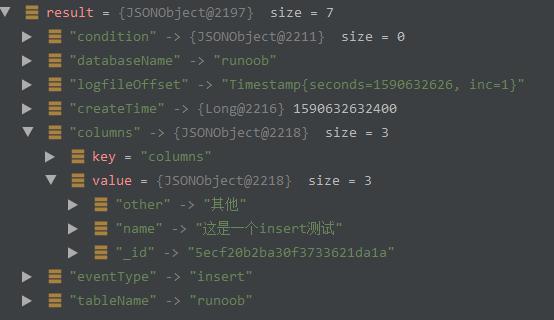
5.1 新增
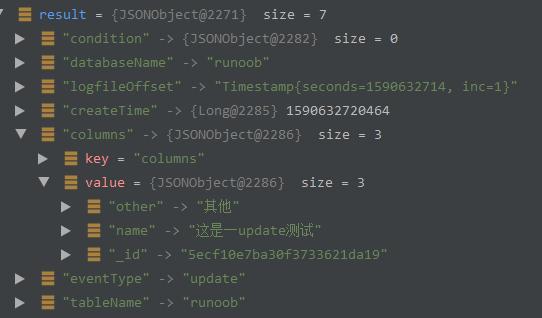
5.2 更新
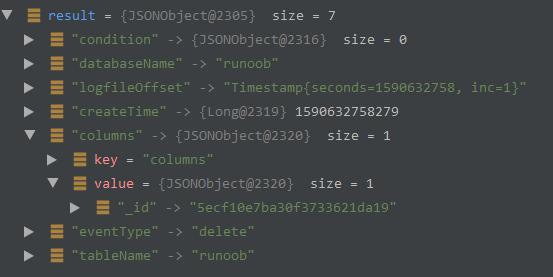
5.3 删除
实践
目前普元数据服务共享平台DSP(Data Service Platform),已经集成离线开发和在线开发实现单表和多表同步到HBASE的实践,做到了这一步,并且对客户的需求完成交付。
总之,对于当前企业数据库MongoDB,无论是使用Change Streams,还是Oplog增量同步,实现数据汇聚、搭建数据服务共享平台,提取价值、长久规划,都是必不可少的。
关于作者 : 雨声,现任普元高级开发工程师,熟悉软件开发的大数据、Java、常用消息组件等主流技术,有数据采集、消息推送、数据清洗、实时计算、数据可视化的完整开发经验。
关于EAWorld :微服务,DevOps,数据治理,移动架构原创技术分享。


