之前,已经介绍过 Netty 的 线程池 组创建过程:bossGroup、workerGroup。bossGroup负责处理客户端连接事件,workerGroup负责处理I/O事件。
一、基础组件说明
在具体讲述 netty 源码之前,必须要了解Netty的基础组件。
1.1 EventLoopGroup接口、EventLoop接口的关系
- 一个EventLoopGroup包含一个或者多个EventLoop;
- 一个EventLoop在它的生命周期内只和一个Thread绑定;
- 所有由EventLoop处理的I/O事件都将在它专有的Thread上被处理;
- 一个Channel在它的生命周期内只注册于一个EventLoop;
- 一个EventLoop可以被分配给一个或多个Channel;
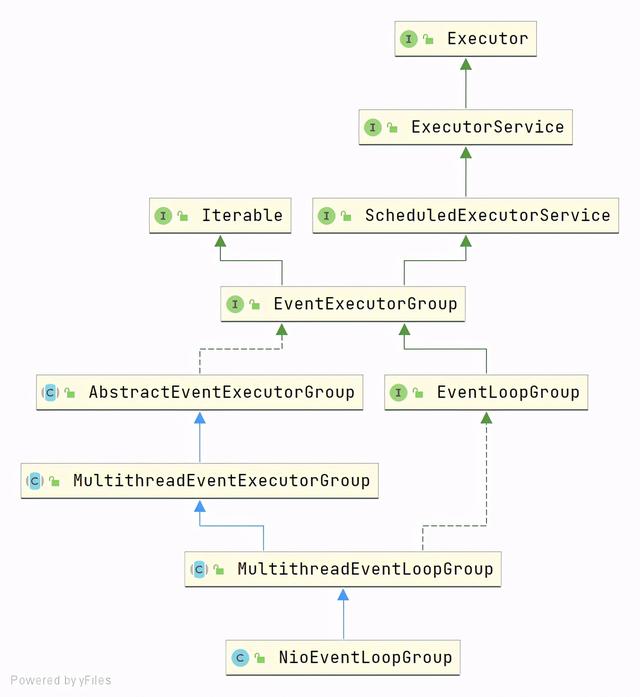
NioEventLoopGroup
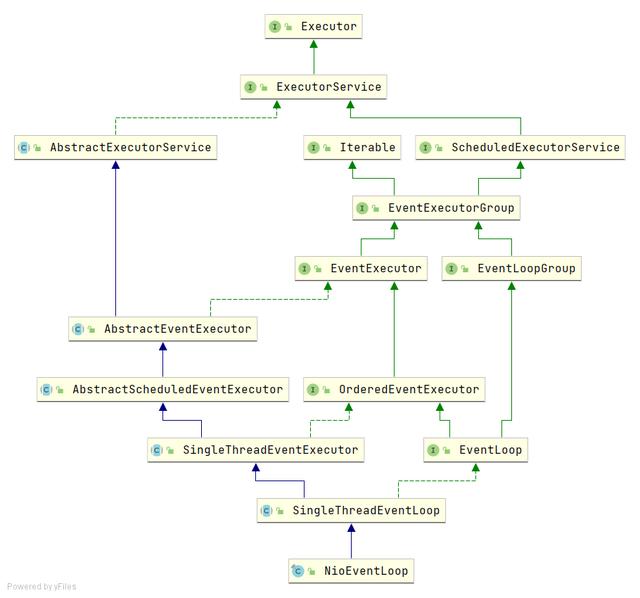
NioEventLoop
1.2 通道Channel与管道ChannelPipeline的关系
- Channel通道与ChannelPipeline管道是一对一关系
- 每一个新建的Channel都会关联唯一的ChannelPipeline,而ChannelPipeline中又维护一个由ChannelHandlerContext组成的双向链表结构, 链表 的头部为HeadContext,尾部为TailContext,且每个ChannelHandlerContext又关联一个ChannelHandler,ChannelHandlerContext是沟通handler与ChannelPipeline的桥梁。
- 事件经过Channel流经ChannelPipeline会由ChannelHandler(入站ChannelInboundHandler或者出站ChannelOutboundHandler)处理,然后通过调用ChannelHandlerContext它会被转发给下一个ChannelHandler。
I/O Request via {@link Channel} or {@link ChannelHandlerContext} | +---------------------------------------------------+---------------+ | ChannelPipeline | | | \|/ | | +---------------------+ +-----------+----------+ | | | Inbound Handler N | | Outbound Handler 1 | | | +----------+----------+ +-----------+----------+ | | /|\ | | | | \|/ | | +----------+----------+ +-----------+----------+ | | | Inbound Handler N-1 | | Outbound Handler 2 | | | +----------+----------+ +-----------+----------+ | | /|\ . | | . . | | ChannelHandlerContext.fireIN_EVT() ChannelHandlerContext.OUT_EVT()| | [ method call] [method call] | | . . | | . \|/ | | +----------+----------+ +-----------+----------+ | | | Inbound Handler 2 | | Outbound Handler M-1 | | | +----------+----------+ +-----------+----------+ | | /|\ | | | | \|/ | | +----------+----------+ +-----------+----------+ | | | Inbound Handler 1 | | Outbound Handler M | | | +----------+----------+ +-----------+----------+ | | /|\ | | +---------------+-----------------------------------+---------------+ | \|/ +---------------+-----------------------------------+---------------+ | | | | | [ Socket.read() ] [ Socket.write() ] | | | | Netty Internal I/O Threads (Transport Implementation) | +-------------------------------------------------------------------+
1.3 入站(ChannelInboundHandler)和出站(ChannelOutboundHandler)
注意这里的入站和出站与数据结构中的入栈和出栈不一样。
从服务器角度来看:接收客户端数据为入站,发送数据给客户端表示出站
从客户端角度来看:接收服务端数据为入站,发送数据给服务端表示出站
1.4 Netty重写的io.netty.Future
Future :表示异步的执行结果,可以通过它提供的方法来检测执行是否完成
ChannelFuture : 继承Future的接口,能够添加监听器,该监听器的作用就是回调任务结果。
Netty中的所有IO操作都是异步的。这意味着任何IO调用都将立即返回,而不能保证在调用结束时已完成请求的IO操作。相反,您将返回一个ChannelFuture实例,该实例为您提供有关IO操作的结果或状态的信息。在正常情况下,addListener(GenericFutureListener)能够在完成I/O操作并执行任何后续任务时得到通知。addListener(GenericFutureListener)是非阻塞的。 只需将指定的ChannelFutureListener添加到ChannelFuture,并且与将来关联的I/O操作完成时,I/O线程将通知监听器。 ChannelFutureListener完全不会阻塞,因此可以产生最佳的性能和资源利用率。
/*** +---------------------------+* | Completed successfully |* +---------------------------+* +----> isDone() = true |* +--------------------------+ | | isSuccess() = true |* | Uncompleted | | +===========================+* +--------------------------+ | | Completed with failure |* | isDone() = false | | +---------------------------+* | isSuccess() = false |----+----> isDone() = true |* | isCancelled() = false | | | cause() = non-null |* | cause() = null | | +===========================+* +--------------------------+ | | Completed by cancellation |* | +---------------------------+* +----> isDone() = true |* | isCancelled() = true |* +---------------------------+**/
二、源码分析
public class NettyServer { private static final Logger logger = LoggerFactory.getLogger(NettyServer.class); public void run() { // bossGroup处理客户端连接,绑定 线程 数1 EventLoopGroup bossGroup = new NioEventLoopGroup(1); // 处理IO事件的事件循环组,线程数为cpu的核心数*2 EventLoopGroup workerGroup = new NioEventLoopGroup(); try { ServerBootstrap serverBootstrap = new Server Bootstrap(); serverBootstrap.group(bossGroup, workerGroup) //初始化ServerBootstrap的线程组 .channel(NioServerSocketChannel.class) // 设置服务端通道实现类型 .option(ChannelOption.SO_BACKLOG, 128) // 服务端用于接收进来的连接,也就是bossGroup线程 .childOption(ChannelOption.SO_KEEPALIVE, true)// 设置workerGroup线程保持活动连接状态 .childHandler(new MyChannelInitializer()); // 绑定端口号,启动服务端 ChannelFuture channelFuture = serverBootstrap.bind(new InetSocketAddress(6666)).sync(); if (channelFuture.isSuccess()){ logger.info("==============服务端启动成功=================="); } // 主线程执行到这里就 wait 子线程结束,子线程才是真正监听和接受请求的 // closeFuture()是开启了一个channel的监听器,负责监听channel是否关闭的状态 // 如果监听到channel关闭了,子线程才会释放, channelFuture.channel().closeFuture().sync(); logger.info("channel已关闭"); } catch ( Exception e) { System.out.println("服务端错误"); } finally { // 关闭线程组 bossGroup. shutdown Gracefully(); workerGroup.shutdownGracefully(); } }}
Netty的源码很复杂,给我的感觉就是绕来绕去的,而且debug的时候一定要按照断点调式,从一个线程切换另一个线程,稍不注意就没找到对应的逻辑。下面就从两个方面(初始化Channel、注册channel)来讲解netty的启动过程做了哪些事情。
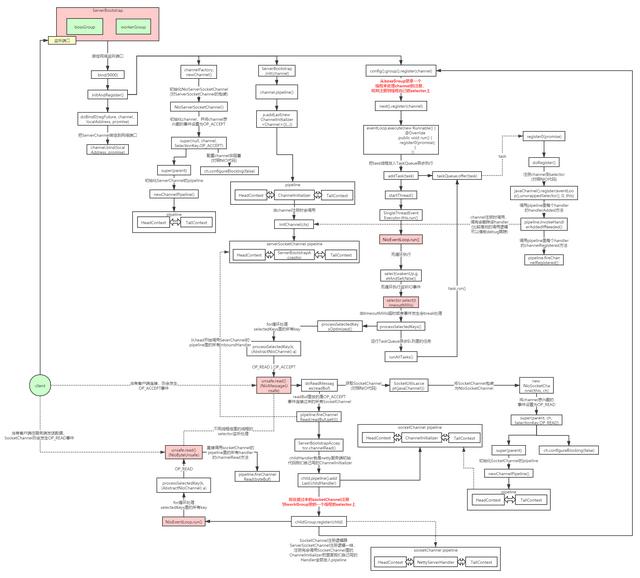
Netty流程图
2.1 初始化channel
当调用 bind (port)方法时,会进入到ServerBootstrap的父类 abstract Bootstrap的bind()方法,代码如下:
public abstract class AbstractBootstrap{ // 绑定端口 private ChannelFuture doBind(final SocketAddress localAddress) { // 1. 初始化ServerSocketChannel并注册 final ChannelFuture regFuture = initAndRegister(); final Channel channel = regFuture.channel(); if (regFuture.cause() != null) { return regFuture; } if (regFuture.isDone()) { // At this point we know that the registration was complete and successful. ChannelPromise promise = channel.newPromise(); doBind0(regFuture, channel, localAddress, promise); return promise; } else { // Registration future is almost always fulfilled already, but just in case it's not. final PendingRegistrationPromise promise = new PendingRegistrationPromise(channel); regFuture.addListener(new ChannelFutureListener() { @Override public void operationComplete(ChannelFuture future) throws Exception { Throwable cause = future.cause(); if (cause != null) { // Registration on the EventLoop failed so fail the ChannelPromise directly to not cause an // IllegalStateException once we try to access the EventLoop of the Channel. promise.setFailure(cause); } else { // Registration was successful, so set the correct executor to use. // See promise.registered(); doBind0(regFuture, channel, localAddress, promise); } } }); return promise; } } final ChannelFuture initAndRegister() { Channel channel = null; try { // 2. 反射创建ServerSocketChannel channel = channelFactory.newChannel(); // 3. 初始化channel,获取ChannelPipeline并向其中添加ChannelHandler init(channel); } catch (Throwable t) { if (channel != null) { // channel can be null if newChannel crashed (eg SocketException("too many open files")) channel.unsafe().closeForcibly(); // as the Channel is not registered yet we need to force the usage of the GlobalEventExecutor return new DefaultChannelPromise(channel, GlobalEventExecutor.INSTANCE).setFailure(t); } // as the Channel is not registered yet we need to force the usage of the GlobalEventExecutor return new DefaultChannelPromise(new FailedChannel(), GlobalEventExecutor.INSTANCE).setFailure(t); } // 4. 获取bossGroup线程组,然后获取里面的线程(next()方法轮询),将channel注册 ChannelFuture regFuture = config().group().register(channel); if (regFuture.cause() != null) { if (channel.isRegistered()) { channel.close(); } else { channel.unsafe().closeForcibly(); } } // If we are here and the promise is not failed, it's one of the following cases: // 1) If we attempted registration from the event loop, the registration has been completed at this point. // i.e. It's safe to attempt bind() or connect() now because the channel has been registered. // 2) If we attempted registration from the other thread, the registration request has been successfully // added to the event loop's task queue for later execution. // i.e. It's safe to attempt bind() or connect() now: // because bind() or connect() will be executed *after* the scheduled registration task is executed // because register(), bind(), and connect() are all bound to the same thread. return regFuture; }}
从以上代码可以看出,initAndRegister(channel)主要做了三件事情,分别为:
- 通过反射调用NioServerSocketChannel的无参构造器来创建NioServerSocketChannel对象
- 向channel的管道channePipeline添加ChannelInitializer
- 将channel注册到对应的selector上
2.1.1 初始化Channel
由以上代码可知,首先需要new一个NioServerSocketChannel的对象。NioServerSocketChannel的UML类图如下:
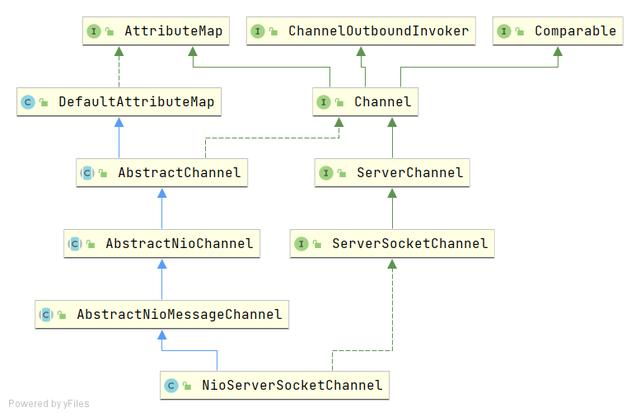
NioServerSocketChannel
由图可知,我们猜测当我们初始化NioServerSocketChannel的时候可能要先初始化其一系列父类了。下面就开始分析了
1. 进入NioServerSocketChannel的无参构造方法。
public class NioServerSocketChannel extends AbstractNioMessageChannel implements io.netty.channel.socket.ServerSocketChannel{ /** 默认选择器 */ private static final SelectorProvider DEFAULT_SELECTOR_PROVIDER = SelectorProvider.provider(); //1. 反射创建对象 public NioServerSocketChannel() { this(newSocket(DEFAULT_SELECTOR_PROVIDER)); } //2. 创建一条server端的channel private static ServerSocketChannel newSocket(SelectorProvider provider) { try { /** * Use the {@link SelectorProvider} to open {@link SocketChannel} and so remove condition in * {@link SelectorProvider#provider()} which is called by each ServerSocketChannel.open() otherwise. * * See <a href="#34;>#2308</a>. */ return provider.openServerSocketChannel(); } catch (IOException e) { throw new ChannelException( "Failed to open a server socket.", e); } } //3. 调用构造方法,初始化,注册感兴趣的事件为Accept事件 public NioServerSocketChannel(ServerSocketChannel channel) { // 这个super调用父类的构造方法做了:生成默认的ChannelPipleline、设置感兴趣的事件为Accept事件、设置非阻塞模式 super(null, channel, SelectionKey.OP_ACCEPT); // 配置类 config = new NioServerSocketChannelConfig(this, javaChannel().socket()); }}
2. 向上调用AbstractNioMessageChannel
我们发现这个父类什么都没做,转交给其父类AbstractNioChannel了
public abstract class AbstractNioMessageChannel extends AbstractNioChannel{ protected AbstractNioMessageChannel(Channel parent, SelectableChannel ch, int readInterestOp) { // 这个父类什么事都没做,继续向上调用父类 super(parent, ch, readInterestOp); }}
3. 继续向上调用AbstractNioChannel
public abstract class AbstractNioChannel extends AbstractChannel{ protected AbstractNioChannel(Channel parent, SelectableChannel ch, int readInterestOp) { // 1. 继续向上调用父类 super(parent); this.ch = ch; // 2. 设置感兴趣的事件为Accept事件 this.readInterestOp = readInterestOp; try { // 3. 设置为非阻塞模式 ch.configureBlocking(false); } catch (IOException e) { try { ch.close(); } catch (IOException e2) { logger.warn( "Failed to close a partially initialized socket.", e2); } throw new ChannelException("Failed to enter non-blocking mode.", e); } }}
我们可以看到这个AbstractNioChannel类首先会继续向上调用其父类,其次它做了两件事情:设置channel感兴趣的事件为Accept事件、设置为非阻塞模式。这块跟JDK的NIO初始化就对上了。
下面,我们去看看super(parent);到底做了哪些事情。
4. AbstractChannel
public abstract class AbstractChannel extends DefaultAttributeMap implements Channel{ private final Channel parent; private final ChannelId id; private final Unsafe unsafe; private final DefaultChannelPipeline pipeline; protected AbstractChannel(Channel parent) { this.parent = parent; // 生成全局唯一的channel id id = newId(); // new Unsafe()类 unsafe = newUnsafe(); // 生成channel关联的唯一pipeline pipeline = newChannelPipeline(); } // 初始化ChannelPipeline protected DefaultChannelPipeline newChannelPipeline() { // 创建默认的channelPipeline return new DefaultChannelPipeline(this); }}
这个类初始化主要做了以下事情:
- 给每个channel生成全局的唯一id
- 创建Unsafe类对象
- 将channel与ChannelPipeline一一关联,我们上面提到过channel与ChannelPipeline是一对一关系,且关联关系是唯一的,不存在一对多的情况
下面来看看这个ChanelPipeline的初始化做了哪些事情:
public class DefaultChannelPipeline implements ChannelPipeline{ // 我们可以看出ChannelPipeline是一个双向链表结构 protected DefaultChannelPipeline(Channel channel) { this.channel = ObjectUtil.checkNotNull(channel, "channel"); succeededFuture = new SucceededChannelFuture(channel, null); voidPromise = new VoidChannelPromise(channel, true); // 尾结点,它是channelHandlerContext、入站handler tail = new TailContext(this); // 头结点,它是channelHandlerContext、出站handler、入站handler head = new HeadContext(this); // 头结点指向尾结点 head.next = tail; // 尾结点的指向头结点 tail.prev = head; }}
可以看出默认的ChannelPipeline在内部维护了一个由ChannelHandlerContext对象组成的双向链表,每一个ChannelHandlerContext会关联维护一个handle。

ChannelPipeline
注意:当向pipeline里面添加handler时,调用 addLast () 方法时,它是从最后一个结点 Tail 的上一个节点插入。
public class DefaultChannelPipeline implements ChannelPipeline{ // 插入的时候addLast(ChannelHandler... handlers), 最终会调用到addLast0这个方法; private void addLast0(AbstractChannelHandlerContext newCtx) { // 获取尾结点tail的上一个结点 AbstractChannelHandlerContext prev = tail.prev; // 新结点前指针指向tail的上一个结点 newCtx.prev = prev; // 新结点后指针指向tail结点 newCtx.next = tail; // prev的后指针指向新结点 prev.next = newCtx; // tail的前指针指向新结点 tail.prev = newCtx; }}
大致场景如下图所示:

至此,Channel对象NioServerSocketChannel就已经初始化完成,下面将进入init(channel)来看看它生成的channel对象做了哪些事情。
2.1.2 init(channel)
下面进入到ServerBootstrap类的init(channel)方法,由于其父类没有该方法,表明此方法是ServerBootstrap类自己扩展的。
public class ServerBootstrap extends AbstractBootstrap<ServerBootstrap, ServerChannel> { /** * 1.9 初始化channel */ @Override void init(Channel channel) { setChannelOptions(channel, newOptionsArray(), logger); setAttributes(channel, attrs0().entrySet().toArray(EMPTY_ATTRIBUTE_ARRAY)); ChannelPipeline p = channel.pipeline(); // 变量声明为final,是因为下面的匿名内部类需要用到这些参数 final EventLoopGroup currentChildGroup = childGroup; final ChannelHandler currentChildHandler = childHandler; final Entry<ChannelOption<?>, Object>[] currentChildOptions; synchronized (childOptions) { currentChildOptions = childOptions.entrySet().toArray(EMPTY_OPTION_ARRAY); } final Entry<AttributeKey<?>, Object>[] currentChildAttrs = childAttrs.entrySet().toArray(EMPTY_ATTRIBUTE_ARRAY); // 主要是给ChannelPipeline添加入站ChannelInboundHandlerAdapter,initChannel会在注册的时候被调用 p.addLast(new ChannelInitializer<Channel>() { @Override public void initChannel(final Channel ch) { final ChannelPipeline pipeline = ch.pipeline(); ChannelHandler handler = config.handler(); if (handler != null) { pipeline.addLast(handler); } ch.eventLoop().execute(new Runnable() { @Override public void run() { pipeline.addLast(new ServerBootstrapAcceptor( ch, currentChildGroup, currentChildHandler, currentChildOptions, currentChildAttrs)); } }); } }); }}
该方法很简单,就是先给一些参数赋值,这些参数就是在启动类里面给serverBootstrap赋值的一些值,然后给channelPipeline添加handler,执行完该方法之后,之前我们说的addLast方法添加之后channelPipeline就表示如下:
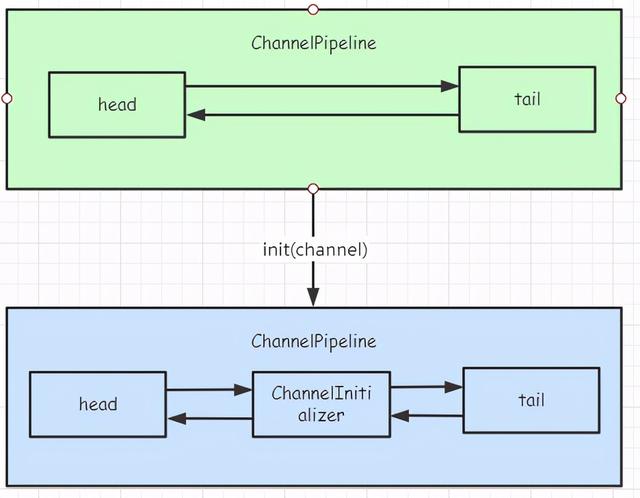
至此,channel的初始化(也就是NioServerSocketChannel)已经全部完成,下面将NioServerSocketChannel注册到对应的selector上,以监听事件。
2.2 注册channel
channel的注册这个模块,其实是整个netty最不好理解的模块,因为我之前说过,它总是跳来跳去,体现的就是组件很多,调用很多,打断点不好调试,下面就简单点来了解以下它做了哪些事情吧。
以这个流程图为例:
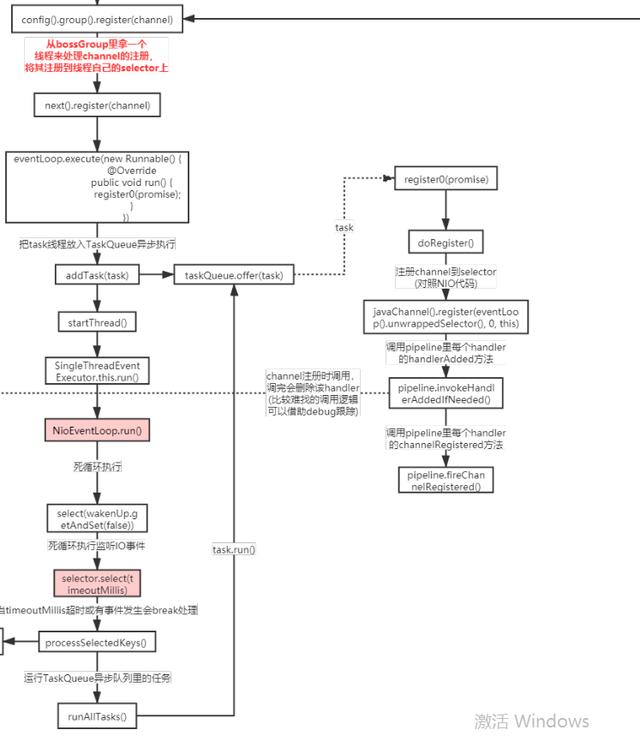
channel的注册
ChannelFuture regFuture = config().group().register(channel);
就上面这一段代码,完成了channel的注册。
config():返回ServerBootstrapConfig。
group():获取线程循环组EventLoopGroup,这个group其实就是.group(boss, worker)里面配置的bossGroup对象。
config().group()返回的是NioEventLoopGroup对象,由于它没有重写register(channel)方法,需要向上调用父类MultithreadEventLoopGroup的register(channel)方法。
public abstract class MultithreadEventLoopGroup extends MultithreadEventExecutorGroup implements EventLoopGroup { @Override public ChannelFuture register(Channel channel) { // next()是获取从executors数组里面获取EventExecutor对象,在本例中,其实际对象为NioEventLoop // NioEventLoop类从没有重写register(channel)方法,需要进入其父类SingleThreadEventLoop调用 return next().register(channel); }}
next()方法表示采用顺序轮询算法从线程组里面拿去一个线程(EventLoop与thread绑定)去注册channel。
进入SingleThreadEventLoop类
public abstract class SingleThreadEventLoop extends SingleThreadEventExecutor implements EventLoop { @Override public ChannelFuture register(Channel channel) { // 调用register return register(new DefaultChannelPromise(channel, this)); } @Override public ChannelFuture register(final ChannelPromise promise) { ObjectUtil.checkNotNull(promise, "promise"); // 获取AbstractUnsafe对象调用register promise.channel().unsafe().register(this, promise); return promise; }}
promise.channel()得到的是NioServerSocketChannel对象,由于其没有unsafe()方法,调用其父类的父类AbstractNioChannel的unsafe()方法,它继续调用AbstractNioChannel类的unsafe()方法,获得NioUnsafe对象。AbstractNioMessageChannel$NioMessageUnsafe。$后面跟的是内部类NioMessageUnsafe。
public abstract class AbstractNioMessageChannel extends AbstractNioChannel{ @Override public NioUnsafe unsafe() { // 返回的是AbstractNioMessageChannel$NioMessageUnsafe对象 return (NioUnsafe) super.unsafe(); } // AbstractNioChannel初始化unsafe的时候会调用 @Override protected AbstractNioUnsafe newUnsafe() { return new NioMessageUnsafe(); }}
下面来重新捋一下:promise为DefaultChannelPromise对象,它里面维护一个channel对象,promise.channel()获取的NioServerSocketChannel对象,NioServerSocketChannel对象没有unsafe()方法,向其父类AbstractNioMessageChannel调用unsafe()方法,而其父类继续向上调用unsafe()方法,从AbstractNioChannel获取Unsafe对象。
public abstract class AbstractChannel{ private final Unsafe unsafe; // 初始化NioServerSocketChannel的时候就开始给其赋值了 protected AbstractChannel(Channel parent) { this.parent = parent; id = newId(); // 初始化unsafe,返回的是AbstractNioMessageChannel$NioMessageUnsafe对象 unsafe = newUnsafe(); pipeline = newChannelPipeline(); } @Override public Unsafe unsafe() { return unsafe; }}
最后,来捋一下unsafe的继承关系
NioMessageUnsafe extends AbstractNioUnsafe extends AbstractUnsafe implements NioUnsafe
我们可以看到NioUnsafe对象,像这样AbstractNioUnsafe= new NioMessageUnsafe(); 然后再向上转型:NioUnsafe = new NioMessageUnsafe();
为什么要转型呢?因为AbstractNioUnsafe对象没有register()方法,该方法再AbstractChannel的内部类AbstractUnsafe中,而它又implements Unsafe接口。
最后调用register(this, promise)时,进入到以下代码:
public abstract class AbstractChannel{ protected abstract class AbstractUnsafe implements Unsafe { @Override public final void register(EventLoop eventLoop, final ChannelPromise promise) { AbstractChannel.this.eventLoop = eventLoop; // 判断当前执行器的线程是否是正在执行中的线程,第一次启动的时候不会进入该分支 if (eventLoop.inEventLoop()) { register0(promise); } else { // 第一次启动的时候进入该分支 try { // 注意这个execute不仅仅只是线程执行器,它里面还做了其它事情: // 1. 将task任务添加到队列中,然后异步执行,这个task线程就是register0(promise) // 2. 调用SingleThreadEventExecutor.this.run方法,死循环执行 eventLoop.execute(new Runnable() { @Override public void run() { register0(promise); } }); } catch (Throwable t) { logger.warn( "Force-closing a channel whose registration task was not accepted by an event loop: {}", AbstractChannel.this, t); closeForcibly(); closeFuture.setClosed(); safeSetFailure(promise, t); } } }}
添加任务task到队列taskQueue中:
public abstract class SingleThreadEventExecutor { @Override public void execute(Runnable task) { ObjectUtil.checkNotNull(task, "task"); execute(task, !(task instanceof LazyRunnable) && wakesUpForTask(task)); } private void execute(Runnable task, boolean immediate) { // 判断当前SingleThreadEventExecutor中的thread是否是当前传进来的线程 // 当第一次调用该方法时,返回false boolean inEventLoop = inEventLoop(); // 添加任务到队列中 addTask(task); if (!inEventLoop) { // 开启线程 startThread(); if (isShutdown()) { boolean reject = false; try { if (removeTask(task)) { reject = true; } } catch (UnsupportedOperationException e) { // The task queue does not support removal so the best thing we can do is to just move on and // hope we will be able to pick-up the task before its completely terminated. // In worst case we will log on termination. } if (reject) { reject(); } } } if (!addTaskWakesUp && immediate) { wakeup(inEventLoop); } }}
startThread() 方法:
private void startThread() { if (state == ST_NOT_STARTED) { if (STATE_UPDATER.compareAndSet(this, ST_NOT_STARTED, ST_STARTED)) { boolean success = false; try { // 准备启动线程 doStartThread(); success = true; } finally { if (!success) { STATE_UPDATER.compareAndSet(this, ST_STARTED, ST_NOT_STARTED); } } } } }
doStartThread()方法:该方法就是给SingleThreadEventExecutor的成员变量thread赋值,然后调用SingleThreadEventExecutor的run()方法,该方法是抽象方法,由子类继承重写(模板模式)。
public abstract class SingleThreadEventExecutor{ private void doStartThread() { assert thread == null; executor.execute(new Runnable() { @Override public void run() { // 给当前SingleThreadEventExecutor类的成员变量thread赋值,为了之前的if条件判断 thread = Thread.currentThread(); if (interrupted) { thread.interrupt(); } boolean success = false; updateLastExecutionTime(); try { // 匿名内部类调用外部类SingleThreadEventExecutor的run方法 SingleThreadEventExecutor.this.run(); success = true; } catch (Throwable t) { logger.warn("Unexpected exception from an event executor: ", t); } finally { } } }); }}
在此实例中,子类为NioEventLoop对象,进入它的run()方法。
public class NioEventLoop{ @Override protected void run() { int selectCnt = 0; // 死循环 for (;;) { try { int strategy; try { // 获取策略,第一次返回的是0 strategy = selectStrategy.calculateStrategy(selectNowSupplier, hasTasks()); switch (strategy) { // -2 case SelectStrategy.CONTINUE: continue; // -3 case SelectStrategy.BUSY_WAIT: // fall-through to SELECT since the busy-wait is not supported with NIO // -1 case SelectStrategy.SELECT: long curDeadlineNanos = nextScheduledTaskDeadlineNanos(); if (curDeadlineNanos == -1L) { curDeadlineNanos = NONE; // nothing on the calendar } nextWakeupNanos.set(curDeadlineNanos); try { if (!hasTasks()) { // select strategy = select(curDeadlineNanos); } } finally { // This update is just to help block unnecessary selector wakeups // so use of lazySet is ok (no race condition) nextWakeupNanos.lazySet(AWAKE); } // fall through default: } } catch (IOException e) { // If we receive an IOException here its because the Selector is messed up. Let's rebuild // the selector and retry. rebuildSelector0(); selectCnt = 0; handleLoopException(e); continue; } selectCnt++; cancelledKeys = 0; needsToSelectAgain = false; final int ioRatio = this.ioRatio; boolean ranTasks; if (ioRatio == 100) { try { if (strategy > 0) { processSelectedKeys(); } } finally { // Ensure we always run tasks. ranTasks = runAllTasks(); } } else if (strategy > 0) { final long ioStartTime = System.nanoTime(); try { // 当有事件发生时,处理selectionKey processSelectedKeys(); } finally { // Ensure we always run tasks. final long ioTime = System.nanoTime() - ioStartTime; ranTasks = runAllTasks(ioTime * (100 - ioRatio) / ioRatio); } } else { // 执行队列中的任务,此方法在SingleThreadEventExecutor类中调用 // 里面是一个for循环,执行完所有任务后,会进入到select策略等待 ranTasks = runAllTasks(0); // This will run the minimum number of tasks } if (ranTasks || strategy > 0) { if (selectCnt > MIN_PREMATURE_SELECTOR_RETURNS && logger.isDebugEnabled()) { logger.debug("Selector.select() returned prematurely {} times in a row for Selector {}.", selectCnt - 1, selector); } selectCnt = 0; } else if (unexpectedSelectorWakeup(selectCnt)) { // Unexpected wakeup (unusual case) selectCnt = 0; } } catch (Exception e) { } finally { } } }}
上面这段代码会进入到ranTasks = runAllTasks(0); 也就是执行我们要添加的任务队列。
通过继承关系可知NioEventLoop调用的runAllTasks(long timeoutNanos)方法在其父类SingleThreadEventExecutor中实现。
public abstract class SingleThreadEventExecutor { protected boolean runAllTasks(long timeoutNanos) { // 判断是否有定时任务,如果scheduledTaskQueue中有定时任务,就将其添加到任务队列taskQueue中 fetchFromScheduledTaskQueue(); Runnable task = pollTask(); if (task == null) { afterRunningAllTasks(); return false; } final long deadline = timeoutNanos > 0 ? ScheduledFutureTask.nanoTime() + timeoutNanos : 0; long runTasks = 0; long lastExecutionTime; for (;;) { // 执行任务 safeExecute(task); runTasks ++; // Check timeout every 64 tasks because nanoTime() is relatively expensive. // XXX: Hard-coded value - will make it configurable if it is really a problem. if ((runTasks & 0x3F) == 0) { lastExecutionTime = ScheduledFutureTask.nanoTime(); if (lastExecutionTime >= deadline) { break; } } task = pollTask(); if (task == null) { lastExecutionTime = ScheduledFutureTask.nanoTime(); break; } } afterRunningAllTasks(); this.lastExecutionTime = lastExecutionTime; return true; }}
执行任务时,会调用到register0()方法:
public abstract class AbstractChannel{ protected abstract class AbstractUnsafe implements Unsafe { private void register0(ChannelPromise promise) { try { boolean firstRegistration = neverRegistered; // 1. 将ServerSocketChannel注册到selector上,并返回selectionKey doRegister(); neverRegistered = false; registered = true; // Ensure we call handlerAdded(...) before we actually notify the promise. This is needed as the // user may already fire events through the pipeline in the ChannelFutureListener. // 2. 调用init(channel)中initChannel方法 pipeline.invokeHandlerAddedIfNeeded(); safeSetSuccess(promise); // 3. 调用channelPipeline中的每个channelRegister方法 pipeline.fireChannelRegistered(); // Only fire a channelActive if the channel has never been registered. This prevents firing // multiple channel actives if the channel is deregistered and re-registered. if (isActive()) { if (firstRegistration) { pipeline.fireChannelActive(); } else if (config().isAutoRead()) { // This channel was registered before and autoRead() is set. This means we need to begin read // again so that we process inbound data. // // See beginRead(); } } } catch (Throwable t) { // Close the channel directly to avoid FD leak. closeForcibly(); closeFuture.setClosed(); safeSetFailure(promise, t); } } }}
该方法做了以下几件事:
1. doRegister();
将ServerSocketChannel注册到selector,注册代码参考JDK NIO
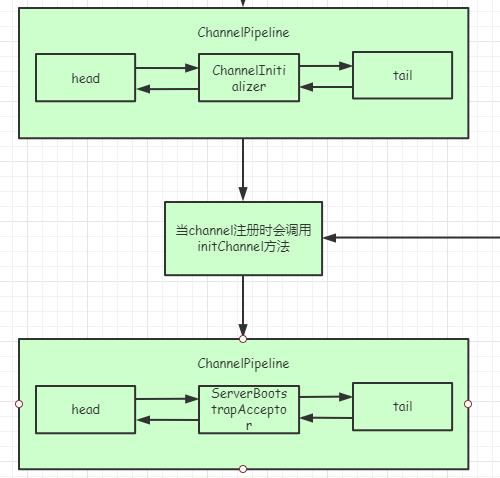
2. pipeline.invokeHandlerAddedIfNeeded();
还记得init(channel)时,向pipeline添加匿名内部类ChannelInitializer时initChannel(final Channel ch)尚未执行,该方法就是调用initChannel方法,调用完成之后添加该节点。
如下图所示:
3. pipeline.fireChannelRegistered();
调用channelPipeline的每个channelRegister方法。
至此,netty启动流程已全部完成,当任务队列的任务执行完后,会进入select策略,等待客户端的连接请求和后续的IO事件。


