大家好,昨天的教程有没有学会呢?
今天小编又给大家带来新知识了!!!!!
通过前端提交给php并写入数据库,在显示到前端中。
听起来是不是很乱,不过没关系只要昨天的教程学会了
对于今天的教程来说就会非常简单,有不懂的可以去看看我昨天的教程哦。
今天所用到的软件有:
sublime text3(编程软件)
phpStudy(本地测试环境)
今天所用的知识;
html基础知识(文件提交)
php基础知识(昨天教程里的知识)
MySQL基础知识(昨天教程中出现了)
首先我们先登录phpmyadmin,昨天讲过了今天我就不演示了
然后我们创建一张表命名为“nr”当然你也可以命名为你自己想要的名称(昨天有讲过今天就不演示了)
我们在给表中写入一个“id”,“nrname”(存标题用),“imgdz”(存图片地址用),“nrnr”(存内容用)
名称可以自己去不一定要用我的(昨天的教材有教过今天就不演示了)
我们在建四个文件分别为“upload.html”(提交页面),“upload.php”(接收并保存图片在写入数据库),“db.php”(数据库连接页面),“tp.php”(显示数据页面)
昨天都有见过那我今天就直接上代码了
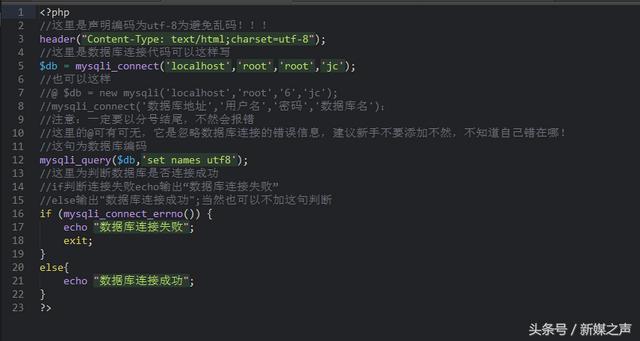
db.php(数据库连接页面)
upload.html(文件提交页面)

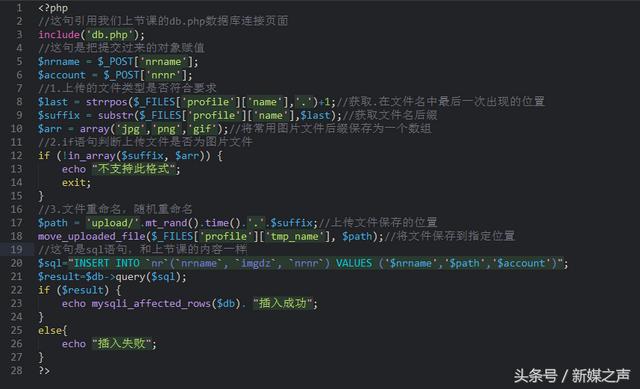
upload.php(文件接收保存并写入数据库)
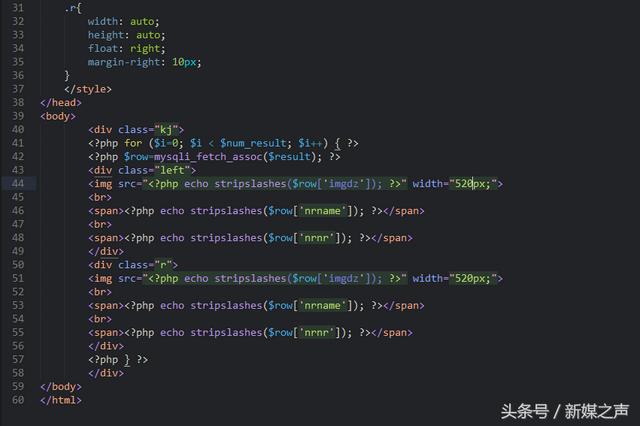
tp.php(显示页面)

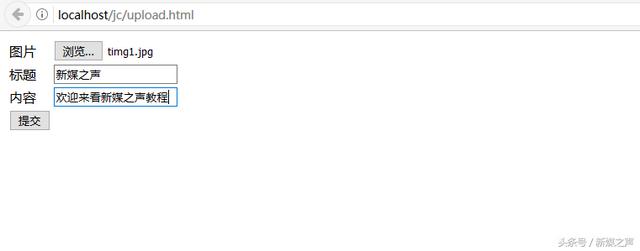
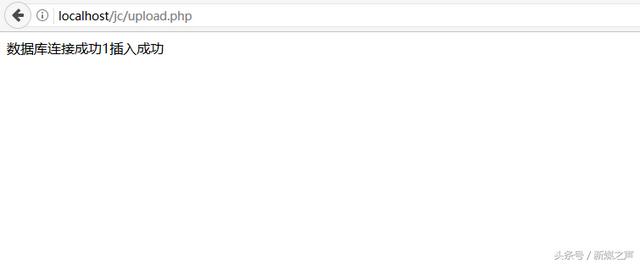
现在我们还测试一下
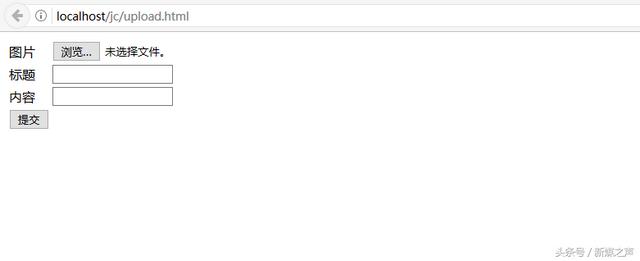
选择文件

填写内容
显示页面效果图

代码共享:
db.php(数据库连接代码)
<?php
//这里是声明编码为utf-8为避免乱码!!!
header(“Content-Type: text/html;charset=utf-8”);
//这里是数据库连接代码可以这样写
$db = mysqli_connect(‘localhost’,’root’,’root’,’jc’);
//也可以这样
//@ $db = new mysqli(‘localhost’,’root’,’6′,’jc’);
//mysqli_connect(‘数据库地址’,’用户名’,’密码’,’数据库名’);
//注意:一定要以分号结尾,不然会报错
//这里的@可有可无,它是忽略数据库连接的错误信息,建议新手不要添加不然,不知道自己错在哪!
//这句为数据库编码
my sql i_query($db,’set names utf8′);
//这里为判断数据库是否连接成功
//if判断连接失败echo输出“数据库连接失败”
//else输出”数据库连接成功”;当然也可以不加这句判断
if (mysqli_connect_errno()) {
echo “数据库连接失败”;
exit;
}
else{
echo “数据库连接成功”;
}
?>
upload.html(提交页面代码)
<!DOCTYPE html>
<html>
<head>
<meta charset=”utf-8″>
<title>文件上传</title>
</head>
<body>
<form action=”upload.php” method=”post” enctype=”multipart/form-data”/>
<table>
<tr>
<td>图片</td>
<!–这句是文件上传–>
<td><input type=”file” name=”profile”></td>
</tr>
<tr>
<td>标题</td>
<td><input type=”text” name=”nrname”></td>
</tr>
<tr>
<td>内容</td>
<td><input type=”text” name=”nrnr”></td>
</tr>
<tr>
<td><input type=”submit” value=”提交”></td>
</tr>
</table>
</form>
</body>
</html>
upload.php(接收页面代码)
<?php
//这句引用我们上节课的db.php数据库连接页面
include(‘db.php’);
//这句是把提交过来的对象赋值
$nrname = $_POST[‘nrname’];
$account = $_POST[‘nrnr’];
//1.上传的文件类型是否符合要求
$last = strrpos($_FILES[‘profile’][‘name’],’.’)+1;//获取.在文件名中最后一次出现的位置
$suffix = substr($_FILES[‘profile’][‘name’],$last);//获取文件名后缀
$arr = array(‘jpg’,’png’,’gif’);//将常用图片文件后缀保存为一个数组
//2.if语句判断上传文件是否为图片文件
if (!in_array($suffix, $arr)) {
echo “不支持此格式”;
exit;
}
//3.文件重命名,随机重命名
$path = ‘upload/’.mt_rand().time().’.’.$suffix;//上传文件保存的位置
move_uploaded_file($_FILES[‘profile’][‘tmp_name’], $path);//将文件保存到指定位置
//这句是 sql语句 ,和上节课的内容一样
$sql=”INSERT INTO `nr`(`nrname`, `imgdz`, `nrnr`) VALUES (‘$nrname’,’$path’,’$account’)”;
$result=$db->query($sql);
if ($result) {
echo mysqli_affected_rows($db). “插入成功”;
}
else{
echo “插入失败”;
}
?>
tp.php(数据显示代码)
<?php
include(‘db.php’);
//引用db.php
mysqli_query($db,’set names utf8′);
//这句为sql查询语句
$sql = “SELECT * FROM `nr` “;
//这句为执行sql语句
$result=mysqli_query($db,$sql);
//这句为来确定sql语句操作返回了多少行记录
$num_result=mysqli_num_rows($result);
?>
<!DOCTYPE html>
<html>
<head>
<meta charset=”utf-8″>
<title>显示</title>
<style type=”text/css”>
.kj{
width: 1080px;
height: auto;
margin: 0 auto;
overflow: auto; zoom: 1;
}
.left{
width: auto;
height: auto;
float: left;
margin-left: 10px;
margin-right: 10px;
}
.r{
width: auto;
height: auto;
float: right;
margin-right: 10px;
}
</style>
</head>
<body>
<div class=”kj”>
<?php for ($i=0; $i < $num_result; $i++) { ?>
<?php $row=mysqli_fetch_assoc($result); ?>
<div class=”left”>
<img src=”<?php%20echo%20stripslashes($row[‘imgdz’]);%20?>” width=”520px;”>
<br>
<span><?php echo stripslashes($row[‘nrname’]); ?></span>
<br>
<span><?php echo stripslashes($row[‘nrnr’]); ?></span>
</div>
<div class=”r”>
<img src=”<?php%20echo%20stripslashes($row[‘imgdz’]);%20?>” width=”520px;”>
<br>
<span><?php echo stripslashes($row[‘nrname’]); ?></span>
<br>
<span><?php echo stripslashes($row[‘nrnr’]); ?></span>
</div>
<?php } ?>
</div>
</body>
</html>
大家要多练哦,不然会对代码生疏的。
有不理解的和想要本次教程中的文件可以在下面留言哦,我会在第一时间回复的,又要合作的也可以给我留言哦。


