小编在上一篇文章 中讲解了 viper 是如何读取配置文件的,本文小编将继续学习和讲解viper的其他功能,包括写配置文件,监听配置文件变动,设置默认值,使用环境变量等操作。
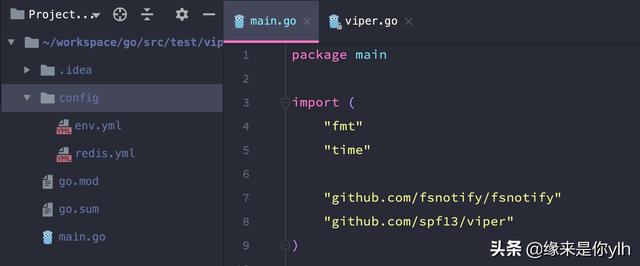
先看一下我demo的目录结构

写配置文件
从配置文件中读取配置文件是有用的,但是有时你想要存储在运行时所做的所有修改。为此,可以使用下面一组命令,每个命令都有自己的用途:
- WriteConfig – 将当前的viper配置写入预定义的路径并 覆盖 (如果存在的话)。如果没有预定义的路径,则报错。
- SafeWriteConfig – 将当前的viper配置写入预定义的路径。如果没有预定义的路径,则报错。如果存在,将不会覆盖当前的配置文件(经过测试,文件存在时会报错,是我翻译错了还是我理解错了?)。 原文:SafeWriteConfig – writes the current viper configuration to the predefined path. Errors if no predefined path. Will not overwrite the current config file, if it exists.
- WriteConfigAs – 将当前的viper配置写入给定的文件路径。将 覆盖 给定的文件(如果它存在的话)。
- SafeWriteConfigAs – 将当前的viper配置写入给定的文件路径。不会覆盖给定的文件(如果它存在的话)。
用法示例 WriteConfig :
 // 这里我新建了一个test.yml文件
viper.AddConfigPath("./config")
viper.SetConfigName("test.yml")
viper.SetConfigType("yaml")

// viper.WriteConfig 写入配置文件 文件不存在报错, 存在会覆盖(对存在的配置项覆盖并不是替换整个文件)
// 配置的key自动转小写
viper.Set("Domain", "127.0.4.3")
viper.Set("TestBool", false)
viper.Set("Test.TestInt", 1314)
viper.Set("Test.TestBool", true)
if err := viper.WriteConfig(); err != nil {
  panic("Write Configuration to predefined file error: " + err.Error())
}


// test.yml 会新增如下配置
domain: 127.0.4.3
test:
  testbool: true
  testint: 1314
testbool: false
 # 我们将 Domain 参数改为127.0.4.8
viper.Set("Domain", "127.0.4.8")

// test.yml
domain: 127.0.4.8
test:
  testbool: true
  testint: 1314
testbool: false
有了这个方法,我们是否可以考虑做个配置中心,对配置项做简单的修改?其余三个放大,感兴趣的可以自己试一试
监听文件变动
viper支持实时监控配置文件的变动,并获取变动后的新值,用法示例如下:
 viper.SetConfigFile("./config/test.yml")

if err := viper.ReadInConfig(); err != nil {
  panic("Read configuration from file error:" + err.Error())
}

// 开始监听
viper.WatchConfig()
viper.OnConfigChange(func(e fsnotify.Event) {    // 此处需要 import"github.com/fsnotify/fsnotify"
  fmt.Println("Config file changed:", e.Name)    // e.Name 是修改的文件名
  fmt.Printf("%+v", e.Op)   // e.Op 是动作
})
// 为了测试让程序暂时sleep
time.Sleep(100 * time.Second)

output:
// 我们将 domain: 127.0.4.8  改为  domain: 127.0.4.81111  并保存
// 从终端我们就可以看到输出信息:  Config file changed: config/test.yml    Write
加载远端配置信息
viper支持加载远端配置信息,目前支持的远端类型有: etcd、Consul、Firestore
etcd
 viper.AddRemoteProvider("etcd", "#34;,"/config/hugo.json")
viper.SetConfigType("json") // because there is no file extension in a stream of bytes, supported extensions are "json", "toml", "yaml", "yml", "properties", "props", "prop", "env", "dotenv"
err := viper.ReadRemoteConfig()
Consul
 viper.AddRemoteProvider("consul", "localhost:8500", "MY_CONSUL_KEY")
viper.SetConfigType("json") // Need to explicitly set this to json
err := viper.ReadRemoteConfig()

fmt.Println(viper.Get("port")) // 8080
fmt.Println(viper.Get("hostname")) // myhostname.com
Firestore
 viper.AddRemoteProvider("firestore", "google-cloud-project-id", "collection/document")
viper.SetConfigType("json") // Config's format: "json", "toml", "yaml", "yml"
err := viper.ReadRemoteConfig()
和环境变量一起使用
viper 完全支持环境变量,这是的应用程序可以开箱即用.
有四个和环境变量有关的方法:
- AutomaticEnv()
- BindEnv(string…) : error
- SetEnvPrefix(string)
- SetEnvKeyReplacer(string…) *strings.Replacer
注意,环境变量时区分大小写的.
Viper提供了一种机制来确保Env变量是唯一的.通过SetEnvPrefix,在从环境变量读取时会添加设置的前缀.BindEnv和AutomaticEnv都会使用到这个前缀.
BindEnv需要一个或两个参数.第一个参数是键名,第二个参数是环境变量的名称.环境变量的名称区分大小写.如果未提供ENV变量名称,则Viper会自动假定该键名称与ENV变量名称匹配,并且ENV变量为全部大写.当您显式提供ENV变量名称时,它不会自动添加前缀.
使用ENV变量时要注意,当关联后,每次访问时都会读取该ENV值.Viper在BindEnv调用时不读取ENV值.
AutomaticEnv与SetEnvPrefix结合将会特别有用.当AutomaticEnv被调用时,任何viper.Get请求都会去获取环境变量.环境变量名为SetEnvPrefix设置的前缀,加上对应名称的大写.
SetEnvKeyReplacer允许您使用一个strings.Replacer对象来将配置名重写为Env名.如果您想在Get()中使用包含-的配置名 ,但希望对应的环境变量名包含_分隔符,就可以使用该方法.
 SetEnvPrefix("spf") //会自动转换成大写
BindEnv("id")

os.Setenv("SPF_ID", "13") // 一般在app 外部设置

id := Get("id") // 13
注册和使用别名
 viper.RegisterAlias("loud", "Verbose")

viper.Set("verbose", true) // same result as next line
viper.Set("loud", true)   // same result as prior line

viper.GetBool("loud") // true
viper.GetBool("verbose") // true 

