今天给大家演示一下官方knative-eventing事件消费 CloudEvent事件的案例,从而帮助我们理解knative-eventing中原理。
1、knative 官方网站地址
2、上传 docker file和相关源码 到带有docker 环境的服务器制作docker镜像文件,并上传镜像私服habor镜像仓库。


官方默认的Dockerfile是需要修改的,主要是国内没办法访问golang.org ,因为 go .mod中使用到了。
 github.com/cloudevents/sdk-go/v2 v2.0.0-RC2
github.com/google/uuid v1.1.1
国内没办法下载,所以我们需要设置代理,具体修改如下:

ENV GOPROXY 接下来我们执行docker build 和 docker push
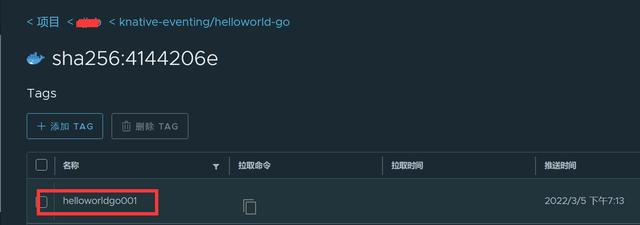
docker build -t=yf.registry.965432.com/sjjcb/knative-eventing/helloworld-go:helloworldgo001 . 接下来我们在用docker push 把创建好的镜像推送到 harbor私有仓库中。
docker push yf.registry.965432.com/sjjcb/knative-eventing/helloworld-go:helloworldgo001 
3.修改sample-app.yaml 文件上传带有安装好kubectl 的机器
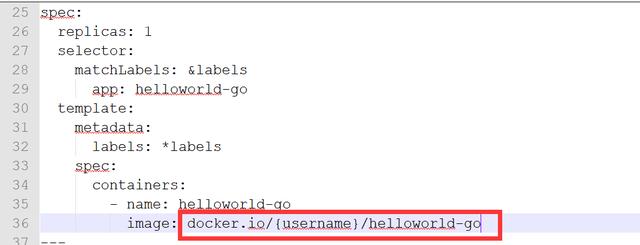
将以下服务定义复制到文件中。确保用 Docker Hub 用户名替换“{username}”

替换刚才创建的私有镜像地址

修改namespace 空间serving-test
修改后的 yaml 如下
 # Namespace for sample application
apiVersion: v1
kind: Namespace
metadata:
  name: serving-test
---
# A default broker
apiVersion: eventing.knative.dev/v1
kind: Broker
metadata:
  name: default
  namespace: serving-test
  annotations:
    # Note: you can set the eventing.knative.dev/broker.class annotation to change the class of the  Broker .
    # The default broker class is MTChannelBasedBroker, but Knative also supports use of the other class.
    eventing.knative.dev/broker.class: MTChannelBasedBroker
spec: {}
---
# Helloworld-go app deployment
apiVersion: apps/v1
kind: Deployment
metadata:
  name: helloworld-go
  namespace: serving-test
spec:
  replicas: 1
  selector:
    matchLabels: &labels
      app: helloworld-go
  template:
    metadata:
      labels: *labels
    spec:
      containers:
        - name: helloworld-go
          image: yf.registry.xx.com/xxx/knative-eventing/helloworld-go:helloworldgo001
---
# Service that exposes helloworld-go app.
# This will be the subscriber for the Trigger
apiVersion: v1
kind: Service
metadata:
  name: helloworld-eventing-go
  namespace: serving-test
spec:
  selector:
    app: helloworld-go
  ports:
    - protocol: TCP
      port: 80
      targetPort: 8080
---
# Knative Eventing Trigger to trigger the helloworld-go service
apiVersion: eventing.knative.dev/v1
kind: Trigger
metadata:
  name: helloworld-go
  namespace: serving-test
spec:
  broker: default
  filter:
    attributes:
      type: dev.knative.samples.helloworld
      source: dev.knative.samples/helloworldsource
  subscriber:
    ref:
      apiVersion: v1
      kind: Service
      name: helloworld-go
将修改后的sample-app.yaml 上传服务器

执行kubectl 命令
kubectl apply -f sample-app.yaml 
创建后我们看rancher 平台上新增加的 工作负载和服务发现


4.接下来验证和测试发送并验证CloudEvents
Get the Broker URL 我们先获取这个Broker 信息
kubectl -n serving-test get broker default 
我们记录返回的URL
部署一个curl pod并用SSH连接到其中
kubectl -n serving-test run curl --image=radial/busyboxplus:curl -it 执行后我们在rancher平台中创建出一个带URL POD

我们点击这个URL 在“执行命令” 窗口中输入一下信息


curl -v "#34; -X POST -H "Ce-Id: 536808d3-88be-4077-9d7a-a3f162705f79" -H "Ce-Specversion: 1.0" -H "Ce-Type: dev.knative.samples.helloworld" -H "Ce-Source: dev.knative.samples/helloworldsource" -H "Content-Type: application/json" -d '{"msg":"Hello World from the curl pod."}' 
执行后
控制台立刻返回信息

同时我们在helloworld-go 容器中查看是否能监听到broker 代理转发的事件信息


果然收到事件监听返回信息
 2022/03/05 15:08:59 Event received.

Validation: valid

Context Attributes,

  specversion: 1.0

  type: dev.knative.samples.helloworld

  source: dev.knative.samples/helloworldsource

  id: 536808d3-88be-4077-9d7a-a3f162705f79

  datacontenttype: application/json

Extensions,

  knativearrivaltime: 2022-03-05T15:08:59.768727795Z

Data,

  {

    "msg": "Hello World from the curl pod."

  }

2022/03/05 15:08:59  Hello World  Message from received event "Hello World from the curl pod."

2022/03/05 15:08:59 Responding with event

Validation: valid

Context Attributes,

  specversion: 1.0

  type: dev.knative.samples.hifromknative

  source: knative/eventing/samples/hello-world

  id: 4cee11fa-0d23-4577-808c-299fb70e11ce

  datacontenttype: application/json

Data,

  {

    "msg": "Hi from helloworld-go app!"

  }
以上我们通过使用curl命令中的CloudEvent属性和触发器监听到消息。
从上面的实例中是个典型的代理与触发器 模式。
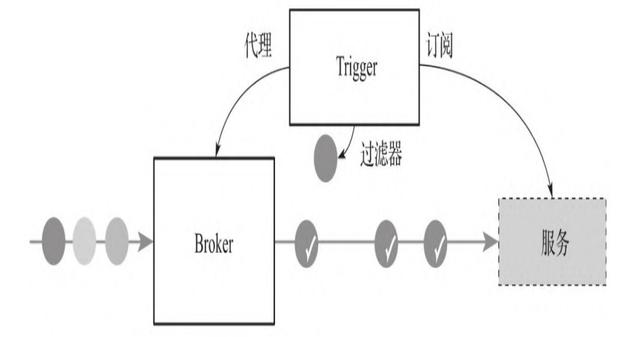
为了更容易地过滤事件,Knative Eventing定义了代理 (Broker)和触发器(Trigger)对象。代理提供了一个可以通过属性选择的事件桶。它接收并转发事件 到由一个或多个匹配的Trigger所定义的订阅者中。 触发器描述了一个基于事件属性的过滤器,该事件将被传递给可 寻址对象。你可以按需创建多个触发器。
对于每个代理,Knative Eventing会隐式地创建一个通道。 Trigger会订阅Broker,并将过滤器作用到消息上。过滤器通过 CloudEvent消息的属性过滤相应的消息,然后将消息传递给感兴趣的 订阅者,下面一张图可以很好地解释。

好了今天的分享就到这里,感兴趣的小伙伴可以持续关注,我后面将陆续介绍Event 其他案例以及原理等。


