一、简介
1. 课程背景
分布式 系统的根基在于网络编程,而 Netty 是 Java 领域网络编程的王者。
2. 课程内容
-
第一部分 NIO 编程,三大组件
-
第二部分 netty 入门学习,EventLoop、Channel、Future、Pipeline、 Handler 、 byte Buf
-
第三部分 Netty 进阶学习,粘包半包的解决方法、协议的设计、 序列化 知识
-
第四部分 Netty 常见参数的学习及优化
-
第五部分 源码
二、NIO 基础
non Blocking IO 非阻塞 IO
1. 三大组件
1.1 Channel & Buffer
channel 有一点类似于 stream,它就是读写数据的双向通道,可以从 channel 将数据读入 buffer,也可以将 buffer 的数据写入 channel,而之前的 stream 要么是写入,要么是输出。
常见的 Channel 有:
-
File Channel
-
DatagramChannel
-
socket Channel
-
ServerSocketChannel
buffer 则用来缓冲读写数据,常见的 buffer 有:
-
ByteBuffer
-
MappedByteBuffer
-
DirectByteBuffer
-
HeapByteBuffer
-
short /Int/Long/Float/Double/Char Buffer
1.2 Selector
使用多线程技术
为每个连接分别开辟一个 线程 ,分别去处理对应的 socket 连接
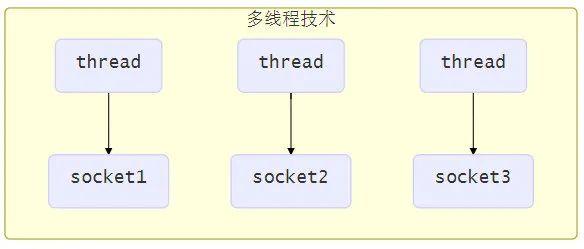
:exclamation: 多线程缺点
-
内存占用高
-
线程上下文切换成本高
-
只适合连接数较少的场景
使用 线程池 技术
使用线程池,让线程池中的线程去处理连接
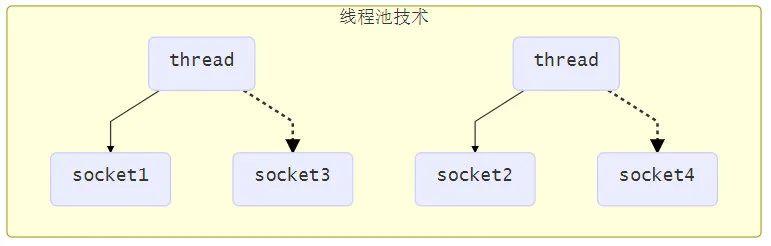
这种方式存在以下几个问题:
-
阻塞模式下,线程仅能处理一个连接
-
仅适合短连接场景
使用 Selector
selector 的作用就是配合一个线程来管理多个 channel( file Channel 因为是阻塞式的,所以无法使用 selector),获取这些 channel 上发生的事件,这些 channel 工作在非阻塞模式下,当一个 channel 中没有执行任务时,可以去执行其他 channel 中的任务。适合连接数多,但流量较少的场景。
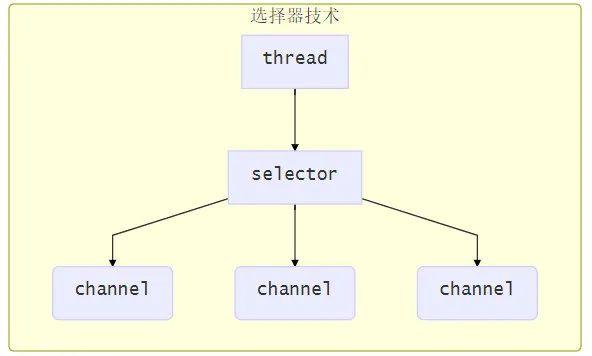
若事件未就绪,调用 selector 的 select 方法会阻塞线程,直到 channel 发生了就绪事件。这些事件就绪后,select 方法就会返回这些事件交给 thread 来处理。
2.ByteBuffer
使用案例
有一普通文本文件 data.txt 内容为
1234567890abc
使用 FileChannel 来读取文件内容
 @Slf4j
public class   Test ByteBuffer {
 public   static    void   main (String[] args) {
// FileChannel
// 1.输入输出流 2.RandomAccessFile
try {
FileChannel fileChannel = new FileInputStream("data.txt").getChannel;
// 准备缓冲区
ByteBuffer buf = ByteBuffer.allocate(10);
// 从 Channel 中读取数据,向 Buffer 写入
int len;
while ((len = fileChannel.read(buf)) != -1) {
 log .info("读取到的字节:{}",  len );
buf.flip; // 切换至读模式
log.debug("输出内容为:{}", new String(buf.array, 0, len));
// while (buf.hasRemaining) { // 是否还剩余数据
// byte b = buf.get;
// log.debug("输出内容为:{}", (char) b);
// }
// 切换为写模式
buf.clear;
}
} catch (IO Exception  e) {
e.printStackTrace;
}
}
}
2.1 ByteBuffer 使用步骤
-
向 buffer 写入数据,e.g. 调用
channel.read(buf) -
调用
flip切换至读模式 -
向 buffer 读取数据,e.g. 调用
buf.get -
调用
clear或compact切换至写模式 -
重复 1~4 步骤
2.2 ByteBuffer 结构
核心属性
字节缓冲区的父类 Buffer 中有几个核心属性,如下:
 // Invariants: mark <= position <= limit <= capacity
 private  int mark = -1;
private int position = 0;
private int limit;
private int capacity;
-
capacity:缓冲区的容量。通过构造函数赋予,一旦设置,无法更改。 -
limit:缓冲区的界限。位于 limit 后的数据不可读写。缓冲的限制不能为负,并且不能大于其容量。 -
position:下一个读写位置的索引(类似 PC)。缓冲区的位置不能为负,并且不能大于 limit。 -
mark:记录当前 position 的值。position 被改变后,可以通过调用reset方法恢复到 mark 的位置。
核心方法:
put 方法
-
put 方法可以将一个数据放入缓冲区
-
进行该操作后,position 的值会 +1,指向下一个可以放入的位置。capacity = limit。
flip 方法
-
flip 方法会切换对缓冲区的操作模式,由写 -> 读 / 读 -> 写
-
进行该操作后
-
如果是 写模式 -> 读模式,position = 0,limit 指向最后一个元素的下一个位置,capacity 不变
-
如果是读 -> 写,则恢复为 put 方法中的值
get 方法
-
get方法会读取缓冲区中的一个值 -
进行该操作后,position 会 +1,如果超过了 limit 则会抛出异常
-
注意:
get(i)方法不会改变 position 的值
rewind 方法
-
该方法只能在读写模式下使用
-
rewind方法后,会恢复 position、limit 和 capacity 的值,变为进行 get 前的值
clean 方法
-
clean 方法会将缓冲区中的各个属性恢复为最初的状态,position = 0,capacity = limit
-
此时,缓冲区的数据依然存在,处于“被遗忘”状态,下次进行写操作时会覆盖这些数据
mark 和 reset 方法
-
mark 方法会将 position 的值保存到 mark 属性中
-
reset 方法会将 position 的值改为 mark 中保存的值
compact 方法
此方法为 ByteBuffer 的方法,而不是 Buffer 的方法
-
compact 会把未读完的数据向前压缩,然后切换到写模式
-
数据前移后,原位置的值并未清零,写时会覆盖之前的值
2.2 ByteBuffer 结构
ByteBuffer 有以下重要属性
-
capacity
-
position
-
limit
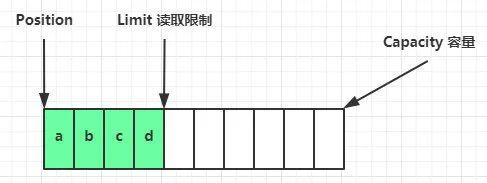
刚开始
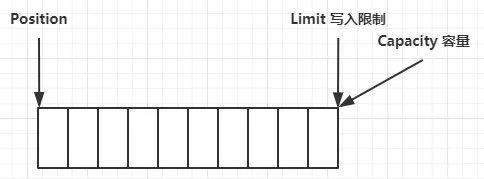
写模式下,position 是写入位置,limit 等于容量,下图表示写入了 4 个字节后的状态。

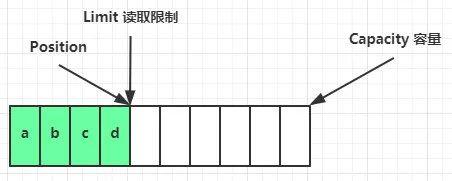
flip 动作发生后,position 切换为读取位置,limit 切换为读取限制。
读取 4 个 byte 后,状态:
clear 动作发生后,状态变为一开始。
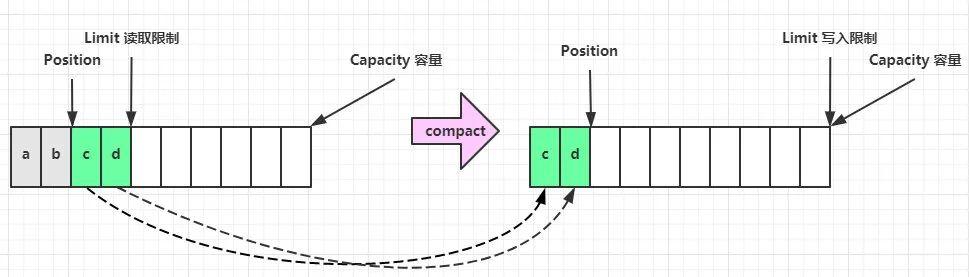
compact 方法,是把未读完的部分向前压缩,然后切换至写模式。
💡 调试工具类
导入依赖:
 <dependency>
<groupId>io.netty</groupId>
<artifactId>netty-all</artifactId>
<version>4.1.51.Final</version>
</dependency>
 public  class  ByteBufferUtil {
private static final char BYTE2CHAR = new char[256];
private static final char HEXDUMP_TABLE = new char[256 * 4];
private static final String HEXPADDING = new String[16];
private static final String HEXDUMP_ROWPREFIXES = new String[65536 >>> 4];
private static final String BYTE2HEX = new String[256];
private static final String BYTE padding  = new String[16];

static {
final char DIGITS = "0123456789abcdef".toCharArray;
for (int i = 0; i < 256; i++) {
HEXDUMP_TABLE[i << 1] = DIGITS[i >>> 4 & 0x0F];
HEXDUMP_TABLE[(i << 1) + 1] = DIGITS[i & 0x0F];
}

int i;

// Generate the lookup table for hex dump paddings
for (i = 0; i < HEXPADDING.length; i++) {
int padding = HEXPADDING.length - i;
 StringBuilder  buf = new StringBuilder(padding * 3);
for (int j = 0; j < padding; j++) {
buf.append(" ");
}
HEXPADDING[i] = buf.toString;
}

// Generate the lookup table for the start-offset header in each row (up to 64KiB).
for (i = 0; i < HEXDUMP_ROWPREFIXES.length; i++) {
StringBuilder buf = new StringBuilder(12);
buf.append(NEWLINE);
buf.append(Long.toHexString(i << 4 & 0xFFFFFFFFL | 0x100000000L));
buf.setCharAt(buf.length - 9, '|');
buf.append('|');
HEXDUMP_ROWPREFIXES[i] = buf.toString;
}

// Generate the lookup table for byte-to-hex-dump conversion
for (i = 0; i < BYTE2HEX.length; i++) {
BYTE2HEX[i] = ' ' + StringUtil.byteToHexStringPadded(i);
}

// Generate the lookup table for byte dump paddings
for (i = 0; i < BYTEPADDING.length; i++) {
int padding = BYTEPADDING.length - i;
StringBuilder buf = new StringBuilder(padding);
for (int j = 0; j < padding; j++) {
buf.append(' ');
}
BYTEPADDING[i] = buf.toString;
}

// Generate the lookup table for byte-to-char conversion
for (i = 0; i < BYTE2CHAR.length; i++) {
if (i <= 0x1f || i >= 0x7f) {
BYTE2CHAR[i] = '.';
} else {
BYTE2CHAR[i] = (char) i;
}
}
}

/**
* 打印所有内容
* @param buffer
*/
 public  static  void  debugAll (ByteBuffer buffer) {
int oldlimit = buffer.limit;
buffer.limit(buffer.capacity);
StringBuilder origin = new StringBuilder(256);
appendPrettyHexDump(origin, buffer, 0, buffer.capacity);
System.out.println("+--------+-------------------- all ------------------------+----------------+");
System.out.printf("position: [%d], limit: [%d]n", buffer.position, oldlimit);
System.out.println(origin);
buffer.limit(oldlimit);
}

/**
* 打印可读取内容
* @param buffer
*/
 public  static  void  debugRead (ByteBuffer buffer) {
StringBuilder builder = new StringBuilder(256);
appendPrettyHexDump(builder, buffer, buffer.position, buffer.limit - buffer.position);
System.out.println("+--------+-------------------- read -----------------------+----------------+");
System.out.printf("position: [%d], limit: [%d]n", buffer.position, buffer.limit);
System.out.println(builder);
}

 private  static  void  appendPrettyHexDump (StringBuilder dump, ByteBuffer buf, int offset, int length) {
if (isOutOfBounds(offset, length, buf.capacity)) {
throw new IndexOutOfBoundsException(
"expected: " + "0 <= offset(" + offset + ") <= offset + length(" + length
+ ") <= " + "buf.capacity(" + buf.capacity + ')');
}
if (length == 0) {
return;
}
dump.append(
" +-------------------------------------------------+" +
NEWLINE + " | 0 1 2 3 4 5 6 7 8 9 a b c d e f |" +
NEWLINE + "+--------+-------------------------------------------------+----------------+");

final int startIndex = offset;
final int fullRows = length >>> 4;
final int remainder = length & 0xF;

// Dump the rows which have 16 bytes.
for (int row = 0; row < fullRows; row++) {
int rowStartIndex = (row << 4) + startIndex;

// Per-row prefix.
appendHexDumpRowPrefix(dump, row, rowStartIndex);

// Hex dump
int rowEndIndex = rowStartIndex + 16;
for (int j = rowStartIndex; j < rowEndIndex; j++) {
dump.append(BYTE2HEX[getUnsignedByte(buf, j)]);
}
dump.append(" |");

//  ASCII  dump
for (int j = rowStartIndex; j < rowEndIndex; j++) {
dump.append(BYTE2CHAR[getUnsignedByte(buf, j)]);
}
dump.append('|');
}

// Dump the last row which has less than 16 bytes.
if (remainder != 0) {
int rowStartIndex = (fullRows << 4) + startIndex;
appendHexDumpRowPrefix(dump, fullRows, rowStartIndex);

// Hex dump
int rowEndIndex = rowStartIndex + remainder;
for (int j = rowStartIndex; j < rowEndIndex; j++) {
dump.append(BYTE2HEX[getUnsignedByte(buf, j)]);
}
dump.append(HEXPADDING[remainder]);
dump.append(" |");

// Ascii dump
for (int j = rowStartIndex; j < rowEndIndex; j++) {
dump.append(BYTE2CHAR[getUnsignedByte(buf, j)]);
}
dump.append(BYTEPADDING[remainder]);
dump.append('|');
}

dump.append(NEWLINE +
"+--------+-------------------------------------------------+----------------+");
}

 private  static  void  appendHexDumpRowPrefix (StringBuilder dump, int row, int rowStartIndex) {
if (row < HEXDUMP_ROWPREFIXES.length) {
dump.append(HEXDUMP_ROWPREFIXES[row]);
} else {
dump.append(NEWLINE);
dump.append(Long.toHexString(rowStartIndex & 0xFFFFFFFFL | 0x100000000L));
dump.setCharAt(dump.length - 9, '|');
dump.append('|');
}
}

 public  static  short  getUnsignedByte (ByteBuffer buffer, int index) {
return (short) (buffer.get(index) & 0xFF);
}
}
测试:
  public  static  void  main (String[] args) {
ByteBuffer buffer = ByteBuffer.allocate(16);
// 向 buffer 写入一个数据
buffer.put((byte) 97);
debugAll(buffer);
// 获取数据
buffer.flip;
debugAll(buffer);
System.out.println((char) buffer.get);
debugAll(buffer);
// 使用 compact 切换模式
buffer.compact;
debugAll(buffer);
// 再次写入
buffer.put((byte) 98);
buffer.put((byte) 99);
debugAll(buffer);

}
结果:
 10:01:36.720 [main] DEBUG io.netty.util.internal.logging.InternalLoggerFactory - Using SLF4J as the default logging framework
+--------+-------------------- all ------------------------+----------------+
position: [1], limit: [16]
+-------------------------------------------------+
| 0 1 2 3 4 5 6 7 8 9 a b c d e f |
+--------+-------------------------------------------------+----------------+
|00000000| 61 00 00 00 00 00 00 00 00 00 00 00 00 00 00 00 |a...............|
+--------+-------------------------------------------------+----------------+
+--------+-------------------- all ------------------------+----------------+
position: [0], limit: [1]
+-------------------------------------------------+
| 0 1 2 3 4 5 6 7 8 9 a b c d e f |
+--------+-------------------------------------------------+----------------+
|00000000| 61 00 00 00 00 00 00 00 00 00 00 00 00 00 00 00 |a...............|
+--------+-------------------------------------------------+----------------+
a
+--------+-------------------- all ------------------------+----------------+
position: [1], limit: [1]
+-------------------------------------------------+
| 0 1 2 3 4 5 6 7 8 9 a b c d e f |
+--------+-------------------------------------------------+----------------+
|00000000| 61 00 00 00 00 00 00 00 00 00 00 00 00 00 00 00 |a...............|
+--------+-------------------------------------------------+----------------+
+--------+-------------------- all ------------------------+----------------+
position: [0], limit: [16]
+-------------------------------------------------+
| 0 1 2 3 4 5 6 7 8 9 a b c d e f |
+--------+-------------------------------------------------+----------------+
|00000000| 61 00 00 00 00 00 00 00 00 00 00 00 00 00 00 00 |a...............|
+--------+-------------------------------------------------+----------------+
+--------+-------------------- all ------------------------+----------------+
position: [2], limit: [16]
+-------------------------------------------------+
| 0 1 2 3 4 5 6 7 8 9 a b c d e f |
+--------+-------------------------------------------------+----------------+
|00000000| 62 63 00 00 00 00 00 00 00 00 00 00 00 00 00 00 |bc..............|
+--------+-------------------------------------------------+----------------+
2.3 ByBuffer 常见方法
分配空间 allocate
ByteBuffer buf = ByteBuffer.allocate(16);
向 buffer 写入数据
-
调用 channel 的
read方法 -
调用 buffer 的
put方法
 int read = channel.read(buf);
// 第二种
buf.put((byte) 97);
从 buffer 读取数据
-
调用 channel 的
write方法 -
调用 buffer 的
get方法
 int writeBytes = channel.write(buf);
byte b = buf.get;
get 方法会让 position 读指针后移,如果想重复读取数据
-
可以调用
rewind方法将 position 重置为 0.public final Buffer rewind {
position = 0;
mark = -1;
return this;
}
-
或者调用
get(int i)获取索引 i 的内容,不会移动读指针。
mark and reset
mark 是在读取时,做一个标记,即使 position 改变,只要调用 reset 就能够回到 mark 的位置
字符串与 ByteBuffer 互转
 // 字符串与 ByteBuffer 互转
// 1.还是写模式
byte bytes = "hello".getBytes;
ByteBuffer buf2 = ByteBuffer.allocate(16);
buf2.put(bytes);
debugAll(buf2);
// 2.Charset,切换到读模式
ByteBuffer buf3 = StandardCharsets.UTF_8.encode("hello");
debugAll(buf3);
// 3.wrap 方法,切换到读模式
ByteBuffer buf4 = ByteBuffer.wrap("hello".getBytes);
debugAll(buf4);
System.out.println((char) buf4.get); // h

// ByteBuffer --> String
String buf2Str = StandardCharsets.UTF_8.decode(buf3).toString;
System.out.println(buf2Str);
Buffer 的线程安全
Buffer 是非线程安全的。
2.4 Scattering Reads
分散读取,有一个文本文件
onttwothree
使用如下方式读取,可以将数据填充至多个 buffer
 // 分散读取
try {
FileChannel channel = new RandomAccessFile("words.txt", "r").getChannel;
ByteBuffer buf1 = ByteBuffer.allocate(3);
ByteBuffer buf2 = ByteBuffer.allocate(3);
ByteBuffer buf3 = ByteBuffer.allocate(5);
channel.read(new ByteBuffer[]{buf1, buf2, buf3});
buf1.flip;
buf2.flip;
buf3.flip;
debugAll(buf1);
debugAll(buf2);
debugAll(buf3);
} catch (IOException e) {
e.printStackTrace;
}
 12:58:55.475 [main] DEBUG io.netty.util.internal.logging.InternalLoggerFactory - Using SLF4J as the default logging framework
+--------+-------------------- all ------------------------+----------------+
position: [0], limit: [3]
+-------------------------------------------------+
| 0 1 2 3 4 5 6 7 8 9 a b c d e f |
+--------+-------------------------------------------------+----------------+
|00000000| 6f 6e 65 |one |
+--------+-------------------------------------------------+----------------+
+--------+-------------------- all ------------------------+----------------+
position: [0], limit: [3]
+-------------------------------------------------+
| 0 1 2 3 4 5 6 7 8 9 a b c d e f |
+--------+-------------------------------------------------+----------------+
|00000000| 74 77 6f |two |
+--------+-------------------------------------------------+----------------+
+--------+-------------------- all ------------------------+----------------+
position: [0], limit: [5]
+-------------------------------------------------+
| 0 1 2 3 4 5 6 7 8 9 a b c d e f |
+--------+-------------------------------------------------+----------------+
|00000000| 74 68 72 65 65 |three |
+--------+-------------------------------------------------+----------------+
2.5 Gathering Writes
 try {
RandomAccessFile file = new RandomAccessFile("words2.txt", "rw");
FileChannel channel = file.getChannel;
ByteBuffer buf = ByteBuffer.allocate(4);
ByteBuffer buf2 = ByteBuffer.allocate(4);
channel.position(11);
buf.put(new byte[]{'f', 'o', 'u', 'r'});
buf2.put(new byte[]{'f', 'i', 'v', 'e'});
buf.flip;
buf2.flip;
debugAll(buf);
debugAll(buf2);
channel.write(new ByteBuffer[]{buf, buf2});
} catch (IOException e) {
e.printStackTrace;
}
 13:05:19.694 [main] DEBUG io.netty.util.internal.logging.InternalLoggerFactory - Using SLF4J as the default logging framework
+--------+-------------------- all ------------------------+----------------+
position: [0], limit: [4]
+-------------------------------------------------+
| 0 1 2 3 4 5 6 7 8 9 a b c d e f |
+--------+-------------------------------------------------+----------------+
|00000000| 66 6f 75 72 |four |
+--------+-------------------------------------------------+----------------+
+--------+-------------------- all ------------------------+----------------+
position: [0], limit: [4]
+-------------------------------------------------+
| 0 1 2 3 4 5 6 7 8 9 a b c d e f |
+--------+-------------------------------------------------+----------------+
|00000000| 66 69 76 65 |five |
+--------+-------------------------------------------------+----------------+
2.6 粘包、半包现象
网络上有多条数据发送给服务端,数据之间使用 n 进行分隔;但由于某种原因这些数据在接收时,被进行了重新组合,例如原始数据有 3 条为:
 hello, worldn
I'm zhangsann
How are you?n
变成了下面的两个 ByteBuffer
 hello, worldnI'm zhangsannHo
w are you?n
要求编写程序,将错乱的数据恢复成原始的 n 分隔的数据。
  public  static  void  main (String[] args) {
// 黏包、半包
ByteBuffer source = ByteBuffer.allocate(32);
source.put("Hello, worldnI'm zhangsannHo".getBytes);
split(source);
source.put("w are you?n".getBytes);
split(source);
}

 private  static  void  split (ByteBuffer source) {
// 传进来的参数是写模式,切换到读模式
source.flip;
for (int i = 0; i < source.limit; i++) {
if (source.get(i) == 'n') {
int len = i + 1 - source.position;
// 把这条完整的消息写入到新的 ByteBuffer
ByteBuffer target = ByteBuffer.allocate(len);
for (int j = 0; j < len; j++) {
target.put(source.get);
}
debugAll(target);
}
}
// 切换到写模式,有些数据被拆分,所以使用 compact
source.compact;
}
 13:26:33.581 [main] DEBUG io.netty.util.internal.logging.InternalLoggerFactory - Using SLF4J as the default logging framework
+--------+-------------------- all ------------------------+----------------+
position: [13], limit: [13]
+-------------------------------------------------+
| 0 1 2 3 4 5 6 7 8 9 a b c d e f |
+--------+-------------------------------------------------+----------------+
|00000000| 48 65 6c 6c 6f 2c 20 77 6f 72 6c 64 0a |Hello, world. |
+--------+-------------------------------------------------+----------------+
+--------+-------------------- all ------------------------+----------------+
position: [13], limit: [13]
+-------------------------------------------------+
| 0 1 2 3 4 5 6 7 8 9 a b c d e f |
+--------+-------------------------------------------------+----------------+
|00000000| 49 27 6d 20 7a 68 61 6e 67 73 61 6e 0a |I'm zhangsan. |
+--------+-------------------------------------------------+----------------+
+--------+-------------------- all ------------------------+----------------+
position: [13], limit: [13]
+-------------------------------------------------+
| 0 1 2 3 4 5 6 7 8 9 a b c d e f |
+--------+-------------------------------------------------+----------------+
|00000000| 48 6f 77 20 61 72 65 20 79 6f 75 3f 0a |How are you?. |
+--------+-------------------------------------------------+----------------+
3.文件编程
3.1 FileChannel
FileChannel 只能工作在阻塞模式下
获取
不能直接打开 FileChannel,必须通过 FileInputStream、FileOutputStream 或者 RandomAccessFile 来获取 FileChannel,它们都有 getChannel 方法。
-
通过 FileInputStream 获取的 channel 只能读
-
通过 FileOutputStream 获取的 channel 只能写
-
通过 RandomAccessFile 是否能读写根据构造 RandomAccessFile 时的读写模式决定。
读取
返回 -1 表示达到了文件的末尾。
int read = channel.read(buf);
写入
 ByteBuffer buf = ...;
buf.put(...); // 存入数据
buf.flip; // 切换读模式
while (buf.hasRemaining) {
channel.write(buf);
}
在 while 中调用 channel.write 是因为 write 方法并不能保证一次将 buffer 中的内容全部写入 channel.
关闭
channel 必须关闭,不过调用了 FileInputStream、FileOutputStream 或者 RandomAccessFile 的 close 方法会间接地调用 channel 的 close 方法。
位置
long pos = channel.position; // 获取当前位置
 long newPos = ...;
channel.position(newPos); // 设置当前位置
设置当前位置时,如果设置为文件的末尾
-
这时会返回 -1
-
这时写入,会追加内容,但是注意如果 position 超过了文件末尾,再写入时在新内容和原末尾之间会有空洞(00)。
大小
channel.size; // 获取文件的大小
强制写入
操作系统出于性能的考虑,会将数据缓存,不是立刻写入磁盘。可以调用 force(true) 方法将文件内容和元数据(文件的权限等信息)立刻写入磁盘.
3.2 两个 Channel 传输数据
  public  static  void  main (String[] args) {
try (FileChannel from = new FileInputStream("data.txt").getChannel;
FileChannel to = new FileOutputStream("to.txt").getChannel;
) {
// 效率高,底层会利用操作系统的零拷贝进行优化
// from.transferTo(0, from.size, to);
long size = from.size;
for (long left = size; left > 0; ) {
left -= from.transferTo((size - left), left, to);
}
} catch (IOException e) {
e.printStackTrace;
}
}
3.3 Path
jdk7 引入了 Path 和 Paths 类
-
Path 用来表示文件路径
-
Paths 是工具类,用来获取 Path 实例
 Path source = Paths.get("1.txt");
sout(source.normalize); // 正常化路径
3.4 Files
| 方法 | 说明 |
|---|---|
| Files.exists(path) | 检查文件是否存在 |
| Files.createDirectory(path) |
|
| Files.createDirectories(path) | 创建多及目录 |
|
拷贝文件,如果文件已存在,抛异常 |
| Files.move(source, target, StandardCopyOption.ATOMIC_MOVE); | 移动文件,StandardCopyOption.ATOMIC_MOVE 保证文件移动的原子性 |
| Files.delete(target) |
|
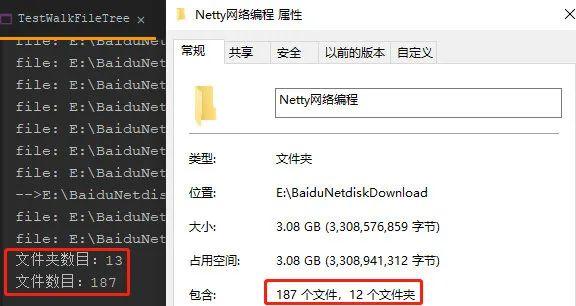
遍历目录文件
public static void main(String[] args) throws IOException {
Path path = Paths.get("E:BaiduNetdiskDownloadNetty网络编程");
// 文件目录总数
AtomicInteger dirCount = new AtomicInteger;
// 文件总数
AtomicInteger fileCount = new AtomicInteger;
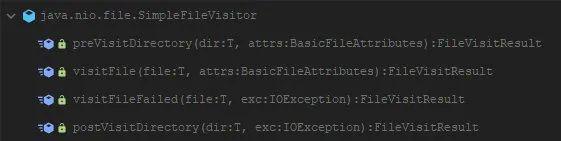
Files.walkFileTree(path, new SimpleFileVisitor<Path> {
@Override
public FileVisitResult preVisitDirectory(Path dir, BasicFileAttributes attrs) throws IOException {
System.out.println("-->" + dir);
dirCount.getAndIncrement;
return super.preVisitDirectory(dir, attrs);
}
@Override
public FileVisitResult visitFile(Path file, BasicFileAttributes attrs) throws IOException {
System.out.println("file: " + file);
fileCount.getAndIncrement;
return super.visitFile(file, attrs);
}
});
System.out.println("文件夹数目:" + dirCount);
System.out.println("文件数目:" + fileCount);
}
SimpleFileVisitor
运行结果:
统计 .md 文档的数目
 Path path = Paths.get("E:BaiduNetdiskDownloadNetty网络编程");
// 统计 .md 文档数目
AtomicInteger mdCnt = new AtomicInteger;
Files.walkFileTree(path, new SimpleFileVisitor<Path> {
@Override
public FileVisitResult visitFile(Path file, BasicFileAttributes attrs) throws IOException {
if (file.toString.endsWith(".md")) { // toFile.toString.
System.out.println(file.toString);
mdCnt.incrementAndGet;
}
return super.visitFile(file, attrs);
}
});
System.out.println("md文档数目:" + mdCnt);
删除多级目录
 Path path = Paths.get("d:a");
Files.walkFileTree(path, new SimpleFileVisitor<Path>{
@Override
public FileVisitResult visitFile(Path file, BasicFileAttributes attrs)
throws IOException {
Files.delete(file);
return super.visitFile(file, attrs);
}

@Override
public FileVisitResult postVisitDirectory(Path dir, IOException exc)
throws IOException {
Files.delete(dir);
return super.postVisitDirectory(dir, exc);
}
});
拷贝多级目录
 long start = System.currentTimeMillis;
String source = "D:Snipaste-1.16.2-x64";
String target = "D:Snipaste-1.16.2-x64aaa";

Files.walk(Paths.get(source)).forEach(path -> {
try {
String targetName = path.toString.replace(source, target);
// 是目录
if (Files.isDirectory(path)) {
Files.createDirectory(Paths.get(targetName));
}
// 是普通文件
else if (Files.isRegularFile(path)) {
Files.copy(path, Paths.get(targetName));
}
} catch (IOException e) {
e.printStackTrace;
}
});
long end = System.currentTimeMillis;
System.out.println(end - start);


