作者:胡宗棠
来源: 匠心独运的博客
文章摘要:借用小厮的一句话“消息队列的本质在于消息的发送、存储和接收”。那么,对于一款消息队列来说,如何做到消息的高效发送与接收是重点和关键。
一、RocketMQ中Remoting通信模块概览
RocketMQ消息队列的整体部署架构如下图所示:
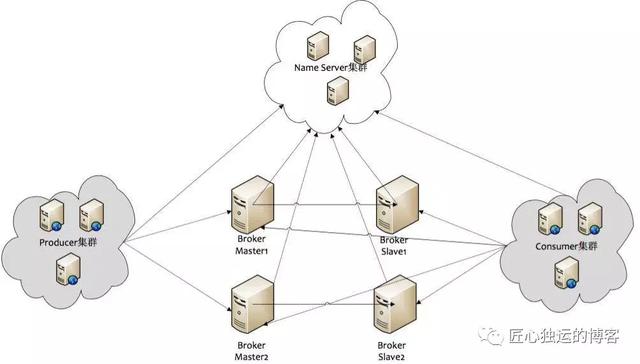
先来说下RocketMQ消息队列集群中的几个角色:
(1)NameServer:在MQ集群中做的是做命名服务,更新和路由发现 broker服务;
(2)Broker-Master:broker 消息主机服务器;
(3)Broker-Slave:broker 消息从机服务器;
(4)Producer:消息生产者;
(5)Consumer:消息消费者;
其中,RocketMQ集群的一部分通信如下:
(1)Broker启动后需要完成一次将自己注册至NameServer的操作;随后每隔30s时间定期向NameServer上报Topic路由信息;
(2)消息生产者Producer作为客户端发送消息时候,需要根据Msg的Topic从本地缓存的TopicPublishInfoTable获取路由信息。如果没有则更新路由信息会从NameServer上重新拉取;
(3)消息生产者Producer根据(2)中获取的路由信息选择一个队列(MessageQueue)进行消息发送;Broker作为消息的接收者收消息并落盘存储; 从上面(1)~(3)中可以看出在消息生产者, Broker和Name Server 之间都会发生通信(这里只说了MQ的部分通信),因此如何设计一个良好的网络通信模块在MQ中至关重要,它将决定RocketMQ集群整体的消息传输能力与最终的性能。
rocketmq-remoting 模块是 RocketMQ消息队列中负责网络通信的模块,它几乎被其他所有需要网络通信的模块(诸如rocketmq-client、rocketmq-server、rocketmq-namesrv)所依赖和引用。为了实现客户端与服务器之间高效的数据请求与接收,RocketMQ消息队列自定义了通信协议并在 Netty 的基础之上扩展了通信模块。ps:鉴于RocketMQ的通信模块是建立在Netty基础之上的,因此在阅读RocketMQ的源码之前,读者最好先对Netty的多线程模型、JAVA NIO模型均有一定的了解,这样子理解RocketMQ源码会较为快一些。
作者阅读的RocketMQ版本是4.2.0, 依赖的netty版本是4.0.42.Final. RocketMQ的代码结构图如下:
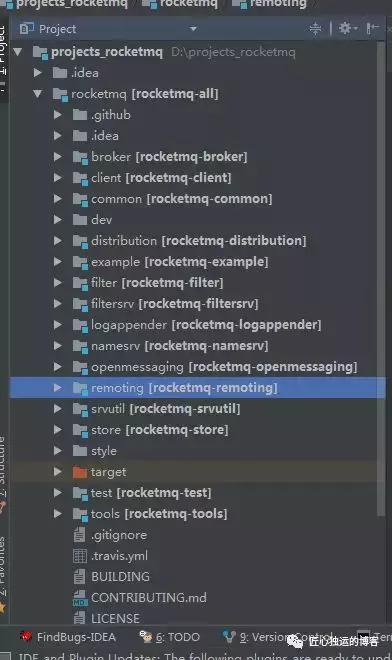
源码部分主要可以分为rocketmq-broker,rocketmq-client,rocketmq-common,rocketmq-filterSrv,rocketmq-namesrv和rocketmq-remoting等模块,通信框架就封装在rocketmq-remoting模块中。 本文主要从RocketMQ的协议格式,消息编解码,通信方式(同步/异步/单向)和具体的发送/接收消息的通信流程来进行阐述等。
二、RocketMQ中Remoting通信模块的具体实现
- Remoting通信模块的类结构图
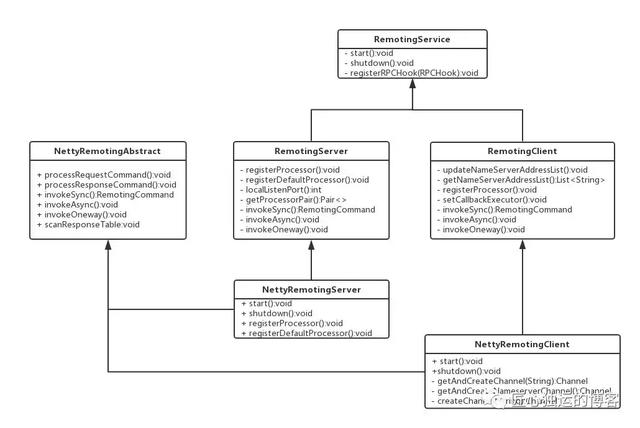
从类层次结构来看:
(1)RemotingService:为最上层的接口,提供了三个方法:
- void
- start();
- void
- shutdown();
- void
- register RPC Hook(
- RPCHook
- rpcHook);
(2)RemotingClient/RemotingSever:两个接口继承了最上层接口—RemotingService,分别各自为Client和Server提供所必需的方法,下面所列的是RemotingServer的方法:
- /**
- * 同RemotingClient端一样
- *
- * @param requestCode
- * @param processor
- * @param executor
- */
- void
- registerProcessor(
- final
- int
- requestCode,
- final
- NettyRequestProcessor
- processor,
- final
- ExecutorService
- executor);
- /**
- * 注册默认的处理器
- *
- * @param processor
- * @param executor
- */
- void
- registerDefaultProcessor(
- final
- Netty request Processor
- processor,
- final
- ExecutorService
- executor);
- int
- localListenPort();
- /**
- * 根据请求code来获取不同的处理Pair
- *
- * @param requestCode
- * @return
- */
- Pair
- <
- NettyRequestProcessor
- ,
- ExecutorService
- > getProcessorPair(
- final
- int
- requestCode);
- /**
- * 同RemotingClient端一样,同步通信,有返回RemotingCommand
- * @param channel
- * @param request
- * @param timeoutMillis
- * @return
- * @ throws InterruptedException
- * @throws RemotingSendRequestException
- * @throws RemotingTimeoutException
- */
- RemotingCommand
- invokeSync(
- final
- Channel
- channel,
- final
- RemotingCommand
- request,
- final
- long
- timeoutMillis)
- throws
- InterruptedException
- ,
- RemotingSendRequestException
- ,
- RemotingTimeoutException
- ;
- /**
- * 同RemotingClient端一样,异步通信,无返回RemotingCommand
- *
- * @param channel
- * @param request
- * @param timeoutMillis
- * @param invokeCallback
- * @throws InterruptedException
- * @throws RemotingTooMuchRequestException
- * @throws RemotingTimeoutException
- * @throws RemotingSendRequestException
- */
- void
- invokeAsync(
- final
- Channel
- channel,
- final
- RemotingCommand
- request,
- final
- long
- timeoutMillis,
- final
- InvokeCallback
- invokeCallback)
- throws
- InterruptedException
- ,
- RemotingTooMuchRequestException
- ,
- RemotingTimeoutException
- ,
- RemotingSendRequestException
- ;
- /**
- * 同RemotingClient端一样,单向通信,诸如心跳包
- *
- * @param channel
- * @param request
- * @param timeoutMillis
- * @throws InterruptedException
- * @throws RemotingTooMuchRequestException
- * @throws RemotingTimeoutException
- * @throws RemotingSendRequestException
- */
- void
- invokeOneway(
- final
- Channel
- channel,
- final
- RemotingCommand
- request,
- final
- long
- timeoutMillis)
- throws
- InterruptedException
- ,
- RemotingTooMuchRequestException
- ,
- RemotingTimeoutException
- ,
- RemotingSendRequestException
- ;
(3)NettyRemotingAbstract:Netty通信处理的 抽象类 ,定义并封装了Netty处理的公共处理方法;
(4)NettyRemotingClient以及NettyRemotingServer:分别实现了RemotingClient和RemotingServer, 都继承了NettyRemotingAbstract抽象类。RocketMQ中其他的组件(如client、nameServer、broker在进行消息的发送和接收时均使用这两个组件)
- 消息的协议设计与编码解码
在Client和Server之间完成一次消息发送时,需要对发送的消息进行一个协议约定,因此就有必要自定义RocketMQ的消息协议。同时,为了高效地在网络中传输消息和对收到的消息读取,就需要对消息进行编解码。在RocketMQ中,RemotingCommand这个类在消息传输过程中对所有数据内容的封装,不但包含了所有的数据结构,还包含了编码解码操作。
RemotingCommand类的部分成员变量如下:
Header字段类型Request说明Response说明codeint请求操作码,应答方根据不同的请求码进行不同的业务处理应答响应码。0表示成功,非0则表示各种错误languageLanguageCode请求方实现的语言应答方实现的语言versionint请求方程序的版本应答方程序的版本opaqueint相当于reqeustId,在同一个连接上的不同请求标识码,与响应消息中的相对应应答不做修改直接返回flagint区分是普通RPC还是onewayRPC得标志区分是普通RPC还是onewayRPC得标志remarkString传输自定义文本信息传输自定义文本信息extFieldsHashMap请求自定义扩展信息响应自定义扩展信息
这里展示下Broker向NameServer发送一次心跳注册的报文:
- [
- code=
- 103
- ,
- //这里的103对应的code就是broker向nameserver注册自己的消息
- language=JAVA,
- version=
- 137
- ,
- opaque=
- 58
- ,
- //这个就是requestId
- flag(B)=
- 0
- ,
- remark=
- null
- ,
- extFields={
- brokerId=
- 0
- ,
- clusterName=
- DefaultCluster
- ,
- brokerAddr=ip1:
- 10911
- ,
- haServerAddr=ip1:
- 10912
- ,
- brokerName=LAPTOP-SMF2CKDN
- },
- serializeTypeCurrentRPC=JSON
下面来看下RocketMQ通信协议的格式:
可以看到传输内容主要可以分为以下4部分:
(1)消息长度: 总长度,四个字节存储,占用一个int类型;
(2)序列化类型&消息头长度: 同样占用一个int类型,第一个字节表示序列化类型,后面三个字节表示消息头长度;
(3)消息头数据: 经过序列化后的消息头数据;
(4)消息主体数据: 消息主体的二进制字节数据内容;
消息的编码和解码分别在RemotingCommand类的encode和decode方法中完成,下面是消息编码encode方法的具体实现:
- public
- byte Buffer
- encode() {
- // 1> header length size
- int
- length =
- 4
- ;
- //消息总长度
- // 2> header data length
- //将消息头编码成byte[]
- byte
- [] headerData =
- this
- .headerEncode();
- //计算头部长度
- length += headerData.length;
- // 3> body data length
- if
- (
- this
- .body !=
- null
- ) {
- //消息主体长度
- length += body.length;
- }
- //分配ByteBuffer, 这边加了4,
- //这是因为在消息总长度的计算中没有将存储头部长度的4个字节计算在内
- ByteBuffer
- result =
- ByteBuffer
- .allocate(
- 4
- + length);
- // length
- //将消息总长度放入ByteBuffer
- result.putInt(length);
- // header length
- //将消息头长度放入ByteBuffer
- result.put(markProtocolType(headerData.length, serializeTypeCurrentRPC));
- // header data
- //将消息头数据放入ByteBuffer
- result.put(headerData);
- // body data;
- if
- (
- this
- .body !=
- null
- ) {
- //将消息主体放入ByteBuffer
- result.put(
- this
- .body);
- }
- //重置ByteBuffer的position位置
- result.flip();
- return
- result;
- }
- /**
- * markProtocolType方法是将RPC类型和headerData长度编码放到一个byte[4]数组中
- *
- * @param source
- * @param type
- * @return
- */
- public
- static
- byte
- [] markProtocolType(
- int
- source,
- SerializeType
- type) {
- byte
- [] result =
- new
- byte
- [
- 4
- ];
- result[
- 0
- ] = type.getCode();
- //右移16位后再和255与->“16-24位”
- result[
- 1
- ] = (
- byte
- ) ((source >>
- 16
- ) &
- 0xFF
- );
- //右移8位后再和255与->“8-16位”
- result[
- 2
- ] = (
- byte
- ) ((source >>
- 8
- ) &
- 0xFF
- );
- //右移0位后再和255与->“8-0位”
- result[
- 3
- ] = (
- byte
- ) (source &
- 0xFF
- );
- return
- result;
- }
消息解码decode方法是编码的逆向过程,其具体实现如下:
- public
- static
- RemotingCommand
- decode(
- final
- ByteBuffer
- byteBuffer) {
- //获取byteBuffer的总长度
- int
- length = byteBuffer.limit();
- //获取前4个字节,组装int类型,该长度为总长度
- int
- oriHeaderLen = byteBuffer.getInt();
- //获取消息头的长度,这里和0xFFFFFF做与运算,编码时候的长度即为24位
- int
- headerLength = getHeaderLength(oriHeaderLen);
- byte
- [] headerData =
- new
- byte
- [headerLength];
- byteBuffer.
- get
- (headerData);
- RemotingCommand
- cmd = headerDecode(headerData, getProtocolType(oriHeaderLen));
- int
- bodyLength = length –
- 4
- – headerLength;
- byte
- [] bodyData =
- null
- ;
- if
- (bodyLength >
- 0
- ) {
- bodyData =
- new
- byte
- [bodyLength];
- byteBuffer.
- get
- (bodyData);
- }
- cmd.body = bodyData;
- return
- cmd;
- }
- 消息的通信方式和通信流程
在RocketMQ消息队列中支持通信的方式主要有以下三种:
(1)同步(sync)
(2)异步(async)
(3)单向(oneway)
其中“同步”通信模式相对简单,一般用在发送心跳包场景下,无需关注其Response。本文将主要介绍RocketMQ的异步通信流程(限于篇幅,读者可以按照同样的模式进行分析同步通信流程)。下面先给出了RocketMQ异步通信的整体流程图:
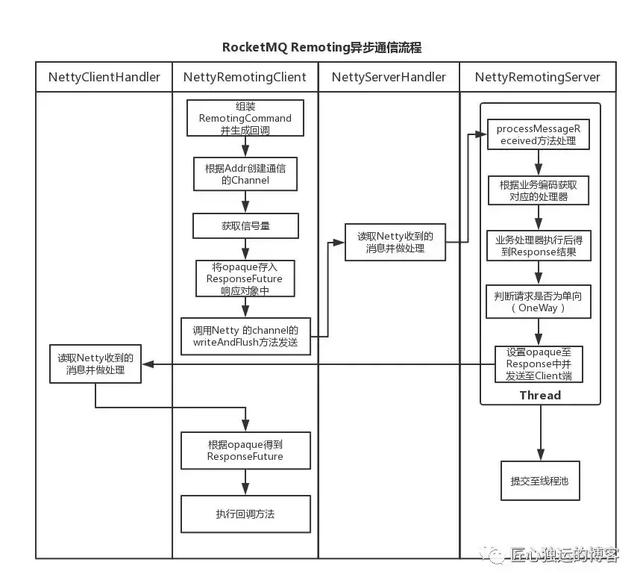
下面两小节内容主要介绍了Client端发送请求消息、Server端接收消息的具体实现并简要分析的Client端的回调。
1)Client发送请求消息的具体实现
当客户端调用异步通信接口—invokeAsync时候,先由RemotingClient的实现类—NettyRemotingClient根据addr获取相应的channel(如果本地缓存中没有则创建),随后调用invokeAsyncImpl方法,将数据流转给抽象类NettyRemotingAbstract处理(真正做完发送请求动作的是在NettyRemotingAbstract抽象类的invokeAsyncImpl方法里面)。
具体发送请求消息的源代码如下所示:
- /**
- * invokeAsync(异步调用)
- *
- */
- public
- void
- invokeAsyncImpl(
- final
- Channel
- channel,
- final
- RemotingCommand
- request,
- final
- long
- timeoutMillis,
- final
- InvokeCallback
- invokeCallback)
- throws
- InterruptedException
- ,
- RemotingTooMuchRequestException
- ,
- RemotingTimeoutException
- ,
- RemotingSendRequestException
- {
- //相当于request ID, RemotingCommand会为每一个request产生一个request ID, 从0开始, 每次加1
- final
- int
- opaque = request.getOpaque();
- boolean
- acquired =
- this
- .semaphoreAsync.tryAcquire(timeoutMillis,
- TimeUnit
- .MILLISECONDS);
- if
- (acquired) {
- final
- SemaphoreReleaseOnlyOnce
- once =
- new
- SemaphoreReleaseOnlyOnce
- (
- this
- .semaphoreAsync);
- //根据request ID构建ResponseFuture
- final
- ResponseFuture
- responseFuture =
- new
- ResponseFuture
- (opaque, timeoutMillis, invokeCallback, once);
- //将ResponseFuture放入responseTable
- this
- .responseTable.put(opaque, responseFuture);
- try
- {
- //使用Netty的channel发送请求数据
- channel.writeAndFlush(request).addListener(
- new
- ChannelFutureListener
- () {
- //消息发送后执行
- @Override
- public
- void
- operationComplete(
- ChannelFuture
- f)
- throws
- Exception
- {
- if
- (f.isSuccess()) {
- //如果发送消息成功给Server,那么这里直接Set后return
- responseFuture.setSendRequestOK(
- true
- );
- return
- ;
- }
- else
- {
- responseFuture.setSendRequestOK(
- false
- );
- }
- responseFuture.putResponse(
- null
- );
- responseTable.remove(opaque);
- try
- {
- //执行回调
- executeInvokeCallback(responseFuture);
- }
- catch
- (
- Throwable
- e) {
- log .warn(
- “excute callback in writeAndFlush addListener, and callback throw”
- , e);
- }
- finally
- {
- //释放信号量
- responseFuture.release();
- }
- log.warn(
- “send a request command to channel <{}> failed.”
- ,
- RemotingHelper
- .parseChannelRemoteAddr(channel));
- }
- });
- }
- catch
- (
- Exception
- e) {
- //异常处理
- responseFuture.release();
- log.warn(
- “send a request command to channel <”
- +
- RemotingHelper
- .parseChannelRemoteAddr(channel) +
- “> Exception”
- , e);
- throw
- new
- RemotingSendRequestException
- (
- RemotingHelper
- .parseChannelRemoteAddr(channel), e);
- }
- }
- else
- {
- if
- (timeoutMillis <=
- 0
- ) {
- throw
- new
- RemotingTooMuchRequestException
- (
- “invokeAsyncImpl invoke too fast”
- );
- }
- else
- {
- String
- info =
- String
- .format(
- “invokeAsyncImpl tryAcquire semaphore timeout, %dms, waiting thread nums: %d semaphoreAsyncValue: %d”
- ,
- timeoutMillis,
- this
- .semaphoreAsync.getQueueLength(),
- this
- .semaphoreAsync.availablePermits()
- );
- log.warn(info);
- throw
- new
- RemotingTimeoutException
- (info);
- }
- }
- }
在Client端发送请求消息时有个比较重要的数据结构需要注意下:
(1)responseTable—保存请求码与响应关联映射
- protected
- final
- ConcurrentHashMap
- <
- Integer
- /* opaque */
- ,
- ResponseFuture
- > responseTable
opaque表示请求发起方在同个连接上不同的请求标识代码,每次发送一个消息的时候,可以选择同步阻塞/异步非阻塞的方式。无论是哪种通信方式,都会保存请求操作码至ResponseFuture的Map映射—responseTable中。
(2)ResponseFuture—保存返回响应(包括回调执行方法和信号量)
- public
- ResponseFuture
- (
- int
- opaque,
- long
- timeoutMillis,
- InvokeCallback
- invokeCallback,
- SemaphoreReleaseOnlyOnce
- once) {
- this
- .opaque = opaque;
- this
- .timeoutMillis = timeoutMillis;
- this
- .invokeCallback = invokeCallback;
- this
- .once = once;
- }
对于同步通信来说,第三、四个参数为null;而对于异步通信来说,invokeCallback是在收到消息响应的时候能够根据responseTable找到请求码对应的回调执行方法,semaphore参数用作流控,当多个线程同时往一个连接写数据时可以通过信号量控制permit同时写许可的数量。
(3)异常发送流程处理—定时扫描responseTable本地缓存
在发送消息时候,如果遇到异常情况(比如服务端没有response返回给客户端或者response因网络而丢失),上面所述的responseTable的本地缓存Map将会出现堆积情况。这个时候需要一个定时任务来专门做responseTable的清理回收。在RocketMQ的客户端/服务端启动时候会产生一个频率为1s调用一次来的定时任务检查所有的responseTable缓存中的responseFuture变量,判断是否已经得到返回, 并进行相应的处理。
- public
- void
- scanResponseTable() {
- final
- List
- <
- ResponseFuture
- > rfList =
- new
- LinkedList
- <
- ResponseFuture
- >();
- Iterator
- <
- Entry
- <
- Integer
- ,
- ResponseFuture
- >> it =
- this
- .responseTable.entrySet().iterator();
- while
- (it.hasNext()) {
- Entry
- <
- Integer
- ,
- ResponseFuture
- >
- next
- = it.
- next
- ();
- ResponseFuture
- rep =
- next
- .getValue();
- if
- ((rep.getBeginTimestamp() + rep.getTimeoutMillis() +
- 1000
- ) <=
- System
- .currentTimeMillis()) {
- rep.release();
- it.remove();
- rfList.add(rep);
- log.warn(
- “remove timeout request, ”
- + rep);
- }
- }
- for
- (
- ResponseFuture
- rf : rfList) {
- try
- {
- executeInvokeCallback(rf);
- }
- catch
- (
- Throwable
- e) {
- log.warn(
- “scanResponseTable, operationComplete Exception”
- , e);
- }
- }
- }
2)Server端接收消息并进行处理的具体实现
Server端接收消息的处理入口在NettyServerHandler类的channelRead0方法中,其中调用了processMessageReceived方法(这里省略了Netty服务端消息流转的大部分流程和逻辑)。
其中服务端最为重要的处理请求方法实现如下:
- public
- void
- processRequestCommand(
- final
- ChannelHandlerContext
- ctx,
- final
- RemotingCommand
- cmd) {
- //根据RemotingCommand中的code获取processor和ExecutorService
- final
- Pair
- <
- NettyRequestProcessor
- ,
- ExecutorService
- > matched =
- this
- .processorTable.
- get
- (cmd.getCode());
- final
- Pair
- <
- NettyRequestProcessor
- ,
- ExecutorService
- > pair =
- null
- == matched ?
- this
- .defaultRequestProcessor : matched;
- final
- int
- opaque = cmd.getOpaque();
- if
- (pair !=
- null
- ) {
- Runnable
- run =
- new
- Runnable
- () {
- @Override
- public
- void
- run() {
- try
- {
- //rpc hook
- RPCHook
- rpcHook =
- NettyRemotingAbstract
- .
- this
- .getRPCHook();
- if
- (rpcHook !=
- null
- ) {
- rpcHook.doBeforeRequest(
- RemotingHelper
- .parseChannelRemoteAddr(ctx.channel()), cmd);
- }
- //processor处理请求
- final
- RemotingCommand
- response = pair.getObject1().processRequest(ctx, cmd);
- //rpc hook
- if
- (rpcHook !=
- null
- ) {
- rpcHook.doAfterResponse(
- RemotingHelper
- .parseChannelRemoteAddr(ctx.channel()), cmd, response);
- }
- if
- (!cmd.isOnewayRPC()) {
- if
- (response !=
- null
- ) {
- response.setOpaque(opaque);
- response.markResponseType();
- try
- {
- ctx.writeAndFlush(response);
- }
- catch
- (
- Throwable
- e) {
- PLOG.error(
- “process request over, but response failed”
- , e);
- PLOG.error(cmd. toString ());
- PLOG.error(response.toString());
- }
- }
- else
- {
- }
- }
- }
- catch
- (
- Throwable
- e) {
- if
- (!
- “com.aliyun.openservices.ons.api.impl.authority.exception.AuthenticationException”
- .equals(e.getClass().getCanonicalName())) {
- PLOG.error(
- “process request exception”
- , e);
- PLOG.error(cmd.toString());
- }
- if
- (!cmd.isOnewayRPC()) {
- final
- RemotingCommand
- response =
- RemotingCommand
- .createResponseCommand(
- RemotingSysResponseCode
- .SYSTEM_ERROR,
- //
- RemotingHelper
- .exceptionSimpleDesc(e));
- response.setOpaque(opaque);
- ctx.writeAndFlush(response);
- }
- }
- }
- };
- if
- (pair.getObject1().rejectRequest()) {
- final
- RemotingCommand
- response =
- RemotingCommand
- .createResponseCommand(
- RemotingSysResponseCode
- .SYSTEM_BUSY,
- “[REJECTREQUEST]system busy, start flow control for a while”
- );
- response.setOpaque(opaque);
- ctx.writeAndFlush(response);
- return
- ;
- }
- try
- {
- //封装requestTask
- final
- RequestTask
- requestTask =
- new
- RequestTask
- (run, ctx.channel(), cmd);
- //想线程池提交requestTask
- pair.getObject2().submit(requestTask);
- }
- catch
- (
- RejectedExecutionException
- e) {
- if
- ((
- System
- .currentTimeMillis() %
- 10000
- ) ==
- 0
- ) {
- PLOG.warn(
- RemotingHelper
- .parseChannelRemoteAddr(ctx.channel())
- //
- +
- “, too many requests and system thread pool busy, RejectedExecutionException ”
- //
- + pair.getObject2().toString()
- //
- +
- ” request code: ”
- + cmd.getCode());
- }
- if
- (!cmd.isOnewayRPC()) {
- final
- RemotingCommand
- response =
- RemotingCommand
- .createResponseCommand(
- RemotingSysResponseCode
- .SYSTEM_BUSY,
- “[OVERLOAD]system busy, start flow control for a while”
- );
- response.setOpaque(opaque);
- ctx.writeAndFlush(response);
- }
- }
- }
- else
- {
- String
- error =
- ” request type ”
- + cmd.getCode() +
- ” not supported”
- ;
- //构建response
- final
- RemotingCommand
- response =
- RemotingCommand
- .createResponseCommand(
- RemotingSysResponseCode
- .REQUEST_CODE_NOT_SUPPORTED, error);
- response.setOpaque(opaque);
- ctx.writeAndFlush(response);
- PLOG.error(
- RemotingHelper
- .parseChannelRemoteAddr(ctx.channel()) + error);
- }
- }
上面的请求处理方法中根据RemotingCommand的请求业务码来匹配到相应的业务处理器;然后生成一个新的线程提交至对应的业务线程池进行异步处理。
(1)processorTable—请求业务码与业务处理、业务线程池的映射变量
- protected
- final
- HashMap
- <
- Integer
- /* request code */
- ,
- Pair
- <
- NettyRequestProcessor
- ,
- ExecutorService
- >> processorTable =
- new
- HashMap
- <
- Integer
- ,
- Pair
- <
- NettyRequestProcessor
- ,
- ExecutorService
- >>(
- 64
- );
个人觉得RocketMQ这种做法是为了给不同类型的请求业务码指定不同的处理器Processor处理,同时消息实际的处理并不是在当前线程,而是被封装成task放到业务处理器Processor对应的线程池中完成异步执行。(在RocketMQ中能看到很多地方都是这样的处理,这样的设计能够最大程度的保证异步,保证每个线程都专注处理自己负责的东西)
3)Client端异步回调执行的实现分析
看到这里可能有一些同学会疑问Client端的异步回调究竟在哪里执行的?从上面“RocketMQ异步通信的整体时序图”来看,回调执行处理的流程的确是放在了Client端来完成,而rocketmq-remoting通信模块中只是给异步回调处理提供了接口。
这里可以看下rocketmq-client模块异步发送消息的部分代码(限于篇幅也只是列举了异步回调执行的部分代码):
- private
- void
- sendMessageAsync(
- final
- String
- addr,
- final
- String
- brokerName,
- final
- Message
- msg,
- final
- long
- timeoutMillis,
- final
- RemotingCommand
- request,
- final
- SendCallback
- sendCallback,
- final
- TopicPublishInfo
- topicPublishInfo,
- final
- MQClientInstance
- instance,
- final
- int
- retryTimesWhenSendFailed,
- final
- AtomicInteger
- times,
- final
- SendMessageContext
- context,
- final
- DefaultMQProducerImpl
- producer
- )
- throws
- InterruptedException
- ,
- RemotingException
- {
- this
- .remotingClient.invokeAsync(addr, request, timeoutMillis,
- new
- InvokeCallback
- () {
- @Override
- public
- void
- operationComplete(
- ResponseFuture
- responseFuture) {
- //先从Server端返回的responseFuture变量中获取RemotingCommand的值
- RemotingCommand
- response = responseFuture.getResponseCommand();
- if
- (
- null
- == sendCallback && response !=
- null
- ) {
- try
- {
- //Client端处理发送消息的Reponse返回(包括对消息返回体的头部进行解码,
- //取得“topic”、“BrokerName”、“QueueId”等值)
- //随后构建sendResult对象并设置Context上下文中
- SendResult
- sendResult =
- MQClientAPIImpl
- .
- this
- .processSendResponse(brokerName, msg, response);
- if
- (context !=
- null
- && sendResult !=
- null
- ) {
- context.setSendResult(sendResult);
- context.getProducer().executeSendMessageHookAfter(context);
- }
- }
- catch
- (
- Throwable
- e) {
- }
- producer.updateFaultItem(brokerName,
- System
- .currentTimeMillis() – responseFuture.getBeginTimestamp(),
- false
- );
- return
- ;
- }
- //省略其他部分代码
- //……
- }
这里需要结合3.1节的内容和NettyRemotingAbstract抽象类的processResponseCommand方法,便可以明白Client端实现异步回调的大致流程了。在Client端发送异步消息时候(rocketmq-client模块最终调用sendMessageAsync方法时),会将InvokeCallback的接口注入,而在Server端的异步线程由上面所讲的业务线程池真正执行后,返回response给Client端时候才会去触发执行。
NettyRemotingAbstract抽象类的processResponseCommand方法的具体代码如下:
- public
- void
- processResponseCommand(
- ChannelHandlerContext
- ctx,
- RemotingCommand
- cmd) {
- //从RemotingCommand中获取opaque值
- final
- int
- opaque = cmd.getOpaque();‘
- //从本地缓存的responseTable这个Map中取出本次异步通信连接对应的ResponseFuture变量
- final
- ResponseFuture
- responseFuture = responseTable.
- get
- (opaque);
- if
- (responseFuture !=
- null
- ) {
- responseFuture.setResponseCommand(cmd);
- responseTable.remove(opaque);
- if
- (responseFuture.getInvokeCallback() !=
- null
- ) {
- //在这里真正去执行Client注入进来的异步回调方法
- executeInvokeCallback(responseFuture);
- }
- else
- {
- //否则释放responseFuture变量
- responseFuture.putResponse(cmd);
- responseFuture.release();
- }
- }
- else
- {
- log.warn(
- “receive response, but not matched any request, ”
- +
- RemotingHelper
- .parseChannelRemoteAddr(ctx.channel()));
- log.warn(cmd.toString());
- }
- }
三、总结
刚开始看RocketMQ源码—RPC通信模块可能觉得略微有点复杂,但是只要能够抓住Client端发送请求消息、Server端接收消息并处理的流程以及回调过程来分析和梳理,那么整体来说并不复杂。RPC通信部分也是RocketMQ源码中最重要的部分之一,想要对其中的全过程和细节有更为深刻的理解,还需要多在本地环境Debug和分析对应的日志。同时,鉴于篇幅所限,本篇还没有来得及对RocketMQ的Netty多线程模型进行介绍,将在消息中间件—RocketMQ的RPC通信(二)篇中来做详细地介绍。


