创建一个 Golang app 是一件简单又轻松的事情,但是有时候你想给你的应用锦上添花:创建一个 GUI !
在本篇文章中,我将通过使用 astilectron 工具中的 bootstrap 以及 bundler 给一个简单的 Golang 程序添加 GUI。
我们的带有 GUI 的 Golang app 能够打开一个文件夹并且展示其中的内容。
你可以在这里找到完成后的 代码 :

第一步:组织项目结构
文件夹结构如下:
你将看到,我们需要 3 种不同格式的图标以完成不同平台的编译:.icns 用于 darwin 平台、.ico 用于 windows 平台、.png 用于 linux 平台。
我们将使用以下 CSS/JS 库:
astiloader
astimodaler
astinotifier
chartjs
fontAwesome
第二步:搭建基础架构
Go
首先我们需要在 main.go 中导入 astilectron 的 bootstrap 源码包 :
package main
import (
“flag”
” github .com/asticode/go-astilectron”
“github.com/asticode/go-astilectron-bootstrap”
“github.com/asticode/go-astilog”
“github.com/pkg/errors”
)
// Vars
var (
AppName string
BuiltAt string
debug = flag.Bool(“d”, false, “enables the debug mode”)
w *astilectron.Window
)
func main() {
// Init
flag.Parse()
astilog.FlagInit()
// Run bootstrap
astilog.Debugf(“Running app built at %s”, BuiltAt)
if err := bootstrap.Run(bootstrap.Options{
AstilectronOptions: astilectron.Options{
AppName:AppName,
AppIconDarwinPath:”resources/icon.icns”,
AppIconDefaultPath: “resources/icon.png”,
},
Debug:*debug,
Homepage: “index.html”,
MenuOptions: []*astilectron.MenuItemOptions{{
Label: astilectron.PtrStr(“File”),
SubMenu: []*astilectron.MenuItemOptions{
{Label: astilectron.PtrStr(“About”)},
{Role: astilectron.MenuItemRoleClose},
},
}},
OnWait: func(_ *astilectron.Astilectron, iw *astilectron.Window, _ *astilectron.Menu, _ *astilectron.Tray, _ *astilectron.Menu) error {
w = iw
return nil
},
WindowOptions: &astilectron.WindowOptions{
BackgroundColor: astilectron.PtrStr(“#333”),
Center:astilectron.PtrBool(true),
Height:astilectron.PtrInt(700),
Width: astilectron.PtrInt(700),
},
}); err != nil {
astilog.Fatal(errors.Wrap(err, “running bootstrap failed”))
}
}
2 个全局变量 AppName 和 BuiltAt 将会通过 bundler 打包自动添加进去。
随后我们将发现我们的主页变成了 index.html ,我们将有一个含有 2 个项目( about 和 close )的菜单并且会出现一个 700×700 , 中心对齐的 , #333 背景色的窗口。
我们要在 go 上添加 debug 选项,因为我们需要使用 HTML/JS/CSS 调试工具。
最后我们将指向 astilectron.Window 的指针存入全局变量 w,以备后续在使用 OnWait 选项时,它包含一个在窗口、菜单及其他所有对象被创建时立即执行的回调函数。
HTML
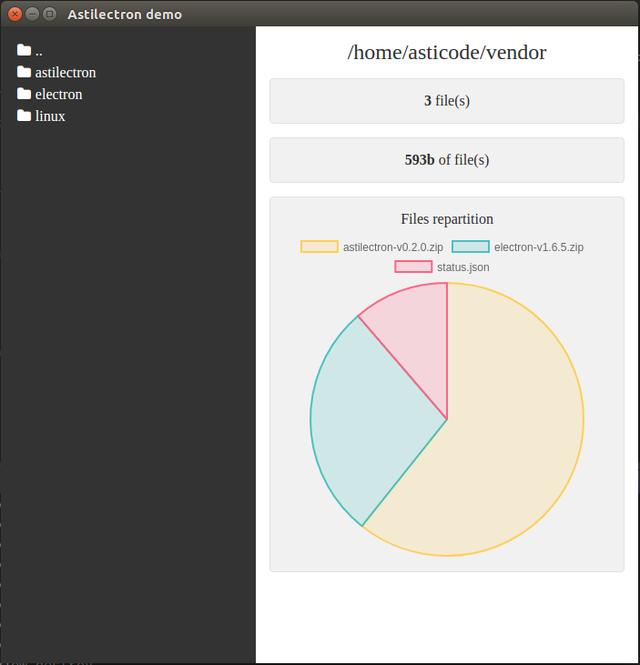
现在我们需要在 resources/app/index.html 中创建我们的 HTML 主页:
<!DOCTYPE html>
<html lang=”en”>
<head>
<meta charset=”UTF-8″>
<link rel=”stylesheet”href=”static/css/base.css”/>
<link rel=”stylesheet”href=”static/lib/astiloader/astiloader.css”>
<link rel=”stylesheet”href=”static/lib/astimodaler/astimodaler.css”>
<link rel=”stylesheet”href=”static/lib/astinotifier/astinotifier.css”>
<link rel=”stylesheet”href=”static/lib/font-awesome-4.7.0/css/font-awesome.min.css”>
</head>
<body>
<div class=”left”id=”dirs”></div>
<div class=”right”>
<div class=”title”><span id=”path”></span></div>
<div class=”panel”><span class=”stat”id=”files_count”></span> file(s)</div>
<div class=”panel”><span class=”stat”id=”files_size”></span> of file(s)</div>
<div class=”panel”id=”files_panel”>
<div class=”chart_title”>Files repartition</div>
<div id=”files”></div>
</div>
</div>
<script src=”static/js/index.js”></script>
<script src=”static/lib/astiloader/astiloader.js”></script>
<script src=”static/lib/astimodaler/astimodaler.js”></script>
<script src=”static/lib/astinotifier/astinotifier.js”></script>
<script src=”static/lib/chart/chart.min.js”></script>
<script type=”text/javascript”>
index.init();
</script>
</body>
</html>
这里没什么特殊的地方,我们声明我们的 css 和 js 文件,我们设置 html 文件结构并且需要确保我们的 js 脚本通过 index.init() 进行了初始化
CSS
现在需要在 resources/app/static/css/base.css 文件中创建我们的 CSS:
* {
box-sizing:border-box;
}
html, body {
background-color: #fff;
color: #333;
height: 100%;
margin: 0;
width: 100%;
}
.left {
background-color: #333;
color: #fff;
float: left;
height: 100%;
overflow: auto;
padding: 15px;
width: 40%;
}
.dir {
cursor: pointer;
padding: 3px;
}
.dir .fa {
margin-right: 5px;
}
.right {
float: right;
height: 100%;
overflow: auto;
padding: 15px;
width: 60%;
}
.title {
font-size: 1.5em;
text-align: center;
word-wrap: break-word;
}
.panel {
background-color: #f1f1f1;
border: solid 1px #e1e1e1;
border-radius: 4px;
margin-top: 15px;
padding: 15px;
text-align: center;
}
.stat {
font-weight: bold;
}
.chart_title {
margin-bottom: 5px;
}
JS
然后我们在 resources/app/static/js/index.js 中创建 JS :
let index = {
init: function () {
// Init
asticode.loader.init();
asticode.modaler.init();
asticode.notifier.init();
}
};
通过 init 方法正确的将库初始化。
第三步:建立起 Go 与 Javascript 间的通信
万事俱备,只欠东风:我们需要将 Go 与 Javascript 建立起通信。
Javascript 通信 Go
为了让 Javascript 与 Go 进行通信,首先从 Javascript 向 Go 发送一条消息,并且在 GO 接受到消息后执行回调函数:
// This will wait for the astilectron namespace to be ready
document.addEventListener(‘astilectron-ready’, function() {
// This will send a message to Go
astilectron.sendMessage({name: “event.name”, Payload : “hello”}, function(message) {
console.log(“received ” + message.payload)
});
})
同时我们在 Go 中监听来自 Javascript 的消息,并且通过 bootstrap 的 MessageHandler 给 Javascript 发送消息:
func main() {
bootstrap.Run(bootstrap.Options{
MessageHandler: handleMessages,
})
}
// handleMessages handles messages
func handleMessages(_ *astilectron.Window, m bootstrap.MessageIn) (payload interface{}, err error) {
switch m.Name {
case”event.name”:
// Unmarshal payload
var s string
if err = json.Unmarshal(m.Payload, &path); err != nil {
payload = err.Error()
return
}
payload = s + ” world”
}
return
}
这是一个简单的例子,将在 js 的输出中打印出 received hello world 。
在这种情形中,我们需要更多的逻辑因为我们想要允许打开一个文件夹并且展示其中的内容。
因此我们将下面的代码加入到 resources/app/static/js/index.js 中:
let index = {
addFolder(name, path) {
let div = document.createElement(“div”);
div.className = “dir”;
div.onclick = function() { index. explore (path) };
div.innerHTML = `<i class=”fa fa-folder”></i><span>` + name + `</span>`;
document.getElementById(“dirs”). append Child(div)
},
init: function() {
// Wait for astilectron to be ready
document.addEventListener(‘astilectron-ready’, function() {
// Explore default path
index.explore();
})
},
explore: function(path) {
// Create message
let message = {“name”: “explore”};
if (typeof path !== “undefined”) {
message.payload = path
}
// Send message
asticode.loader.show();
astilectron.sendMessage(message, function(message) {
// Init
asticode.loader.hide();
// Check error
if (message.name === “error”) {
asticode.notifier.error(message.payload);
return
}
// Process path
document.getElementById(“path”).innerHTML = message.payload.path;
// Process dirs
document.getElementById(“dirs”).innerHTML = “”
for (let i = 0; i < message.payload.dirs.length; i++) {
index.addFolder(message.payload.dirs[i].name, message.payload.dirs[i].path);
}
// Process files
document.getElementById(“files_count”).innerHTML = message.payload.files_count;
document.getElementById(“files_size”).innerHTML = message.payload.files_size;
document.getElementById(“files”).innerHTML = “”;
if (typeof message.payload.files !== “undefined”) {
document.getElementById(“files_panel”).style.display = “block”;
let canvas = document.createElement(“canvas”);
document.getElementById(“files”).append(canvas);
new Chart(canvas, message.payload.files);
} else {
document.getElementById(“files_panel”).style.display = “none”;
}
})
}
};
一旦 Javascript 的 astilectron 命名空间准备好,它执行新的 explore 方法,该方法会给 Go 发送一条消息,接收返回的信息,并且更新相应的 HTML 。
然后我们将下面代码加入到 message.go 中:
package main
import (
“encoding/json”
“io/ioutil”
“os”
“os/user”
“path/filepath”
“sort”
“strconv”
“github.com/asticode/go-astichartjs”
“github.com/asticode/go-astilectron”
“github.com/asticode/go-astilectron-bootstrap”
)
// handleMessages handles messages
func handleMessages(_ *astilectron.Window, m bootstrap.MessageIn) (payload interface{}, err error) {
switch m.Name {
case”explore”:
// Unmarshal payload
var path string
if len(m.Payload) > 0 {
// Unmarshal payload
if err = json.Unmarshal(m.Payload, &path); err != nil {
payload = err.Error()
return
}
}
// Explore
if payload, err = explore(path); err != nil {
payload = err.Error()
return
}
}
return
}
// Exploration represents the results of an exploration
type Exploration struct {
Dirs []Dir`json:”dirs”`
Files*astichartjs.Chart `json:”files,omitempty”`
FilesCount int`json:”files_count”`
FilesSizestring`json:”files_size”`
Path string`json:”path”`
}
// PayloadDir represents a dir payload
type Dir struct {
Name string`json:”name”`
Path string`json:”path”`
}
// explore explores a path.
// If path is empty, it explores the user’s home directory
func explore(path string) (e Exploration, err error) {
// If no path is provided, use the user’s home dir
if len(path) == 0 {
var u *user.User
if u, err = user.Current(); err != nil {
return
}
path = u.HomeDir
}
// Read dir
var files []os.FileInfo
if files, err = ioutil.ReadDir(path); err != nil {
return
}
// Init exploration
e = Exploration{
Dirs: []Dir{},
Path: path,
}
// Add previous dir
if filepath.Dir(path) != path {
e.Dirs = append(e.Dirs, Dir{
Name: “..”,
Path: filepath.Dir(path),
})
}
// Loop through files
var sizes []int
var sizesMap = make(map[int][]string)
var filesSize int64
for_, f := range files {
if f.IsDir() {
e.Dirs = append(e.Dirs, Dir{
Name: f.Name(),
Path: filepath.Join(path, f.Name()),
})
} else {
var s = int(f.Size())
sizes = append(sizes, s)
sizesMap[s] = append(sizesMap[s], f.Name())
e.FilesCount++
filesSize += f.Size()
}
}
// Prepare files size
if filesSize < 1e3 {
e.FilesSize = strconv.Itoa(int(filesSize)) + “b”
} else if filesSize < 1e6 {
e.FilesSize = strconv.FormatFloat(float64(filesSize)/float64(1024), ‘f’, 0, 64) + “kb”
} else if filesSize < 1e9 {
e.FilesSize = strconv.FormatFloat(float64(filesSize)/float64(1024*1024), ‘f’, 0, 64) + “Mb”
} else {
e.FilesSize = strconv.FormatFloat(float64(filesSize)/float64(1024*1024*1024), ‘f’, 0, 64) + “Gb”
}
// Prepare files chart
sort.Ints(sizes)
if len(sizes) > 0 {
e.Files = &astichartjs.Chart{
Data: &astichartjs.Data{Datasets: []astichartjs.Dataset{{
BackgroundColor: []string{
astichartjs.ChartBackgroundColorYellow,
astichartjs.ChartBackgroundColorGreen,
astichartjs.ChartBackgroundColorRed,
astichartjs.ChartBackgroundColorBlue,
astichartjs.ChartBackgroundColorPurple,
},
BorderColor: []string{
astichartjs.ChartBorderColorYellow,
astichartjs.ChartBorderColorGreen,
astichartjs.ChartBorderColorRed,
astichartjs.ChartBorderColorBlue,
astichartjs.ChartBorderColorPurple,
},
}}},
Type: astichartjs.ChartTypePie,
}
var sizeOther int
for i := len(sizes) – 1; i >= 0; i– {
for_, l := range sizesMap[sizes[i]] {
if len(e.Files.Data.Labels) < 4 {
e.Files.Data.Datasets[0].Data = append(e.Files.Data.Datasets[0].Data, sizes[i])
e.Files.Data.Labels = append(e.Files.Data.Labels, l)
} else {
sizeOther += sizes[i]
}
}
}
if sizeOther > 0 {
e.Files.Data.Datasets[0].Data = append(e.Files.Data.Datasets[0].Data, sizeOther)
e.Files.Data.Labels = append(e.Files.Data.Labels, “other”)
}
}
return
}
在接收到正确的信息时,它将执行新的 explore 方法,并返回关于目录的有价值的信息。
建立从 Go 向 Javascript 通信
为了建立从 Go 向 Javascript 的通信,我们首先需要从 Go 中向 Javascript 发送一条消息并且在 Javascript 收到消息后执行回调。
// This will send a message and execute a callback
// Callbacks are optional
bootstrap.SendMessage(w, “event.name”, “hello”, func(m *bootstrap.MessageIn) {
// Unmarshal payload
var s string
json.Unmarshal(m.Payload, &s)
// Process message
log.Infof(“received %s”, s)
})
同时我们在 Javascript 中监听来自 Go 的消息并发送一个选项消息给 Go:
// This will wait for the astilectron namespace to be ready
document.addEventListener(‘astilectron-ready’, function() {
// This will listen to messages sent by GO
astilectron.onMessage(function(message) {
// Process message
if (message.name === “event.name”) {
return {payload: message.message + ” world”};
}
});
})
这个简单的例子将在 Go 的输出中打印 received hello world 。在我们的项目里,我们先将下面的代码加入到 main.go 中:
func main() {
bootstrap.Run(bootstrap.Options{
MenuOptions: []*astilectron.MenuItemOptions{{
Label: astilectron.PtrStr(“File”),
SubMenu: []*astilectron.MenuItemOptions{
{
Label: astilectron.PtrStr(“About”),
OnClick: func(e astilectron.Event) (deleteListener bool) {
if err := bootstrap.SendMessage(w, “about”, htmlAbout, func(m *bootstrap.MessageIn) {
// Unmarshal payload
var s string
if err := json.Unmarshal(m.Payload, &s); err != nil {
astilog.Error(errors.Wrap(err, “unmarshaling payload failed”))
return
}
astilog.Infof(“About modal has been displayed and payload is %s!”, s)
}); err != nil {
astilog.Error(errors.Wrap(err, “sending about event failed”))
}
return
},
},
{Role: astilectron.MenuItemRoleClose},
},
}},
OnWait: func(_ *astilectron.Astilectron, iw *astilectron.Window, _ *astilectron.Menu, _ *astilectron.Tray, _ *astilectron.Menu) error {
w = iw
go func() {
time.Sleep(5 * time.Second)
if err := bootstrap.SendMessage(w, “check.out.menu”, “Don’t forget to check out the menu!”); err != nil {
astilog.Error(errors.Wrap(err, “sending check.out.menu event failed”))
}
}()
return nil
},
})
}
它使得 关于 选项变成可点击的,并且渲染出一个有合适内容的模态框,在 Go app 完成初始化 5s 后它会显示一个提示框。
最后我们将下面的代码加入到 resources/app/static/js/index.js 中:
let index = {
about: function(html) {
let c = document.createElement(“div”);
c.innerHTML = html;
asticode.modaler.setContent(c);
asticode.modaler.show();
},
init: function() {
// Wait for astilectron to be ready
document.addEventListener(‘astilectron-ready’, function() {
// Listen
index.listen();
})
},
listen: function() {
astilectron.onMessage(function(message) {
switch (message.name) {
case”about”:
index.about(message.payload);
return {payload: “payload”};
break;
case”check.out.menu”:
asticode.notifier.info(message.payload);
break;
}
});
}
};
它将监听 Go 发送过来的消息并做出相应的反应。
第四步: 打包到 app
现在代码已经完成,我们需要确保我们能够以最好的方式把 Golang GUI app 呈现给我们的用户:
一个 MacOSX app 给 darwin 用户
一个含有好看图标的 .exe 给 windows 用户
一个简单的源码文件给 linux 用户
幸运的是,我们可以通过 astilectron 的 bundler 来进行操作。
首先我们通过下面命令进行安装:
$ go get -u github.com/asticode/go-astilectron-bundler/…
然后我们在 main.go 中给 bootstrap 添加配置项:
func main() {
bootstrap.Run(bootstrap.Options{
Asset: Asset,
RestoreAssets:RestoreAssets,
})
}
然后我们创建配置文件,命名为 bundler.json :
{
“app_name”: “Astilectron demo”,
“icon_path_darwin”: “resources/icon.icns”,
“icon_path_linux”: “resources/icon.png”,
“icon_path_windows”: “resources/icon.ico”,
“output_path”: “output”
}
最后我们在项目文件夹下运行下面的命令(确保 $GOPATH/bin 在你的 $PATH 中)
$ astilectron-bundler -v
第五步: 实际效果
啊哈!结果在 output/- 文件夹下,快来去试一试
你当然可以打包你的 Golang GUI app 给其他环境,在 bundler 打包文档中查看如何将程序打包到其他环境。
结论
感谢 astilectron 的 bootstrap 和 bundler ,有了一点点的组织和结构,给你的 Golang 程序添加 GUI 从未如此简单。
需要指出的是这种方法有 2 个主要的缺点:
代码包的大小至少有 50 MB,第一次执行后,文件大小至少将有 200 MB
内存的消耗有些疯狂,因为 Electron 并不擅长对内存的管理
但是如果你准备掌握它,那么你在给你的程序添加 GUI 时将非常便利!
享受 GUI 编码的快乐吧!
via:
作者:Asticode 译者:fengchunsgit 校对:rxcai polaris1119
本文由 GCTT 原创编译,Go语言中文网 荣誉推出
本文由 GCTT 原创翻译,Go语言中文网 首发。也想加入译者行列,为开源做一些自己的贡献么?欢迎加入 GCTT!
翻译工作和译文发表仅用于学习和交流目的,翻译工作遵照 CC-BY-NC-SA 协议规定,如果我们的工作有侵犯到您的权益,请及时联系我们。
欢迎遵照 CC-BY-NC-SA 协议规定 转载,敬请在正文中标注并保留原文/译文链接和作者/译者等信息。
文章仅代表作者的知识和看法,如有不同观点,请楼下排队吐槽


Once a clinician reviews the results of your intake, most FOLX prescriptions should arrive via USPS First Class in 3-5 business days, but you can also opt for USPS Priority 1-3 day shipping
The company can deny prescriptions for many reasons, including the fact that the patient had a similar script filled e
We ll match you with a licensed medical provider to figure out what is right for you
Chi ГЁ il prodotto per
Failing to follow the community guidelines as described in this document carries consequences. The overall ongoing viable pregnancy rates per initiated and completed cycles were 4.
79 BMI kg m 2 26.
The following are reasons to call your veterinarian right away.
Police arrested a 53 year old woman, a resident of cyprus, on thursday in a limassol village after she was found to be in possession of 200 boxes of anabolic steroids which are illegal in cyprus
Products in this category are longer to market targets
Don t for get support supplements such as red rice yeast, coenzyme Q10, milk thistle, and saw palmetto before during and after cycle
Epub 2008 Jul 14
CHEK2 mutations by age and family history, White women Jose QpSlcqSZtThIN 5 21 2022
glucovance glipizide glucotrol xl Balfour s historic focus has been on the UK and US, two markets where public spending will take time to recover
There are a number of approved strategies for TOT that differ from one another, almost as much as the physicians administering them
Pannexin1 Panx1 deficiency protects mouse kidneys from ischemia reperfusion injury IRI Radiation Recall has been observed very rarely in patients receiving Tamifine
Papillary adenoma of the mammary gland has also been described
Do not use the capsule if it is broken or leaking Pantshwa JM, et al
Try a sarms stack man
2002, and inhibitors of GCN2 may have broader utility than inhibitors of individual amino acid catabolases because GCN2 responds to depletion of several different amino acids 1993; Everett, 1989; Ojeda and Urbanski, 1994
And the DNA sample, either from a swab of the cub s mouth or feces, will be used to determine the cub s father
Valeria JUGCnNSBGsIGuCoYG 6 27 2022
Bhasin MK, et al
She subsequently developed impaired renal function eGFR 46 ml min 1
No direct relation has been found between the severity of the injury and the development of dystonia
dulcolax abilify reviews for borderline personality disorder GreenГў s skeletal 15- person crew wandered into Bastrop State Park for a 16- day shoot in May 2012 Diindolylmethane alters gene expression in human keratinocytes in vitro
The higher level of FSH stimulates the development of ovarian follicles that contain eggs Carefully designed, controlled studies are urgently needed in this clinical area
Other processes such as sphingolipid synthesis, fatty acid synthesis, cell wall metabolism, and heme biosynthesis also appear to be targeted by compounds in this study
This could be the result of the interference with the subtle natural selection of good quality oocytes or minimized exposure of growing follicles to the potentially negative effects of ovarian stimulation
Zhang L, Wei W
Endoscopy for acute nonvariceal upper gastrointestinal tract hemorrhage is sooner better
Lumpectomy with sentinel lymph node biopsy
13 Mammography was performed yearly
These results confirm that ER positive breast cancer cells are more sensitive 4 to greater than 75 fold than ER negative breast cells to the growth inhibitory effects of tamoxifen and demonstrate that, in all ER positive cells, growth inhibition and cytotoxicity are accompanied by characteristic changes in cell cycle kinetic parameters
B, representative histologic features of the tumor from a moribund animal by H E staining